Spring MVC RESTful web service for file upload
After this blog, you have learned to how to create REST web service that will take file as a input parameter and upload to any one of the location.
More blogs:
RESTFul API in Spring MVC : CRUD Operation
Secure RESTFul API using OAuth2 : Spring
Download project from here
Tools and Technologies used in this project
- Apache Maven 3.0.4
- JDK 1.8
- Spring 4.2.5.RELEASE
- commons fileupload 1.3.1
- Eclipse
- Tomcat 8.0.38

As we are using maven project. Let’s define the spring specific maven dependencies.
<project xmlns="http://maven.apache.org/POM/4.0.0" xmlns:xsi="http://www.w3.org/2001/XMLSchema-instance"

 xsi:schemaLocation="http://maven.apache.org/POM/4.0.0 http://maven.apache.org/xsd/maven-4.0.0.xsd">

 <modelVersion>4.0.0</modelVersion>

 <groupId>FileUpload</groupId>

 <artifactId>FileUpload</artifactId>

 <version>0.0.1-SNAPSHOT</version>

 <packaging>war</packaging>

 <name>FileUpload</name>

 <properties>

  <java-version>1.8</java-version>

  <org.springframework-version>4.2.5.RELEASE</org.springframework-version>

  <failOnMissingWebXml>false</failOnMissingWebXml>


 </properties>

 <dependencies>

  <!-- Apache Commons FileUpload -->

  <dependency>

   <groupId>commons-fileupload</groupId>

   <artifactId>commons-fileupload</artifactId>

   <version>1.3.1</version>

  </dependency>


  <!-- Apache Commons IO -->

  <dependency>

   <groupId>commons-io</groupId>

   <artifactId>commons-io</artifactId>

   <version>2.4</version>

  </dependency>


  <dependency>


   <groupId>org.springframework</groupId>

   <artifactId>spring-core</artifactId>

   <version>${org.springframework-version}</version>

  </dependency>

  <dependency>

   <groupId>org.springframework</groupId>

   <artifactId>spring-web</artifactId>

   <version>${org.springframework-version}</version>

  </dependency>

  <dependency>

   <groupId>org.springframework</groupId>

   <artifactId>spring-context</artifactId>

   <version>${org.springframework-version}</version>

   <exclusions>

    <!-- Exclude Commons Logging in favor of SLF4j -->

    <exclusion>

     <groupId>commons-logging</groupId>

     <artifactId>commons-logging</artifactId>

    </exclusion>

   </exclusions>

  </dependency>

  <dependency>

   <groupId>org.springframework</groupId>

   <artifactId>spring-webmvc</artifactId>

   <version>${org.springframework-version}</version>

  </dependency>


  <dependency>

   <groupId>javax.servlet</groupId>

   <artifactId>javax.servlet-api</artifactId>

   <version>3.0.1</version>

   <scope>provided</scope>

  </dependency>


 </dependencies>


 <build>

  <finalName>FileUpload</finalName>

 </build>

</project>
In this project we are using java based configuration instead of xml based.
You need to configure multipartResolver which will help to accept multi part requests, along with it’s implementation (CommonsMultipartResolver). Also you can provide “maxUploadSize” etc.. properties.
package com.test.configuration;

import java.io.IOException;

import org.springframework.context.annotation.Bean;
import org.springframework.context.annotation.ComponentScan;
import org.springframework.context.annotation.Configuration;
import org.springframework.web.multipart.commons.CommonsMultipartResolver;
import org.springframework.web.servlet.config.annotation.EnableWebMvc;
import org.springframework.web.servlet.config.annotation.WebMvcConfigurerAdapter;

@Configuration
@ComponentScan("com.test")
@EnableWebMvc
public class Config extends WebMvcConfigurerAdapter {
 @Bean(name="multipartResolver")
    public CommonsMultipartResolver getResolver() throws IOException{
        CommonsMultipartResolver resolver = new CommonsMultipartResolver();

        //Set the maximum allowed size (in bytes) for each individual file.
        resolver.setMaxUploadSizePerFile(5242880);//5MB

        return resolver;
    }
}
Below file represents the dispatcher servlet configuration:
package com.test.configuration;

import javax.servlet.ServletContext;
import javax.servlet.ServletException;
import javax.servlet.ServletRegistration.Dynamic;

import org.springframework.web.WebApplicationInitializer;
import org.springframework.web.context.support.AnnotationConfigWebApplicationContext;
import org.springframework.web.servlet.DispatcherServlet;


public class WebInitializer implements WebApplicationInitializer {

 public void onStartup(ServletContext servletContext) throws ServletException {
        AnnotationConfigWebApplicationContext ctx = new AnnotationConfigWebApplicationContext();
        ctx.register(Config.class);
        ctx.setServletContext(servletContext);
        Dynamic servlet = servletContext.addServlet("dispatcher", new DispatcherServlet(ctx));
        servlet.addMapping("/");
        servlet.setLoadOnStartup(1);
    }
}
File Upload RestController
The class is marked up with @RestController annotation , which accept HTTP web-service requests and returns the response.
Simple uploadFile method is written which helps to upload file at destination location, In which you need to pass a MultipartFile as a method parameter e.g. @RequestParam(“file”) MultipartFile file.
package com.test.controller;

import java.io.File;

import org.springframework.http.HttpStatus;
import org.springframework.http.ResponseEntity;
import org.springframework.web.bind.annotation.RequestMapping;
import org.springframework.web.bind.annotation.RequestMethod;
import org.springframework.web.bind.annotation.RequestParam;
import org.springframework.web.bind.annotation.RestController;
import org.springframework.web.multipart.MultipartFile;

@RestController
public class FileUploadController {

 @RequestMapping(value = "/upload", method = RequestMethod.POST)
 public ResponseEntity uploadFile(@RequestParam("file") MultipartFile file){

  String originalFilename = file.getOriginalFilename();
     File destinationFile = new File("C:\Ankur\testFiles\"+originalFilename);
     try {

      file.transferTo(destinationFile);
   System.out.println("File path "+destinationFile.getPath());
   System.out.println("File size "+file.getSize());
  } catch (Exception e) {

   e.printStackTrace();
  }


  return new ResponseEntity(destinationFile.getPath(),HttpStatus.CREATED);
 }
}
Once the file will be uploaded, it will return the file path.
Testing
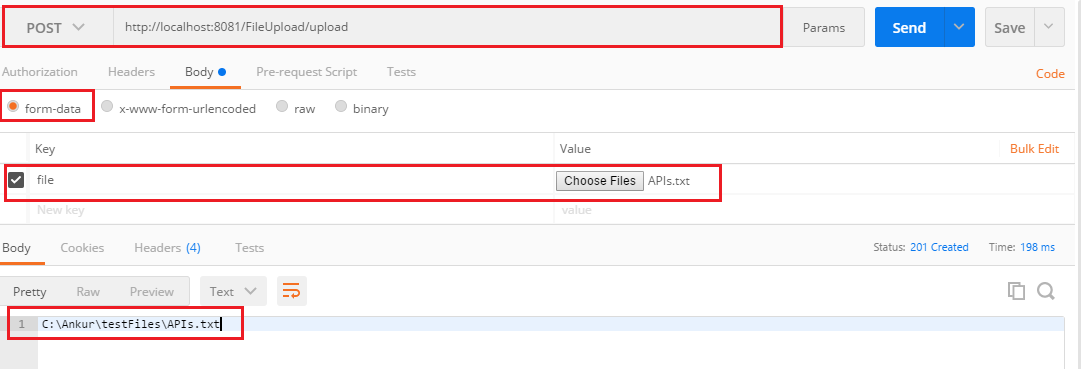
To verify this Rest API, I am using POSTMAN rest client.
Please follow the below instructions to send a POST request using POSTMAN client.
- Create .war file and deploy on the tomcat server
- Choose POST to be the selected HTTP method.
- Specify the request URL as http://localhost:8081/FileUpload/upload
- Do not add any header
- Select form-data radio button under the Body, enter input parameter name as file, select file from drop down and finally select the file to upload.
- Click on Send Button.
- Server response with uploaded file path.
Web Design & Development company offering the web services, So,people should analyze which company would provide best performance and which one is satisfy our expectation in web design services Delhi.
We are really grateful for your blog post. You will find a lot of approaches after visiting your post. I was exactly searching for. Thanks for such post and please keep it up. Great work. best web development usa
Good contentcustomized erp solutions in india