
Call Business Intelligence API in Oracle Integration Cloud
This is a frequent requirement to call Business Intelligence (BI) service in Oracle Integration Cloud (OIC). This article focuses on how to call BI SOAP API in the OIC scheduler process and extract data.
See useful links
How to create a SOAP connection
How to create a Scheduled Integration
First, have a look at the sample request and response of BI SOAP API
BI SOPA Endpoint: https://ef-dev1.af.em1.oraclecloud.com/xmlpserver/services/v2/ReportService?wsdl
Method: runReport
Request
<x:Envelope xmlns:x="http://schemas.xmlsoap.org/soap/envelope/" xmlns:v="http://xmlns.oracle.com/oxp/service/v2">
    <x:Header/>
    <x:Body>
        <v:runReport>
            <v:reportRequest>
                <v:reportAbsolutePath>/Custom/Integration/XX_sales.xdo</v:reportAbsolutePath>
                <v:sizeOfDataChunkDownload>-1</v:sizeOfDataChunkDownload>
            </v:reportRequest>
            <v:userID>ankur</v:userID>
            <v:password>#####</v:password>
        </v:runReport>
    </x:Body>
</x:Envelope>
Response:
<?xml version="1.0" encoding="UTF-8"?>
<soapenv:Envelope xmlns:soapenv="http://schemas.xmlsoap.org/soap/envelope/" xmlns:xsd="http://www.w3.org/2001/XMLSchema" xmlns:xsi="http://www.w3.org/2001/XMLSchema-instance">
    <soapenv:Body>
        <runReportResponse xmlns="http://xmlns.oracle.com/oxp/service/v2">
            <runReportReturn>
                <metaDataList xsi:nil="true"/>                <reportBytes>PD94bWwgdmVyc2lvbj0iMS4wIiBlbmNvZGluZz0iVVRGLTgiPz4KPCEtLUdlbmVyYXRlZCBieSBPcmFjbGUgQkkgUHVibGlzaGVyIC1EYXRhZW5naW5lLCBkYXRhbW9kZWw6X0N1c3RvbV9JbnRlZ3JhdGlvbl9YWE1</reportBytes>
                <reportContentType>text/xml</reportContentType>
                <reportFileID xsi:nil="true"/>
                <reportLocale xsi:nil="true"/>
            </runReportReturn>
        </runReportResponse>
    </soapenv:Body>
</soapenv:Envelope>
Notice the reportBytes field, BI provides the data into Base64. If we decode the same, it will provide the data in XML format as below:
<?xml version="1.0" encoding="UTF-8"?>
<DATA_DS>
   <P_REASON_CODE />
   <P_CUSTOMER_NUMBER />
   <G_1>
      <OU>OU Unit</OU>
      <WNAME>WNAME</WNAME>
      <ORDER_NUMBER>11</ORDER_NUMBER>
      <HEADER_ID>123</HEADER_ID>
      <ORDER_DATE>2018-010-04T00:00:00.000+00:00</ORDER_DATE>
      <CUSTOMER_NUMBER>1</CUSTOMER_NUMBER>
      <CUSTOMER_ID>11</CUSTOMER_ID>
      <AMOUNT>11</AMOUNT>
      <CURRENCY_CODE>INR</CURRENCY_CODE>
      <CUSTOMER_NAME>ab1</CUSTOMER_NAME>
   </G_1>
   <G_1>
      <OU>OU Unit</OU>
      <WNAME>WNAME</WNAME>
      <ORDER_NUMBER>11</ORDER_NUMBER>
      <HEADER_ID>123</HEADER_ID>
      <ORDER_DATE>2019-10-10T00:00:00.000+00:00</ORDER_DATE>
      <CUSTOMER_NUMBER>1</CUSTOMER_NUMBER>
      <CUSTOMER_ID>11</CUSTOMER_ID>
      <AMOUNT>11</AMOUNT>
      <CURRENCY_CODE>INR</CURRENCY_CODE>
      <CUSTOMER_NAME>ab1</CUSTOMER_NAME>
   </G_1>
   <G_3>
      <INSTANCE_ID>11</INSTANCE_ID>
      <ORCHESTRATION>10008</ORCHESTRATION>
      <OBJECT>1</OBJECT>
      <HOLD>22</HOLD>
      <User>AOO</User>
      <USERID>10</USERID>
   </G_3>
</DATA_DS>
Let’s go ahead and consume the BI API in OIC scheduled process.
Consume BI Service in OIC
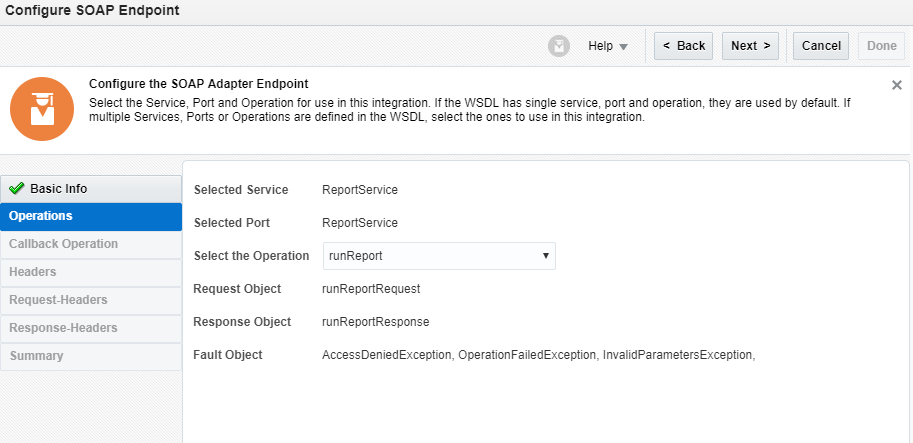
Create a scheduled orchestration and drop the BI soap connection just below the Scheduled activity. From the wizard enter the endpoint name, select Next. From the Next screen select Operation Name “runReport” and finish the wizard
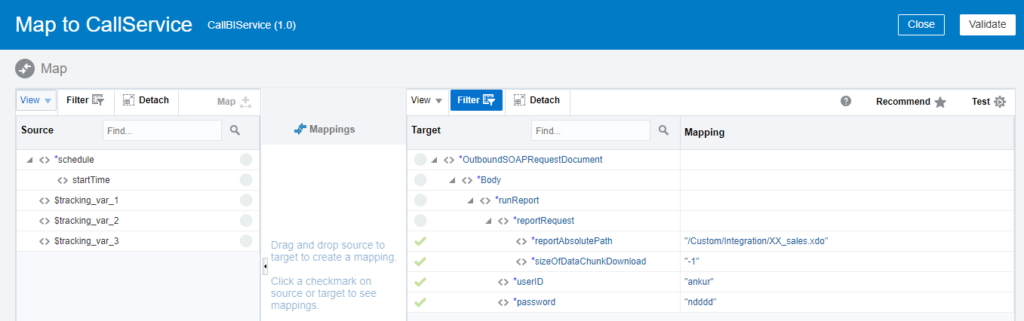
Open the SOAP mapper and map the request parameter as below:
- reportAbsolutePath
- sizeOfDataChunkDownload
- userID
- password
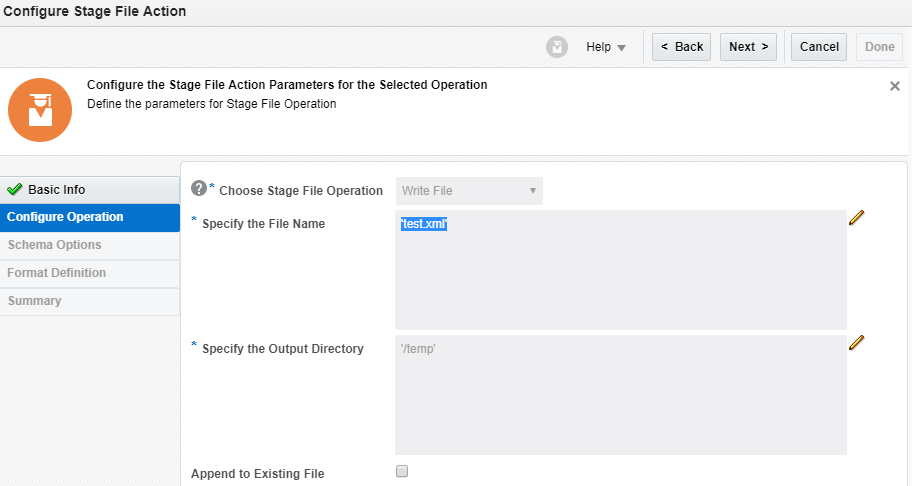
Drop a Stage activity below the SOAP Adapter and name as “WriteDataOnStage and click on the Next button. On the next screen, Select Operation as “Write File“, enter the file name as “test.xml“, Specify Output directory as “/temp“
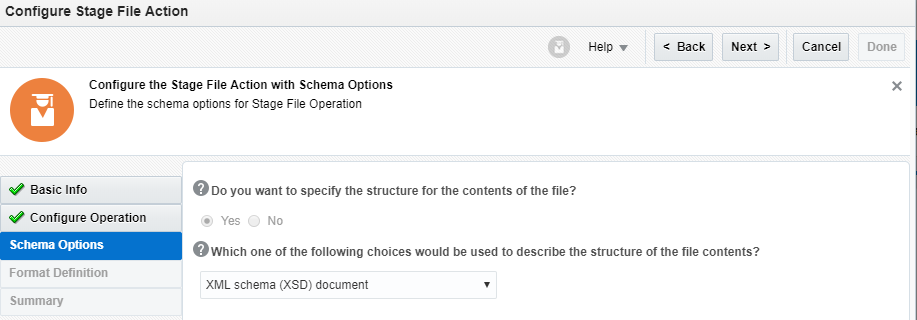
On the next screen, select “XML Schema (XSD) document” from the drop-down
On the next screen select the opaque.xsd and Finish the wizard. Below is opaque.xsd
<?xml version = '1.0' encoding = 'UTF-8'?>
<schema targetNamespace="http://xmlns.oracle.com/pcbpel/adapter/opaque/"
            xmlns="http://www.w3.org/2001/XMLSchema" >
      <element name="opaqueElement" type="base64Binary" />
</schema>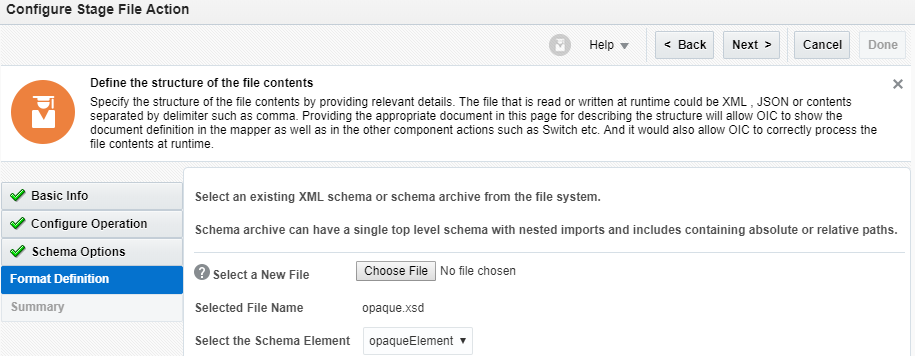
Edit WriteDataOnStage mapper and map runBytes to opaqueElement.
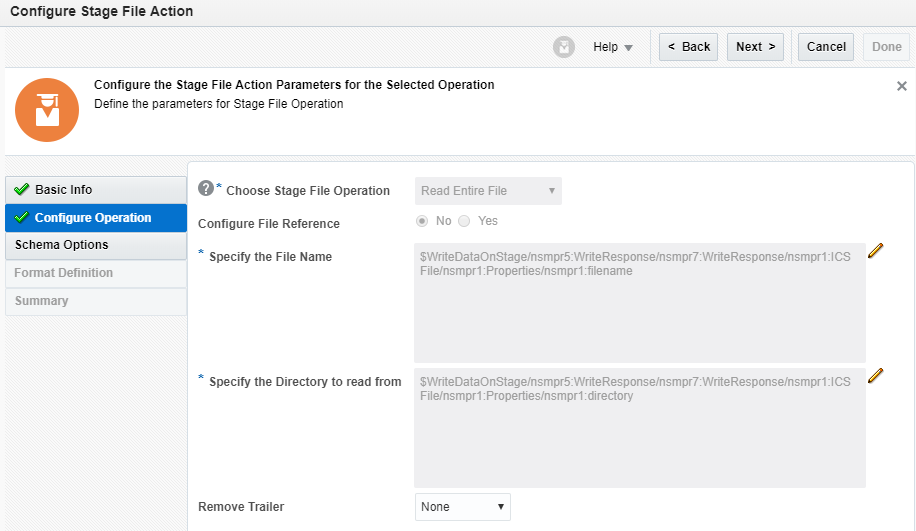
Drop another Stage activity and name it as “ReadFileFromStage” and click on the Next button. Configure operation and select the Next button
- Choose Stage File Operation: Select “Read Entire File” operation
- Choose File Reference: No
- Specify the File Name: $WriteDataOnStage/nsmpr5:WriteResponse/nsmpr7:WriteResponse/nsmpr1:ICSFile/nsmpr1:Properties/nsmpr1:filename
- Specify the Directory to read From: $WriteDataOnStage/nsmpr5:WriteResponse/nsmpr7:WriteResponse/nsmpr1:ICSFile/nsmpr1:Properties/nsmpr1:directory
On the next screen, select “XML Schema (XSD) document” from the drop-down and click the Next button. From the next screen, choose the XSD file. The XSD file can be created online using XML. Use XML which came from reportBytes decoded value as I did above. Below will be the corresponding schema file.
<xs:schema attributeFormDefault="unqualified" elementFormDefault="qualified" xmlns:xs="http://www.w3.org/2001/XMLSchema">
  <xs:element name="DATA_DS">
    <xs:complexType>
      <xs:sequence>
        <xs:element type="xs:string" name="P_REASON_CODE"/>
        <xs:element type="xs:string" name="P_CUSTOMER_NUMBER"/>
        <xs:element name="G_1" maxOccurs="unbounded" minOccurs="0">
          <xs:complexType>
            <xs:sequence>
              <xs:element type="xs:string" name="OU"/>
              <xs:element type="xs:string" name="WNAME"/>
              <xs:element type="xs:byte" name="ORDER_NUMBER"/>
              <xs:element type="xs:byte" name="HEADER_ID"/>
              <xs:element type="xs:string" name="ORDER_DATE"/>
              <xs:element type="xs:byte" name="CUSTOMER_NUMBER"/>
              <xs:element type="xs:byte" name="CUSTOMER_ID"/>
              <xs:element type="xs:byte" name="AMOUNT"/>
              <xs:element type="xs:string" name="CURRENCY_CODE"/>
              <xs:element type="xs:string" name="CUSTOMER_NAME"/>
            </xs:sequence>
          </xs:complexType>
        </xs:element>
        <xs:element name="G_3">
          <xs:complexType>
            <xs:sequence>
              <xs:element type="xs:byte" name="INSTANCE_ID"/>
              <xs:element type="xs:short" name="ORCHESTRATION"/>
              <xs:element type="xs:byte" name="OBJECT"/>
              <xs:element type="xs:byte" name="HOLD"/>
              <xs:element type="xs:string" name="User"/>
              <xs:element type="xs:byte" name="USERID"/>
            </xs:sequence>
          </xs:complexType>
        </xs:element>
      </xs:sequence>
    </xs:complexType>
  </xs:element>
</xs:schema>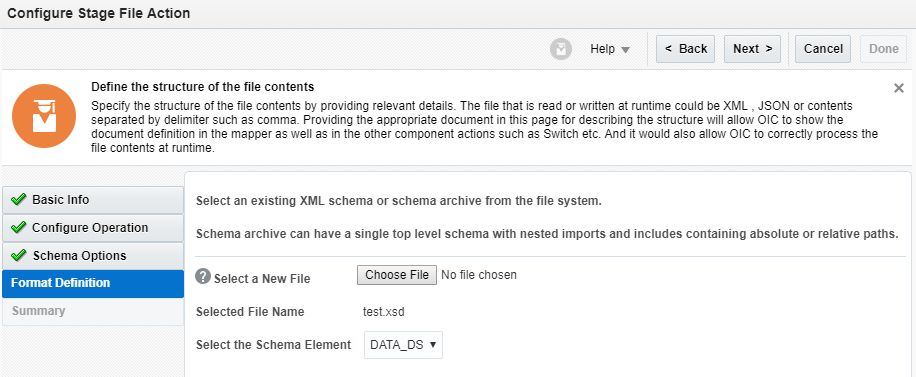
Drop a forEach loop and configure options as below:
- Name: Data
- Repeating Element: $ReadFileFromStage/nsmpr12:ReadResponse/nsmpr1:DATA_DS/nsmpr1:G_1
- Current Element Name: Current
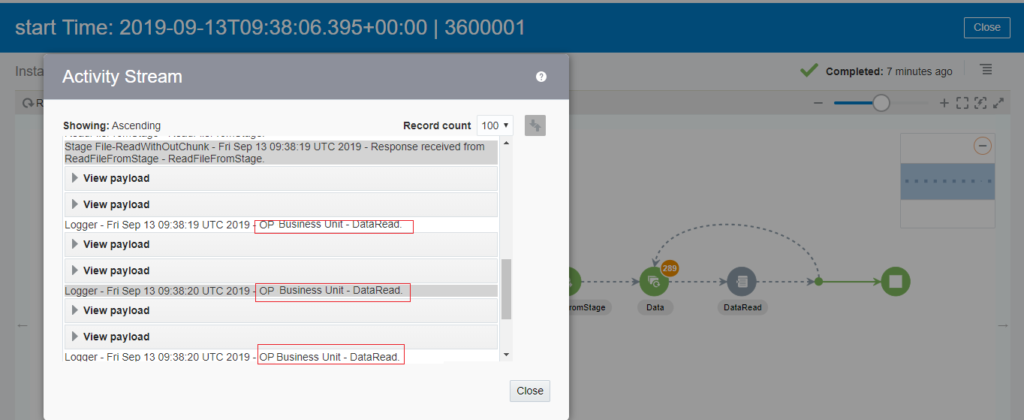
Drop a logger inside the for loop and print the OU name.
Integration is completed now. Let’s try to execute the Integration
Run the Integration
Activate the Integration. Click on the Action menu and click on Submit Now button. Go to the Monitoring tab and see the OU should get printed into the logger


I think something was left out of the article. How did you actually decode the base64binary element into the final XML that is using that schema? Was there an xpath function involved? I think a mapping step is missing from your explanation unless OIC does the decoding automatically?
Hi Mike,
Nothing is missed, if you have noticed the opaque.xsd there is element opaqueElement of type base64Binary which will automatically decode the data.
Regards,
Ankur