Oracle API Physical Gateway installation and registration
In the previous blog, we have covered how to provision Oracle API Cloud Service instance: Creating an Oracle API Platform Cloud Service (CS) InstanceTo deploy the service on Oracle API CS instance, Oracle API physical gateway must be installed and should be registered with Oracle API Logical Gateway.


In this post, we’ll cover the step by step process which will help to install Oracle API physical gateway.
Physical Gateway installation roadmap
Step-1 Virtual Machine Setup
Step-2 Create Logical Gateway in Oracle API CS
Step-3 Install Oracle jdk-8u171
Step-4 Installation of Oracle Physical Gateway
Step-5 Deploy Service on Physical Gateway
Let’s go step by step
Step-1 Virtual Machine Setup
For this blog, we’ll create the compute instance on Oracle Cloud Infrastructure (OCI)
Below is the requirement for physical gateway installation:
|
Components
|
Specification
|
|
OS
|
Oracle Linux and Red Hat Enterprise Linux 7.2, 6.7, and 6.4.
Microsoft Windows 10 supported for development and testing only
Microsoft Windows Server 2016 supported for production
|
|
CPU
|
Dual core, 2 GHz or more per CPU
|
|
Disk Space
|
30 GB
|
|
Memory
|
4 GB
|
|
JDK Version
|
Oracle-Certified Java SE JDK 8+. OpenJDK is not supported
|
In one of the blow, we have showcased step by step procedure on how to provision compute instance on OCI. Please cover the blog before we move forward
Step-2 Create Logical Gateway in Oracle API CS instance
A Logical Gateway comprises multiple physical gateways registered with it. Once logical gateway created, physical gateway installer can be downloaded. To Create the Logical Gateway, we should have API CS instance provisioned. The blog shows, how to provision API CS instance.
Below are the steps to create Logical Gateway in API CS.
- Login to API CS https://<API_CS_IP>/apiplatform/
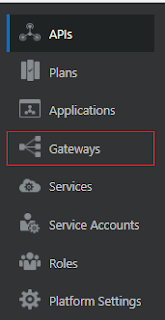
- Go to the Gateway tab
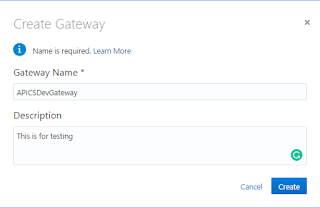
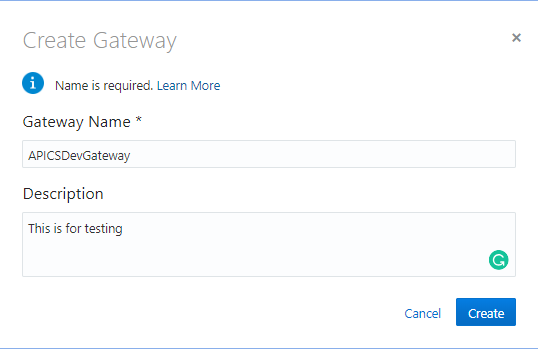
- Click on Create button
- Provide name, description and click Create button
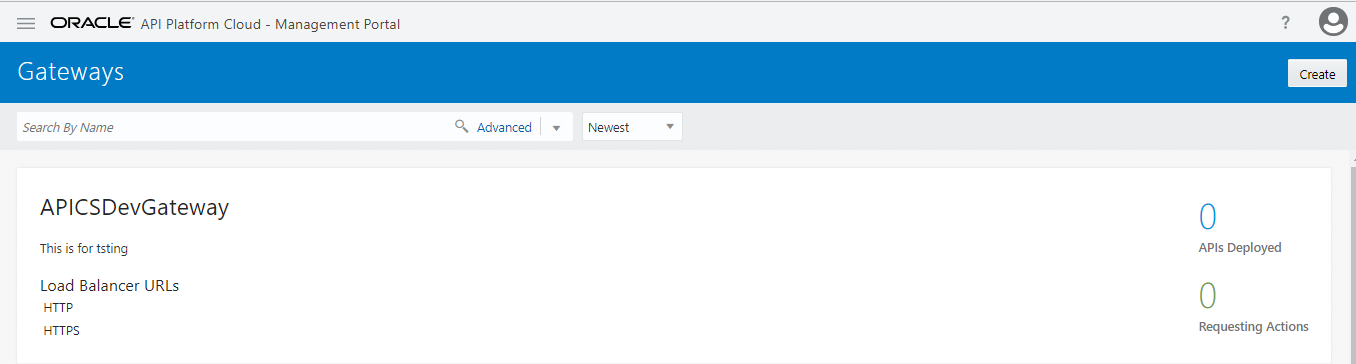
- Click on the Gateway, we just created
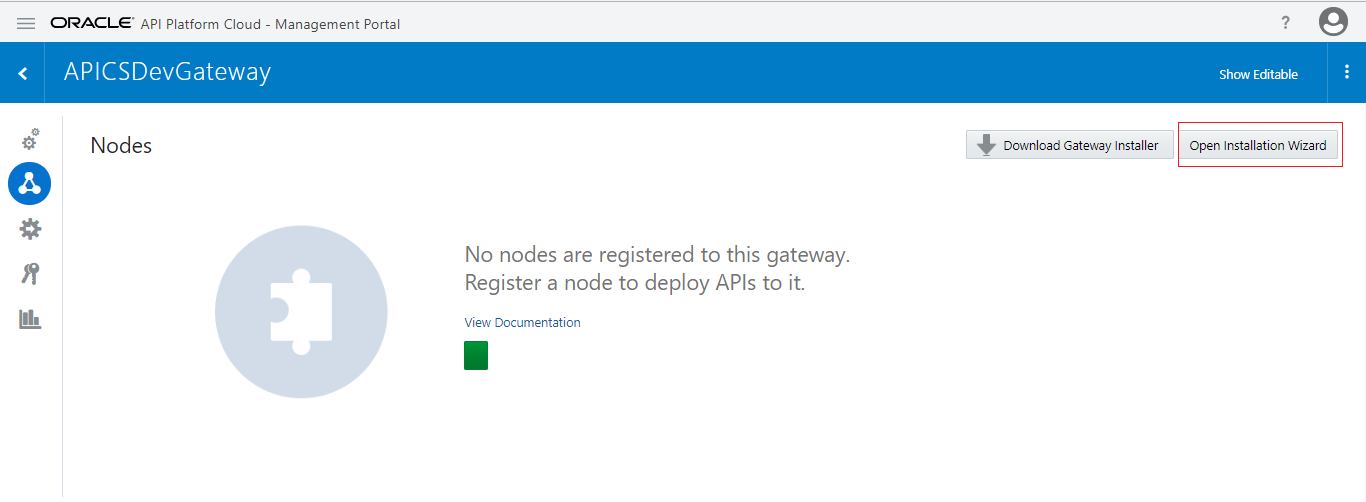
- Click on the Nodes tab

- Download the Physical Gateway installer by clicking the Download Gateway Installer button. It will download zip file “ApicsGatewayInstaller.zip” file.
- Create the gateway configuration file which will be used while installing the physical gateway. Click on the Open Installation Wizard button to create the configuration file.
- The configuration wizard will get open. Click on the Next button

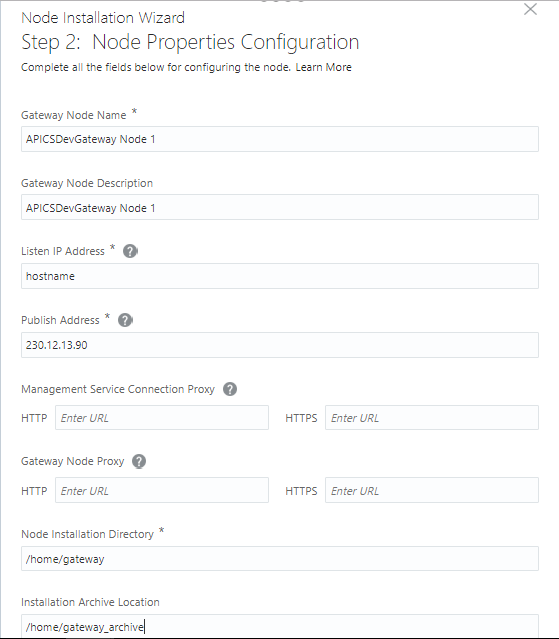
- In the next screen, provide information as below and click Next butto
- Gateway Node Name: Keep the default value
- Gateway Node Description: Keep the default value
- Listen IP Address: Provide hostname of the host machine where physical gateway will be installed
- Publish Address: Provide IP address of the host machine where physical gateway will be installed
- Management Service Connection Proxy: This property is required at runtime if the gateway node needs the proxy to connect to the management service
- Gateway Node Proxy: This property is required at runtime if the gateway node needs the proxy to pass client requests to backend services
- Node Installation Directory: Gateway installation directory for example (/home/gateway)
- Installation Archive Location: Gateway installation archive directory for example (/home/gateway_archive)
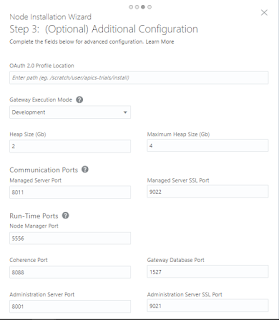
- In the next screen, keep the default values and click Next button
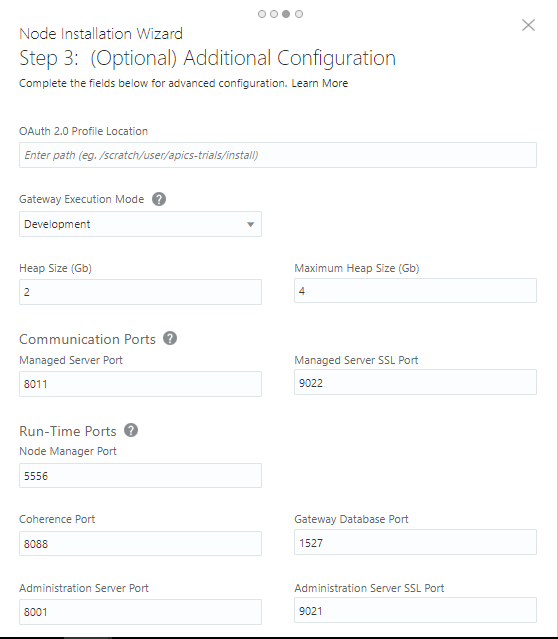
- In the Next screen, click Download File button. Downloaded file name would be gateway-props.json. Save the file at some place as it would be required during physical gateway installation. Below is the structure of gateway-props.json file
{
“logicalGatewayId” : “106”,
“managementServiceUrl” : “https://128.10.15.12:443”,
“gatewayNodeName” : “APICSDevGateway Node 1”,
“gatewayNodeDescription” : “APICSDevGateway Node 1”,
“listenIpAddress” : “hostname”,
“publishAddress” : “220.12.13.90”,
“nodeInstallDir” : “/home/gateway”,
“installationArchiveLocation” : “/home/gateway_archive”,
“gatewayExecutionMode” : “Development”,
“heapSizeGb” : “2”,
“maximumHeapSizeGb” : “4”,
“gatewayMServerPort” : “8011”,
“gatewayMServerSSLPort” : “9022”,
“nodeManagerPort” : “5556”,
“coherencePort” : “8088”,
“gatewayDBPort” : “1527”,
“gatewayAdminServerPort” : “8001”,
“gatewayAdminServerSSLPort” : “9021”
}
- Create below two users from API CS weblogic console using http://<API_CS_IP>:7001/console and assing the respective group
|
User
|
Group
|
|
gateway-manager-user
|
APIGatewayManagers
|
|
gateway-runtime-user
|
APIGatewayRuntimeUsers
|
- Click the Assign tab of the created Gateway

- There is five Grants tab. Assign the users as per below table. Use Add Grantee button to add users
|
Grant Tab
|
User / Group
|
|
Manage Gateway
|
Weblogic
gateway-manager-user
|
|
View all details
|
Weblogic
gateway-manager-user
|
|
Deploy to Gateway
|
Weblogic
gateway-manager-user
|
|
Request Deployment to Gateway
|
Weblogic
API Managers users/group
|
|
Node service account
|
Weblogic
gateway-runtime-user
|
Step-3 Install Oracle jdk-8u171
- Download Oracle jdk-8u171-linux-i586.tar.gz from Oracle Site
- Log in to the VM which is created in Step-1 via SSH client like putty
- Copy the jdk to /usr directoy
- Extract Oracle jdk-8u171-linux-i586.tar.gz using blow command
-
tar -zxvf jdk-8u171-linux-i586.tar.gz
-
Step-4 Installation of Oracle Physical Gateway
- Log in to the VM which is created in Step-1 via SSH client like putty
- Create three folders into the /home directory
- gateway
- gateway_archive
- GWinsalller
- Copy the ApicsGatewayInstaller.zip into GWinsalller directory
- Go to /home/GWinsalller unzip the ApicsGatewayInstaller.zip file
- Notice that gateway-props.json under /home/GWinsalller directory

- Replace the existing gateway-props.json file with the file which was downloaded in the Step-2
- Set JAVA_HOME and PATH variables as below:
- export JAVA_HOME=/usr/jdk1.8.0_171
- export PATH=$PATH:$JAVA_HOME/bin
- Go to the /home/GWinsalller directory
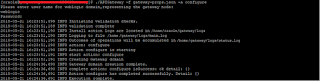
- Run below command to install API Gateway binaries. It will ask for credentials you want to set for WebLogic Server to be installed on the node. We kept weblogic/Welcome1
-
./APIGateway -f gateway-props.json -a install
-

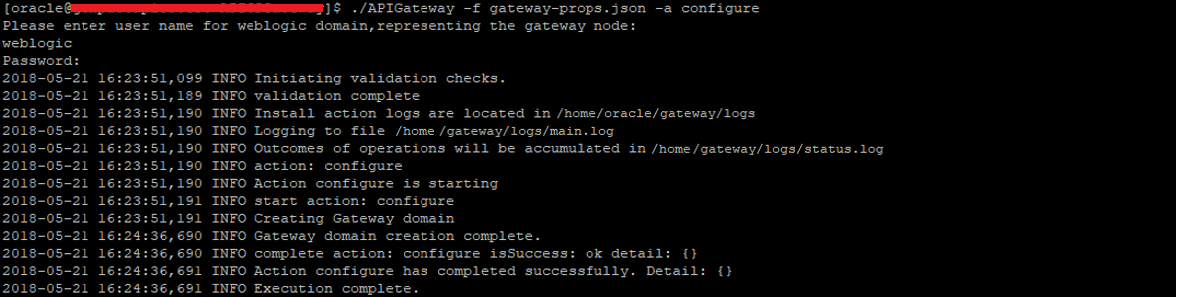
- Run below command to Configure the API Gateway Weblogic domain
- ./APIGateway -f gateway-props.json -a configure
- Run below command to Start the API Gateway Admin server, Managed server, and a lightweight Java DB
- ./APIGateway -f gateway-props.json -a start

Note: Gateway startup logs are written in startWls.out, startMServer.out files which is under
/home/gateway/domain/gateway1 the directory
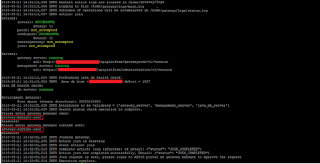
- Run below command to Request for the API Gateway Node to join the Logical Gateway. This requires approval from an API Gateway Manager user on the Management Portal to allow successful pairing. It will ask for gateway manager & runtime user credentials. Provide same users we had assigned grant in logical gateway tab
- ./APIGateway -f gateway-props.json -a join
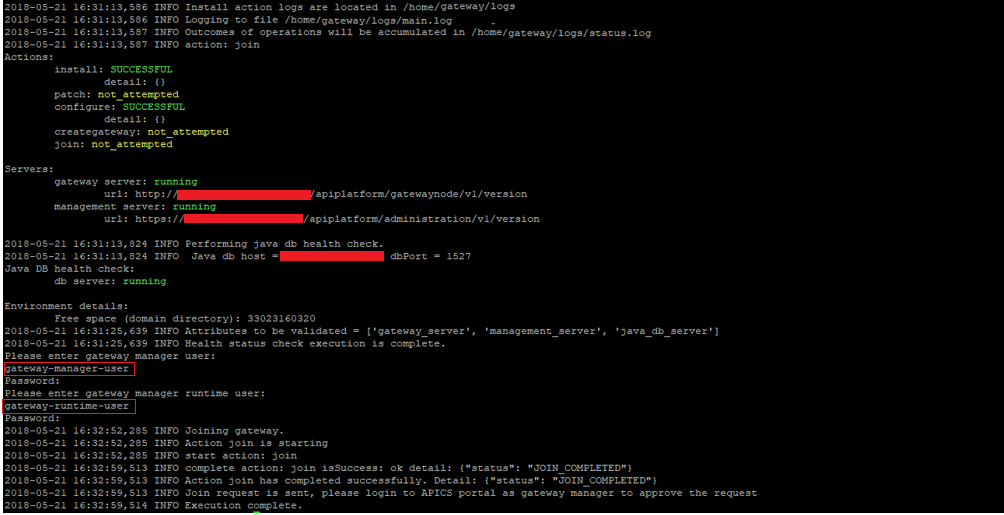
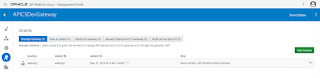
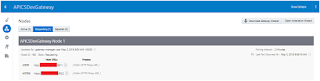
- Gateway installation is complete now. Go to API management console -> Gateway -> Nodes tab to approve node. Currently, the node is under “Requesting” tab

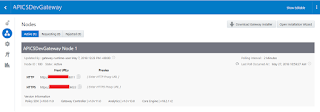
- Once approved, the node will be shown under “Active” tab
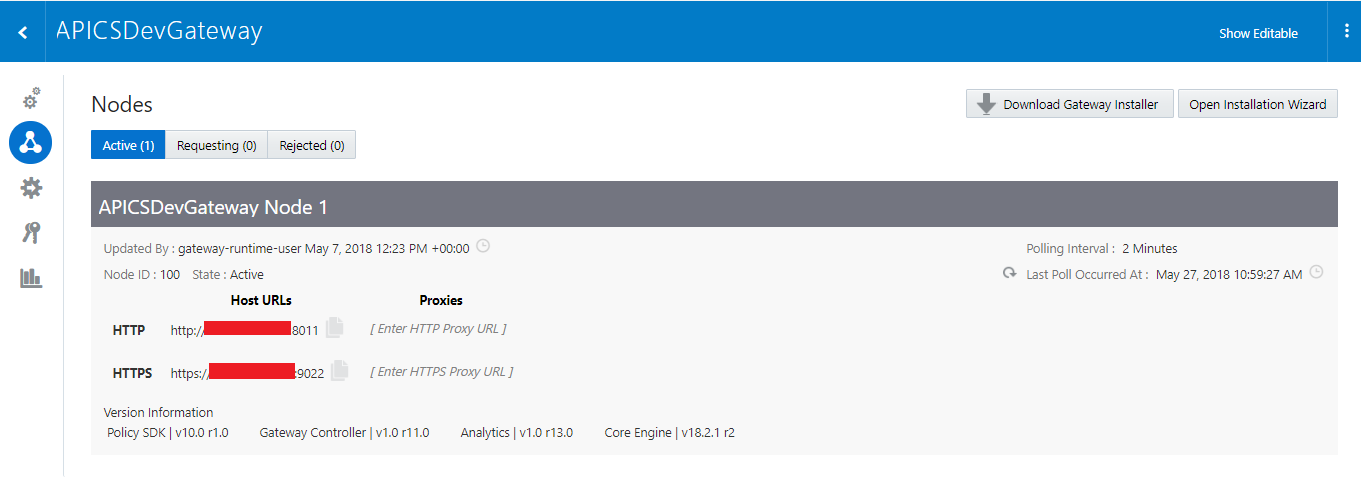
- Port 8011 & 9022 port should be added to security list so that the API CS service can be accessed from public network too. Without the ports opened, API CS service would not be accessible from the open network.
NOTE: It is not recommended to make gateway ports accessible on the public Internet. In a real implementation, we should always route the request to API gateway through the load balancer.
Step-5 Deploy Service on Physical Gateway
To make this blog shorter, we wrote another blog which will show how to configure backend service in API CS and deploy on the physical gateway.
Note: Service logs are written in the apics.log log file under /home/gateway/domain/gateway1/apics/logs directory
This information is quite useful, I truly enjoyed. Thanks for this blog.
core java training in chennai
core java Training in Porur
C++ Training
C Language Training
javascript training in chennai
javascript course in chennai
core java Training in Adyar
clinical sas training in chennai