How to write files using OIC FTP adapter
In this blog we are going to show you, how to use Oracle Integration cloud FTP adapter to write files on the SFTP location.
In my previous blog, I have explained how to create SFTP connection with the help of FTP adapter in Oracle Integration Cloud (OIC).
Use Case: In the blog, I’ll develop a REST service that will accept the below json in request, create a .csv file and upload the same on SFTP location.
“employeeId”:”ABC@123″,
“firstName”:”Ankur”,
“lastName”:”Jain”,
“Qualification”:”MCA”,
“Designation”:”Sr. Manager”
}
This Use case requires only simple 4 steps to complete:
- Create REST connection
- Create FTP connection
- Create an Integration
- Activate the Integration
- Create REST connection: The REST connection will be used to create the REST API. Refer the blog to create the REST connection.
- Create FTP connection: FTP connection allow you to interact with SFTP. We have already showcased the same in one of my blog. Please check it out before moving forward.
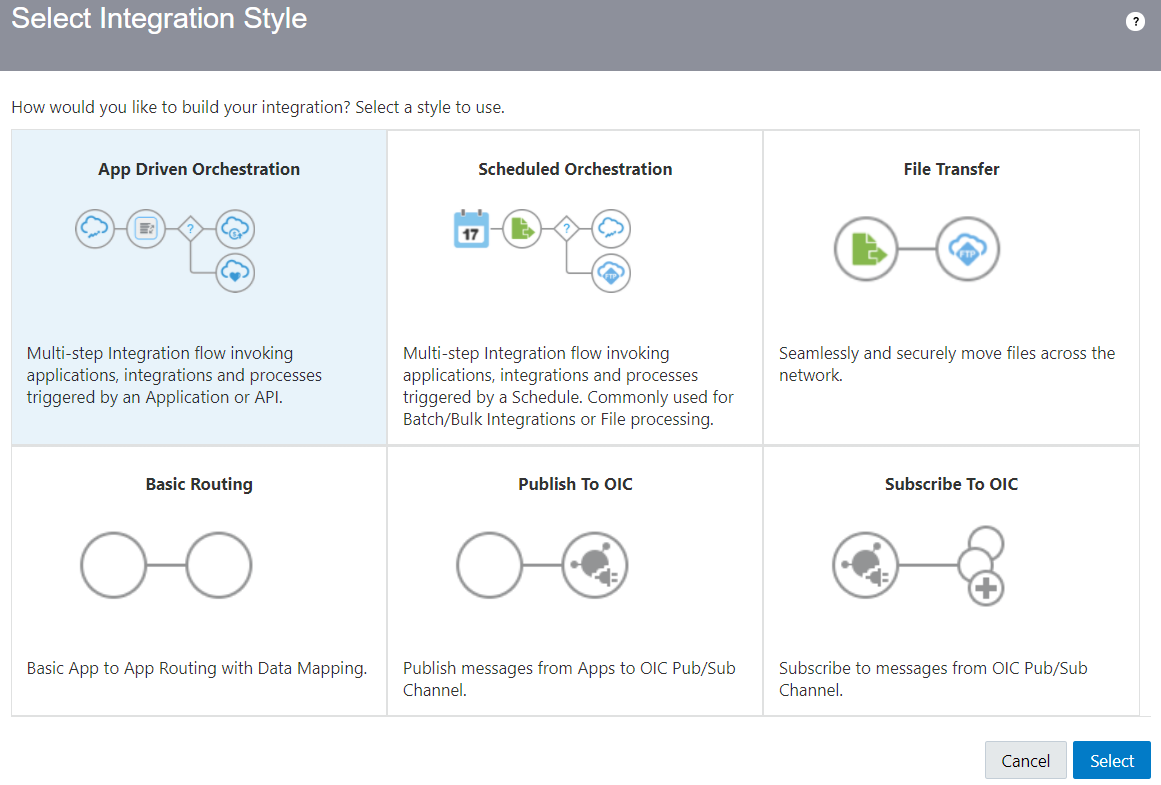
- Create an Integration: Follow below steps to create an App Driven Orchestration Integration
- Login into OIC console and navigate to the Integrations -> Integrations
- From the top right corner click on Create button
- Select App Driven Orchestration pattern from the dialog box
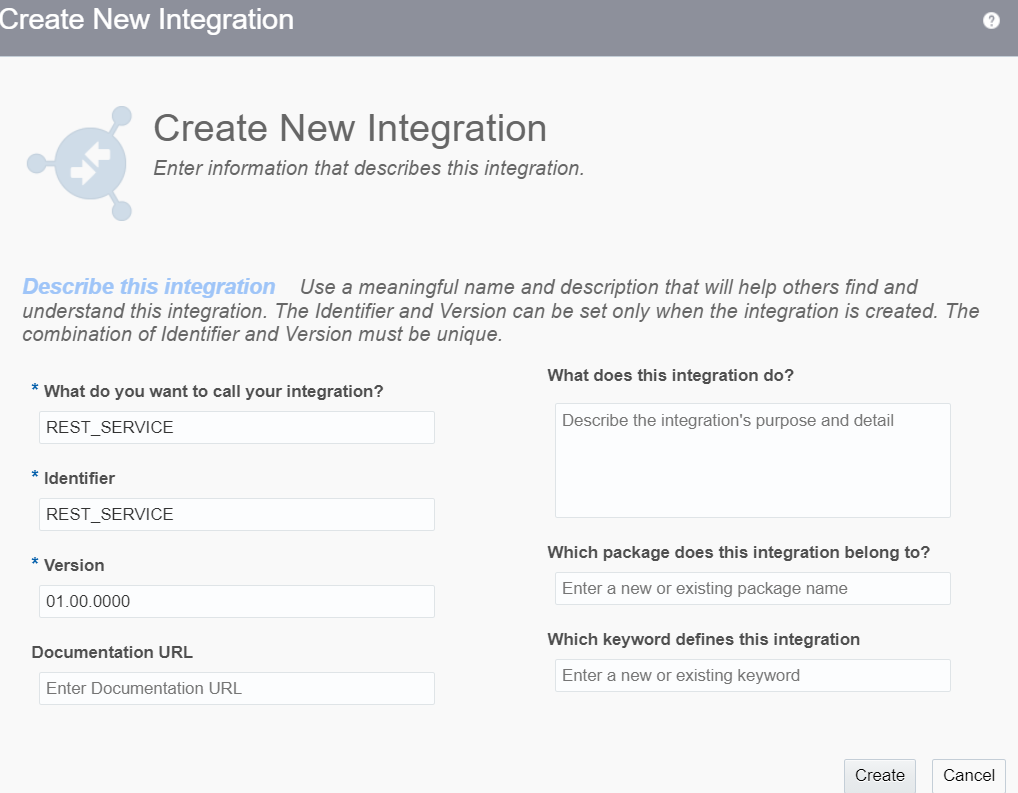
- Enter Below information and click on Create button
- Enter Integration Name in What do you want to call your integration text box
- An Identifier would be picked up automatically from Integration name however you can update it
- Let the Version as it is
- Enter the description in What does this integration do box
- Leave the package box as it is
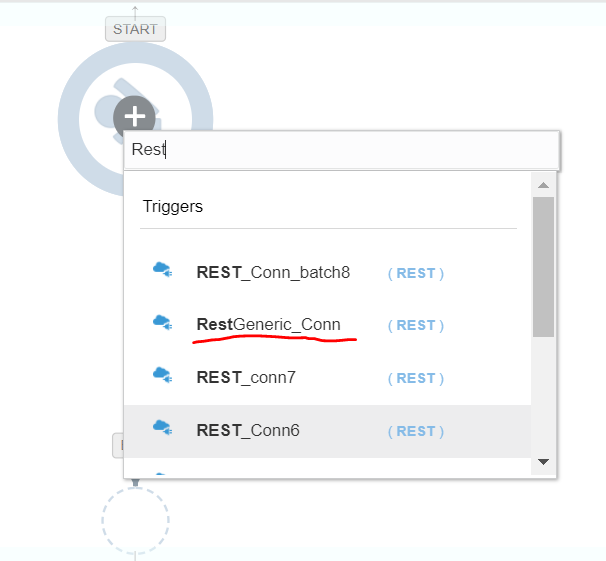
- Select inline or Drop the the REST connection on the canvas
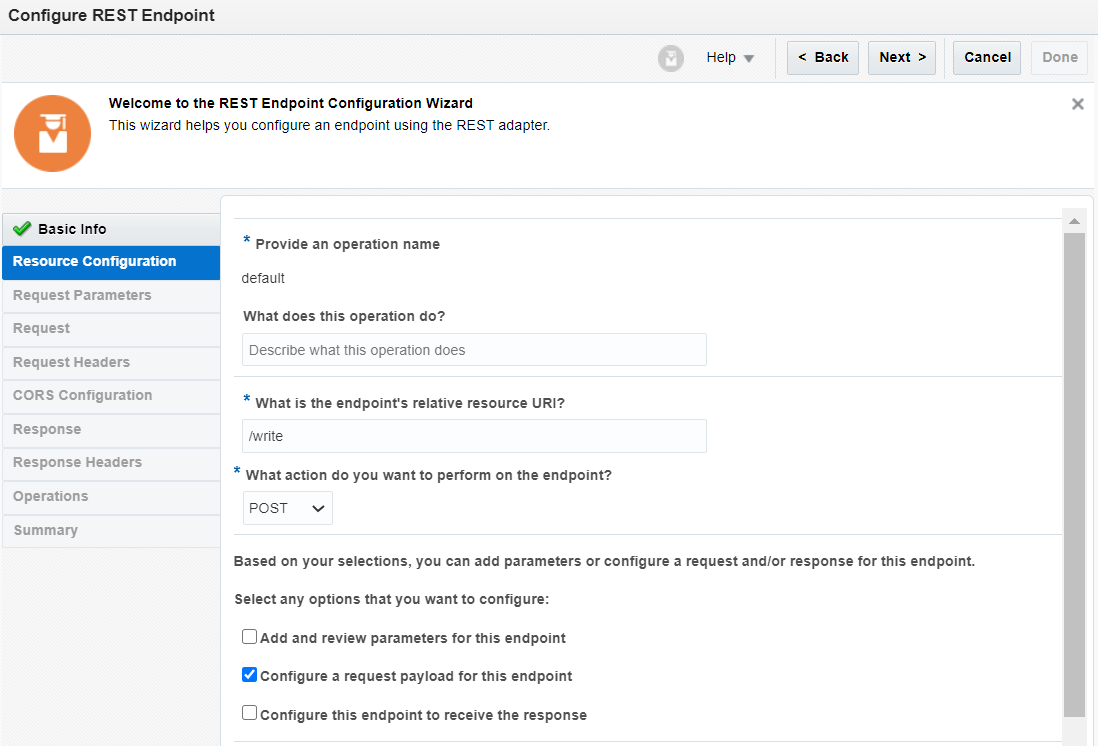
- Enter “Write File” in the “What do you want to call your endpoint” input text and click Next button.
- On the next screen, Enter below information and Click Next
- What is the endpoint’s relative resource URI?: Enter /write
- What action do you want to perform on the endpoint: Select POST
- Select Configure a request payload for this endpoint checkbox- This option allows us to assign payload in the next step
- Select JSON Sample from the Select the request payload fromat drop down button. Select inline link and enter the sample JSON payload as mentioned under Use Case section above
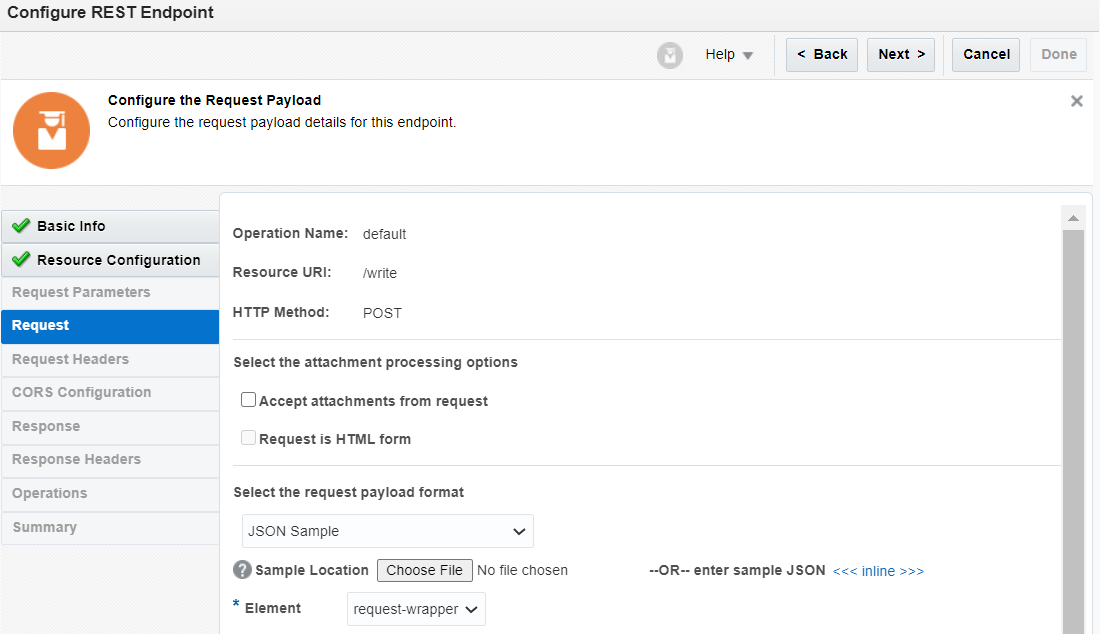
- Click Next and finish the wizard
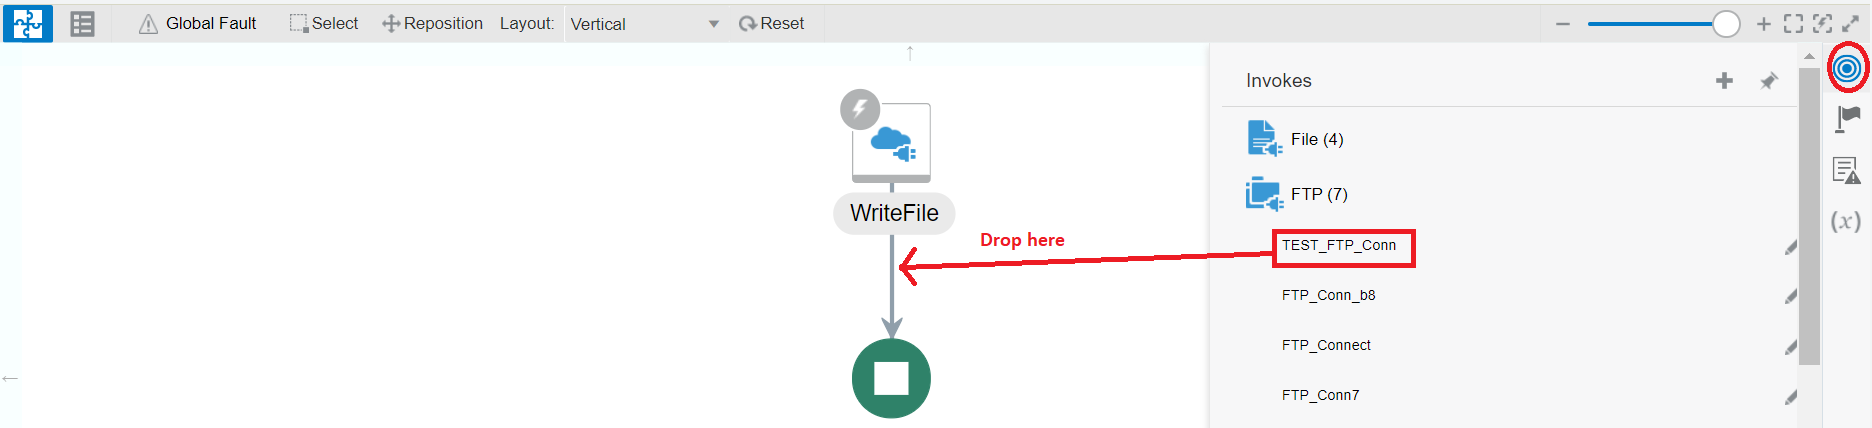
- Click Invokes from right, Select TEST_FTP_Conn, drag and drop the TEST_FTP_Conn just below the REST adapter
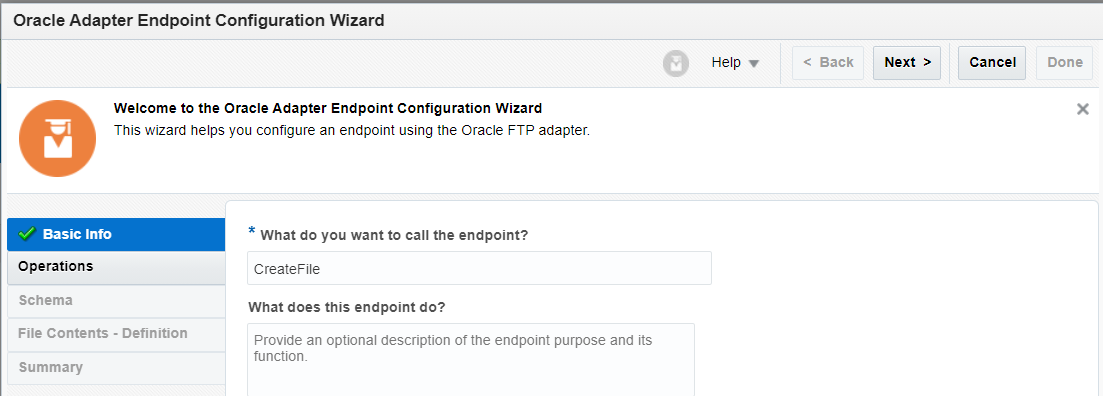
- Enter Name and optionally description. Click Next button
- Enter below information and click Next button
-
- Select Operation: In our case select Write File
- Select a Transfer Mode: Select ASCII
- Specify an Output Directory: Enter directory location where the file to be written
- Specify a File Name Pattern: Either enter any hard coded file name or File Name pattern. In our case, I will enter a File name pattern as test_%yyMMddHHmmss%.csv
- Append to Existing File: If this option is selected, the data will be appended to the existing file if already exist with same name.
-
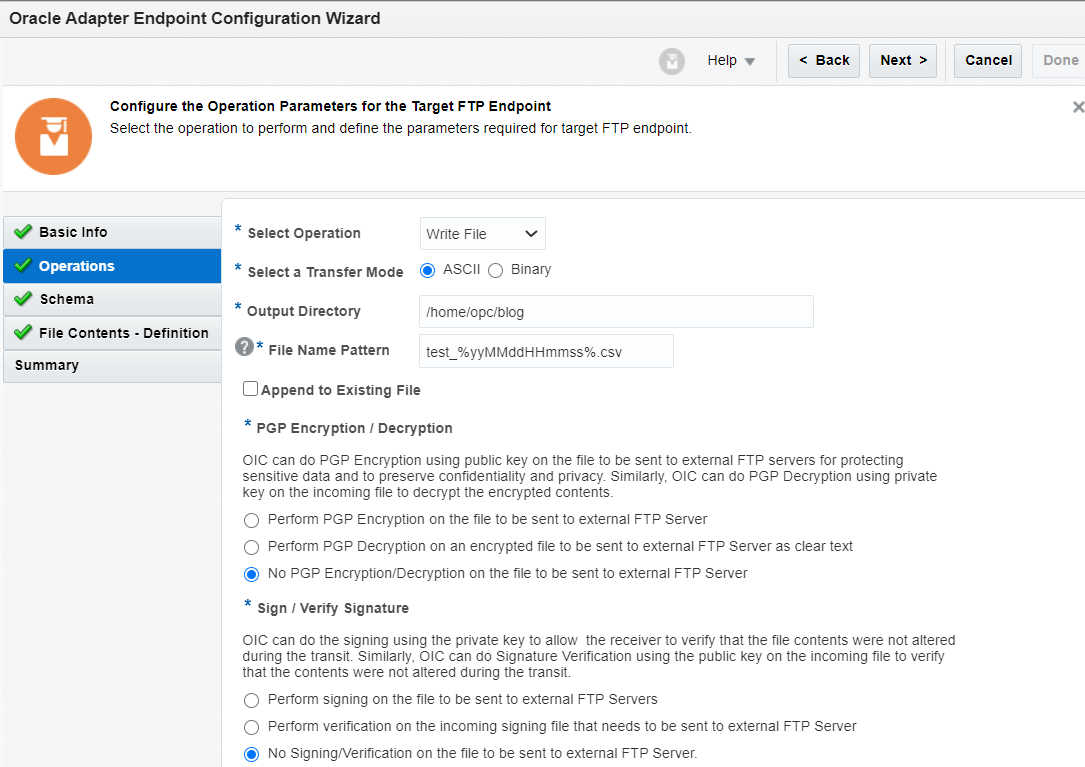
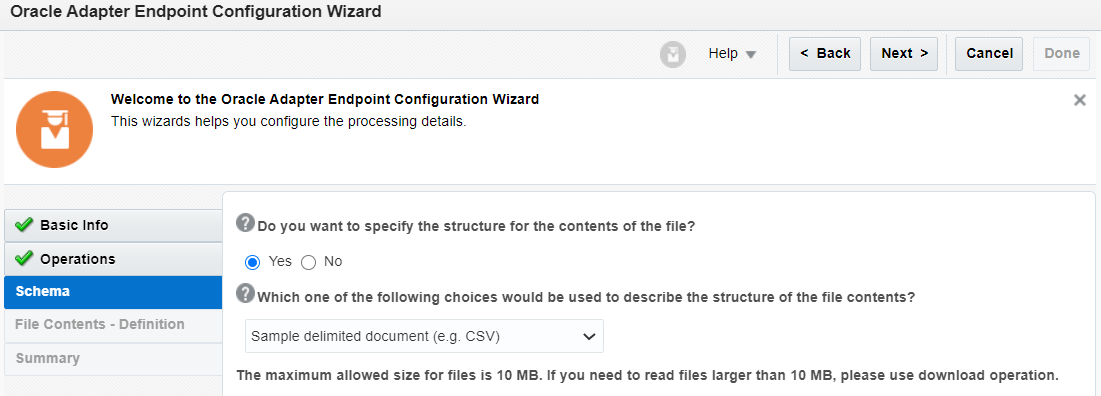
- Select the below options and click on the Next button
- Do you want to sepcify the structure for the contents of the file: Select Yes
- Which one of the following choices would be used to describe the structure of the file contents: Select Sample delimeted document (e.g CSV)
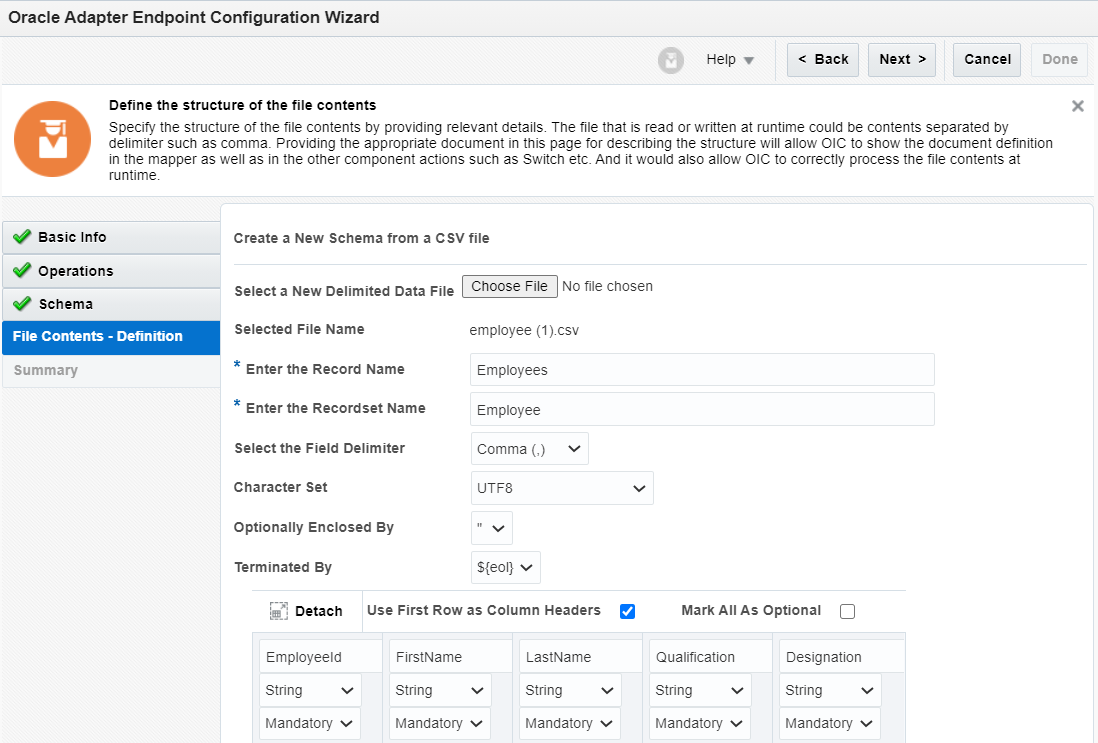
- From the next screen, enter below information and Click Next button
- Select the Delimited Data File: Select the comma separated file from your local machine. Please download sample file from here
- Enter the Record Name: Enter Employees
- Enter the Recordset Name: Enter Employee
- Select the Field Delimiter: Select Comma(,) as a delimiter
- Character Set: This allows us to select character set
- Optionally Enclosed By: Let it be “
- The below table allows us to select which field to keep optional and which would be mandatory. Atleast one column must be mandatory.
- Review summary and finish the wizard
- Click on Map to CreateFile mapper and click edit button
- Mapper will allows us to map source and target fileds.
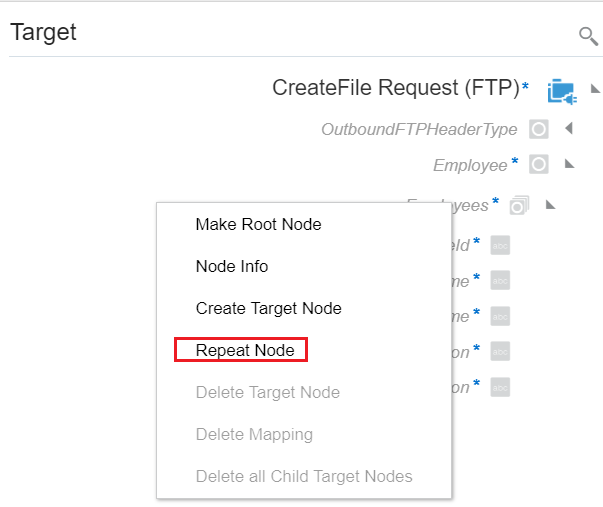
- In order to create the headers in the csv file, expand Employee node from Target and click on Employees node and select “Repeat Node“. This action will add new Employees node in the target mapper.
- Expand the (1 of 2) Employees node
- Right click on the EmployeeId and click on the Create Target Node. This action will open the Expression box on the bottom of the screen. Click Switch to Developer View icon
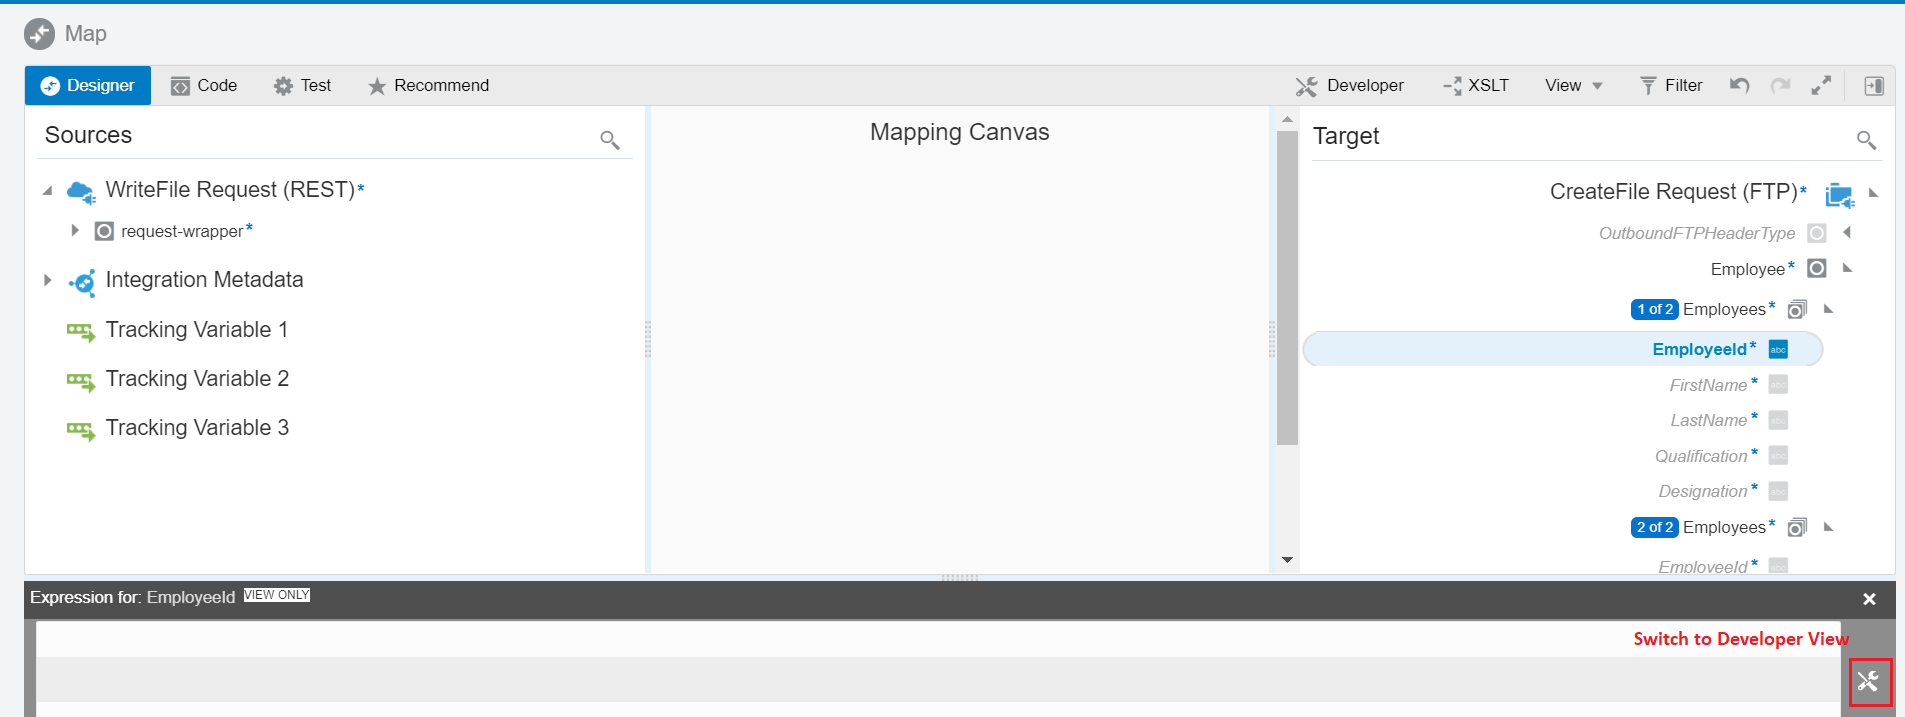
- Enter the hardocoded string as ‘EmployeeId‘ in single quotes and click on the Save icon.
- Repeate above two steps for rest of the fields (FirstName, LastName, Qualification and Designation)
- Now expand the (2 of 2) Employees node. Map the source and target fields as per below:
WriteFile/request-wrapper/employeeId —> CreateFile/Employee/(2 of 2) Employees/EmployeeId
WriteFile/request-wrapper/firstName —> CreateFile/Employee/(2 of 2) Employees/FirstName
WriteFile/request-wrapper/lastName —> CreateFile/Employee/(2 of 2) Employees/LastName
WriteFile/request-wrapper/Qualification —> CreateFile/Employee/(2 of 2) Employees/Qualification
WriteFile/request-wrapper/Designation —> CreateFile/Employee/(2 of 2) Employees/Designation
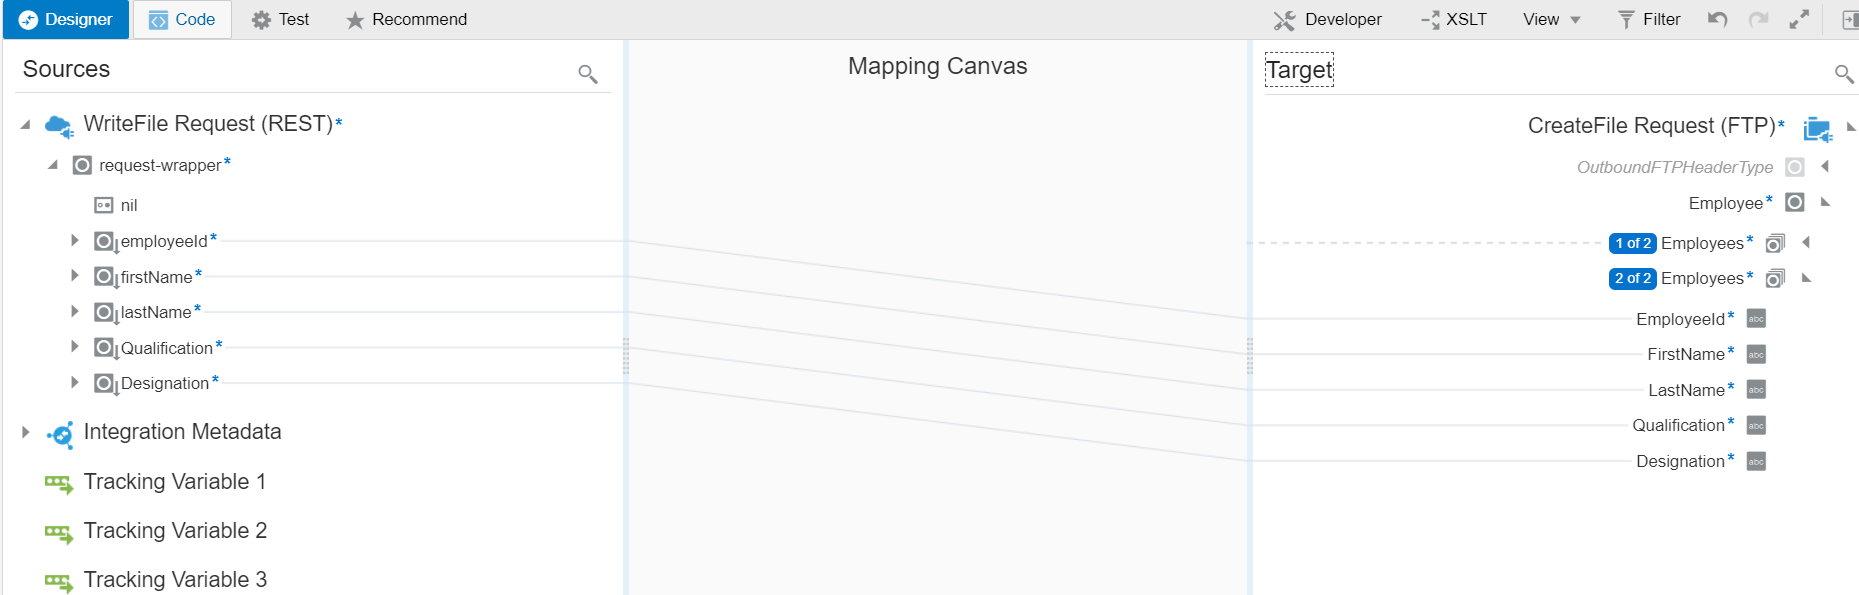
- Validate and Close the mapper
- Select Actions icon from the top righ corner and click on Tracking. Integration can’t be activated without this step. Basically this allows us to track the message with configured parameter. In our case we will select employeeId field.
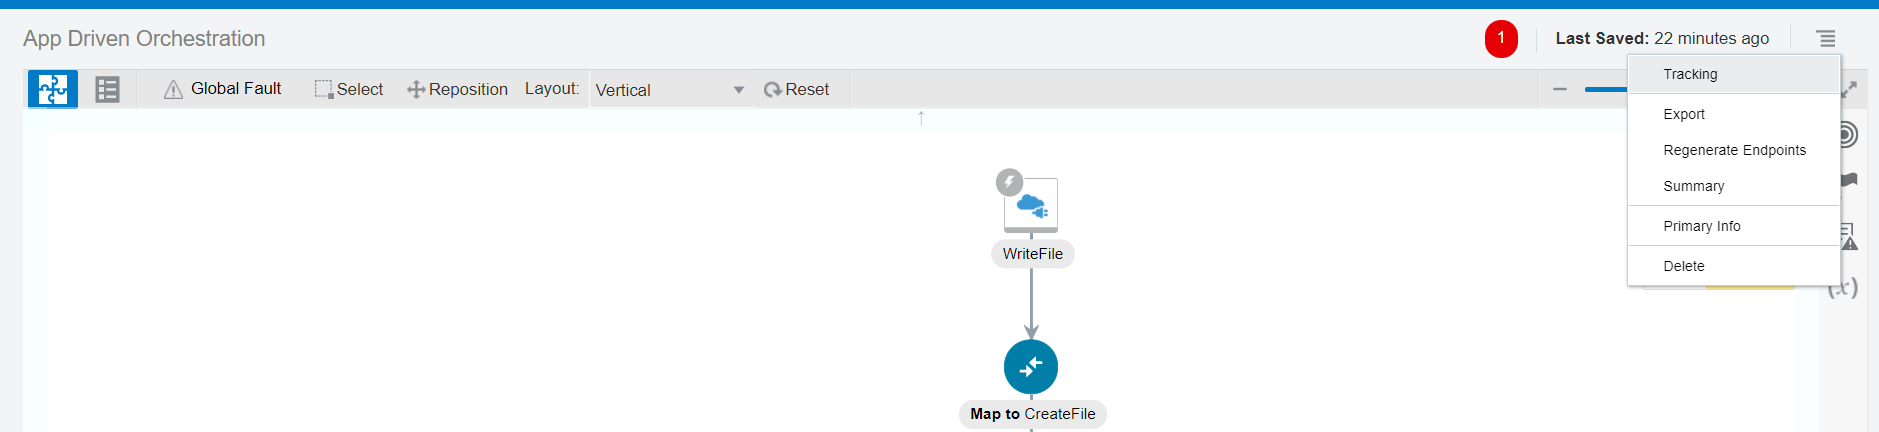
- Drag & Drop the employeeId from left panel to first row in Tracking Field and click Done button
- Click Save and Close button from upper right corner
- Click on Activate icon to activate the integration.

- Select Enable tracking and Include payload check boxes. This option is useful if we want to see payload in the logs. Click Activate button
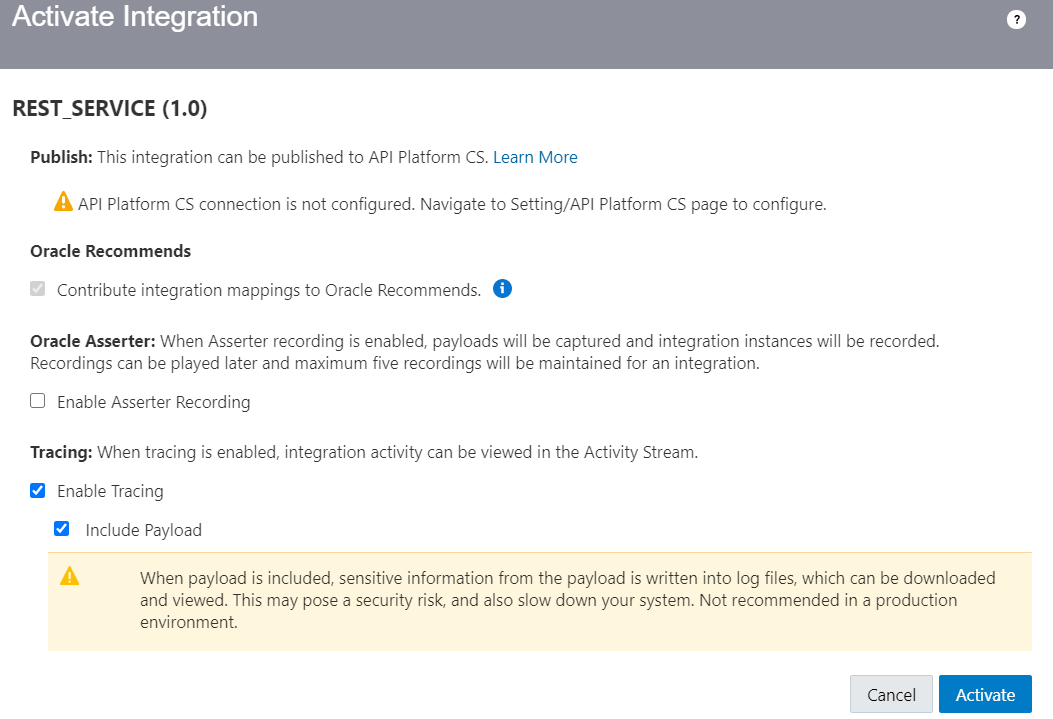
- This step will deploy the integration on the OIC server.
- Click on the Body and enter the JSON payload to test. Click on the Test button

- Open FTP location and see the file should be created there.
You can view my YouTube video also.


Helpful article i am new to ICS,this helps me lot…
I relish, result in I discovered exactly what I used to be taking a look for. You've ended my four day lengthy hunt! God Bless you man. Have a great day. Bye
open afp file
Hi, it's possible in your opinion to read the content of .txt file using FTP Adapter?Specila Thanks
Hi, do you have any sample integration from reading a file (FTP) until writing a file (FTP)? Basically, end-to-end process of reading and writing the same file. I had the same integration but even if I had an Append to an existing file option, only the last row is being printed. Thanks!
The Portable Document Format (PDF) jam the designing of most records superior to anything options like HTML and MS Word. http://create-editable-pdf.com/
The header is missing in the generated csv. How can I add that?
Hi my friend, one question, Why "Select a Transfer Mode: Select ASCII" and not Binary?
Hi Ankur,
I am totally stuck in one scenario wherein I am trying to create a target file using STAGE FILE Write Operation. The use case is I am downloading some sample file from FTP server and then using STAGE Read operation I am reading the file. After that I am trying to do some level of tranformation and create a new target file using STAGE WRITE operation.
The issue that is happening is in my new target csv file all the rows are coming into single line only instead of coming to multiple lines.
For e.g. if the input file contains data as mentioned below
name1,100,test1
name2,200,test2
name3,300,test3
then the output that is getting generated is
name1 name2 name3 100 200 300 test1 test2 test3
Can you please provide any input on this.
Highly appreciated !!
Hi Sumit J,
In the WriteFile mapper, right click on the repeated Employees element and click Add. After that hardcode the header values.
Regards,
Ankur
Hi,
I don't have as such. But you can refer my another blog to see how to read files using FTP adapter.
https://www.techsupper.com/2017/09/how-to-read-file-using-ics-file-adapter.html
Regards,
Ankur
Hi Ishan,
Can you please share the IAR.
Regards,
Ankur
There is one problem with that. When I try to right click and "repeat element", the new element is created in the end.
Is there a way to move it as the first position so, I don't lose my mappings.
Hi Carlos,
Export the integration and change the xslt file directly. Move the element up and down as per your need.
Hi Ankur,
I am trying to move a file from source FTP location to Target. so when the source file name is "test.txt" i am trying to rename the target with "test_%yyMMddHHmmss%.txt". But the renaming doesn't happen . rather in the target i see, "test_%yyMMddHHmmss%.txt" as file name.
Do let me know if i am making any pattern mistake.
Try to delete double quotes from the file name.
Thanks for sharing this great source of information. onlineconvertfree
Thankyou for sharingerp software
This comment has been removed by the author.