Salesforce integration in Oracle Integration Cloud Service
In this article, we will show you to create an integration with Salesforce.

Use case description
- Expose a REST service(Source) that takes five input parameters(first name, last name, designation, employee id, and band)
- Check employee already exist in Salesforce based on employee id. If exists, update employee details else create a new employee
- Send the response back to REST service caller
Pre-requisites:
- REST service connection: Rest service connection should already be created in ICS. If not, please follow the blog
- Salesforce connection: Salesforce connection should already exist in ICS. If not, please follow the blog
- Salesforce custom object: Ask the Salesforce team to provide the custom object which will be used to send above employee details.
Let’s go in deep and see how to use Salesforce custom object to send employee details in ICS.
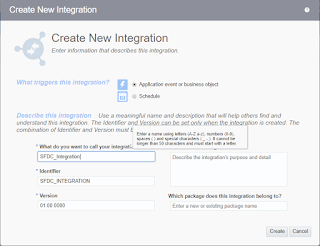
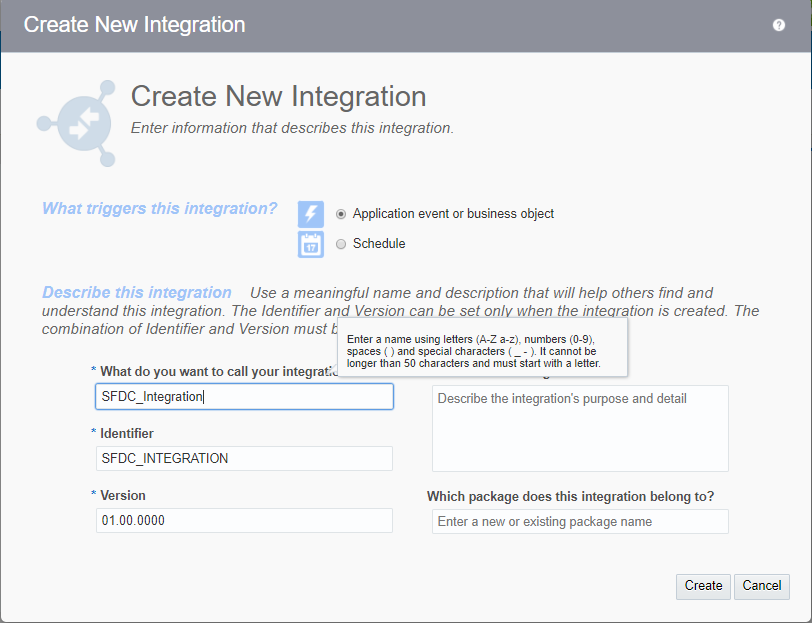
- Login into ICS and click on Integration tile from home page
- Click on the Create button from the upper right corner
- Select the Orchestration pattern from the dialog box
- Enter Below information and click on Create button
- Select Application event or business object radio button
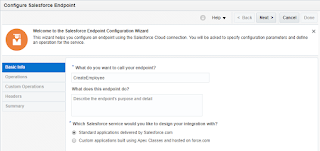
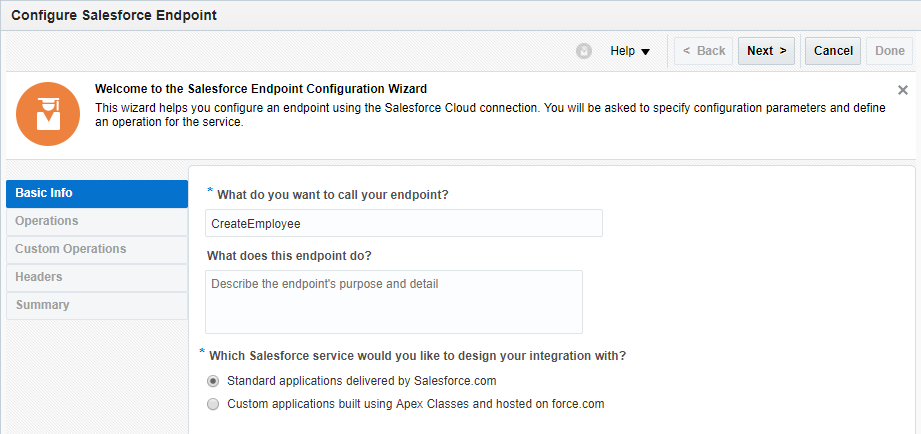
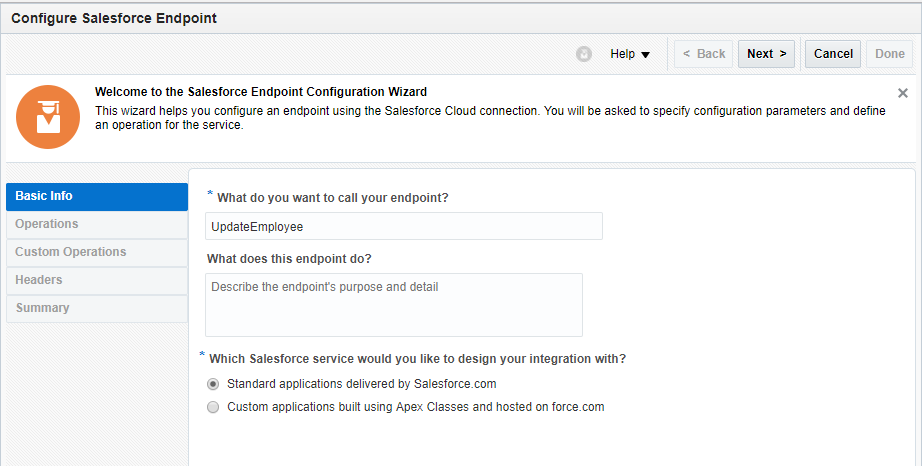
- Enter Integration Name in What do you want to call your integration text box
- An Identifier would be picked up automatically from Integration name however you can edit it
- Keep the Version as it is
- Enter the description What does this integration do box
- Leave the package box as it is
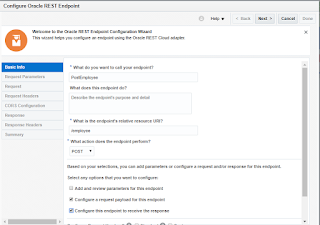
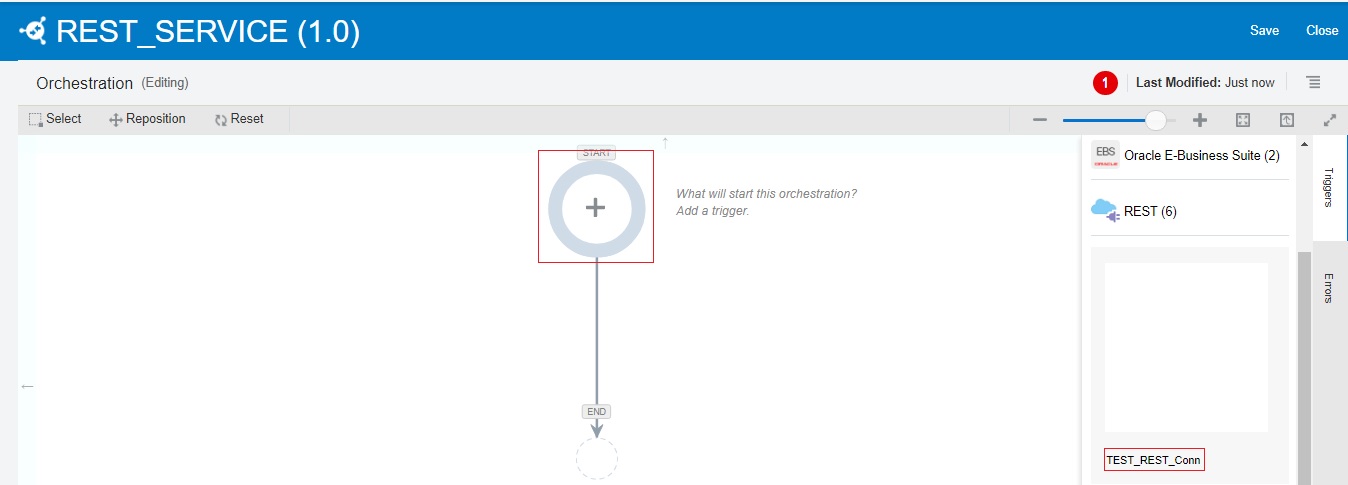
- Drag the TEST_REST_Conn Connection on the canvas from REST connection
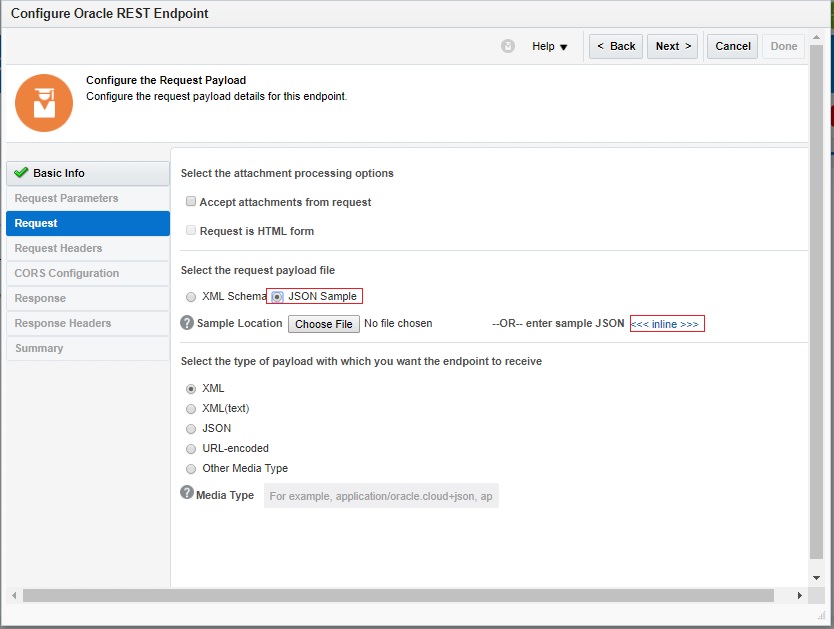
- Enter below information and Click Next
- Name of the endpoint
- Relative URI(must start with /)
- Select HTTP verb
- Select Configure a request payload for this endpoint checkbox- This option allows us to assign sample request payload in the next step
- Select Configure this endpoint to receive the response checkbox- This option allows us to assign sample response payload in the next step
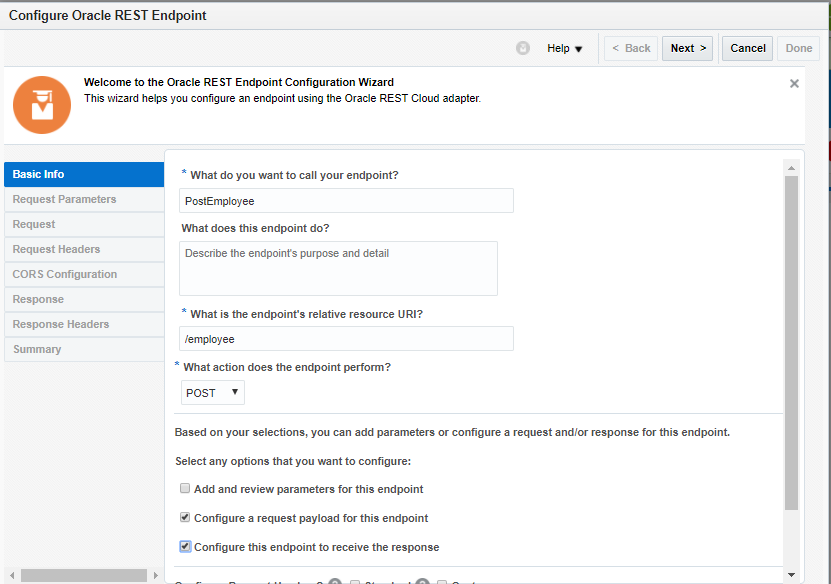
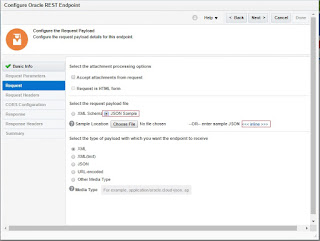
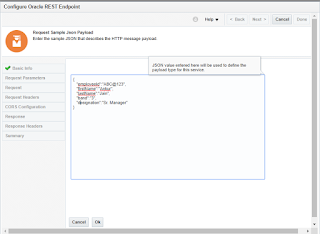
- Select JSON Sample Radio button: This option allows us to take input in JSON format. Select inline link to give sample payload
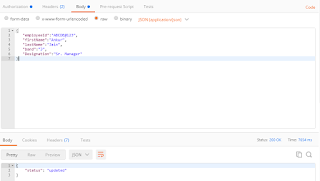
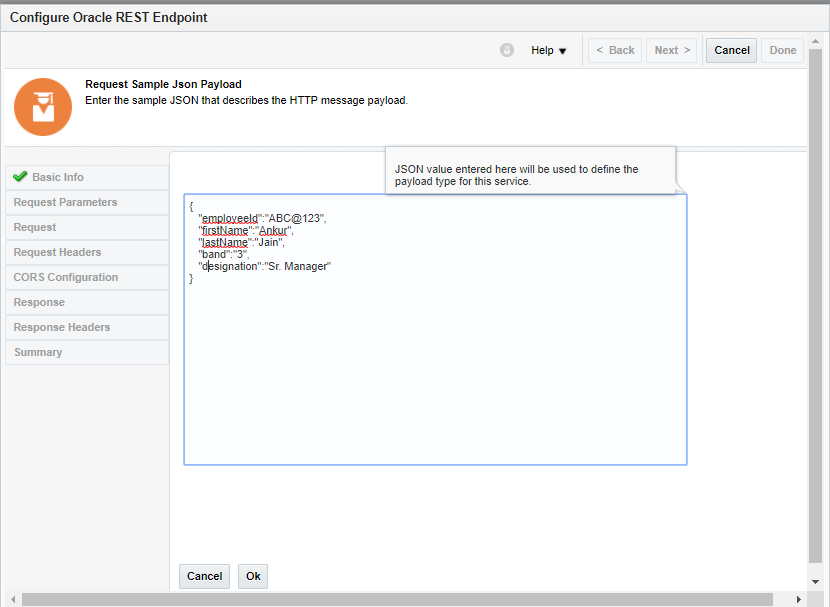
- Enter below payload and click OK
{
“employeeId”:“ABC@123”,
“firstName”:“Ankur”,
“lastName”:“Jain”,
“band”:“3”,
“Designation”:“Sr. Manager”
}
“employeeId”:“ABC@123”,
“firstName”:“Ankur”,
“lastName”:“Jain”,
“band”:“3”,
“Designation”:“Sr. Manager”
}
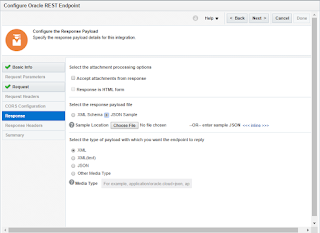
- Below step allows us to configure sample response payload. Select JSON radio button and click inline link
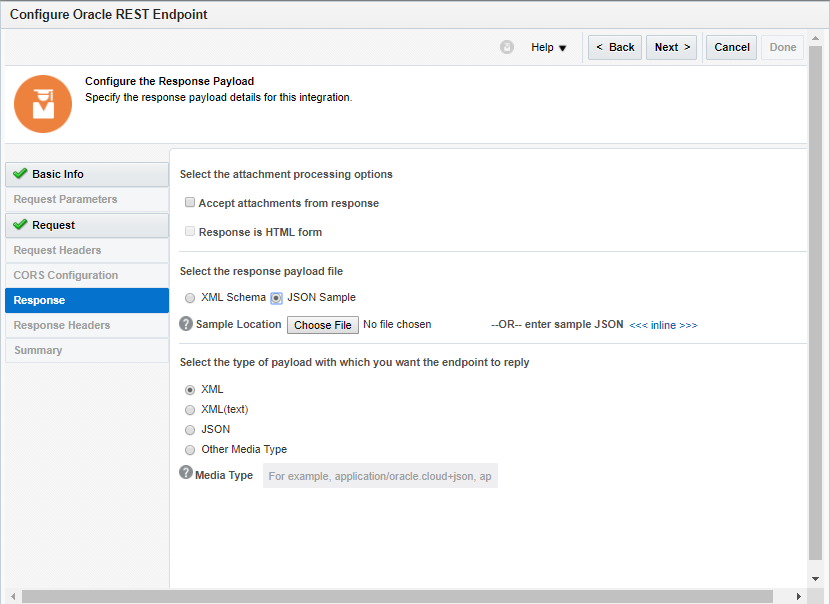
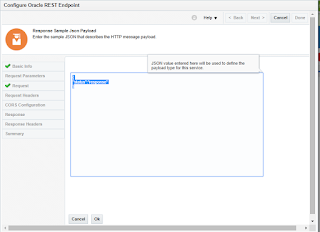
- Enter below payload and click OK
{
“status”:“response”
}
“status”:“response”
}

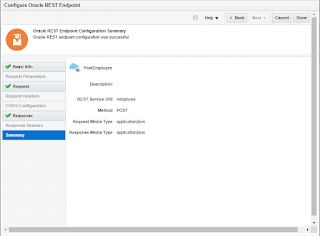
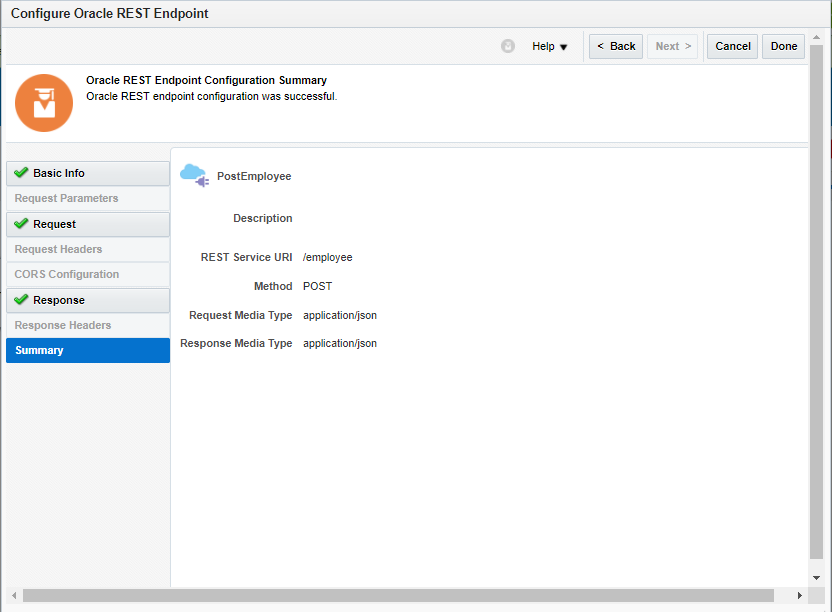
- Click Done button
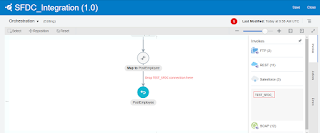
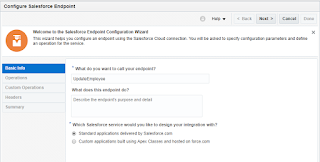
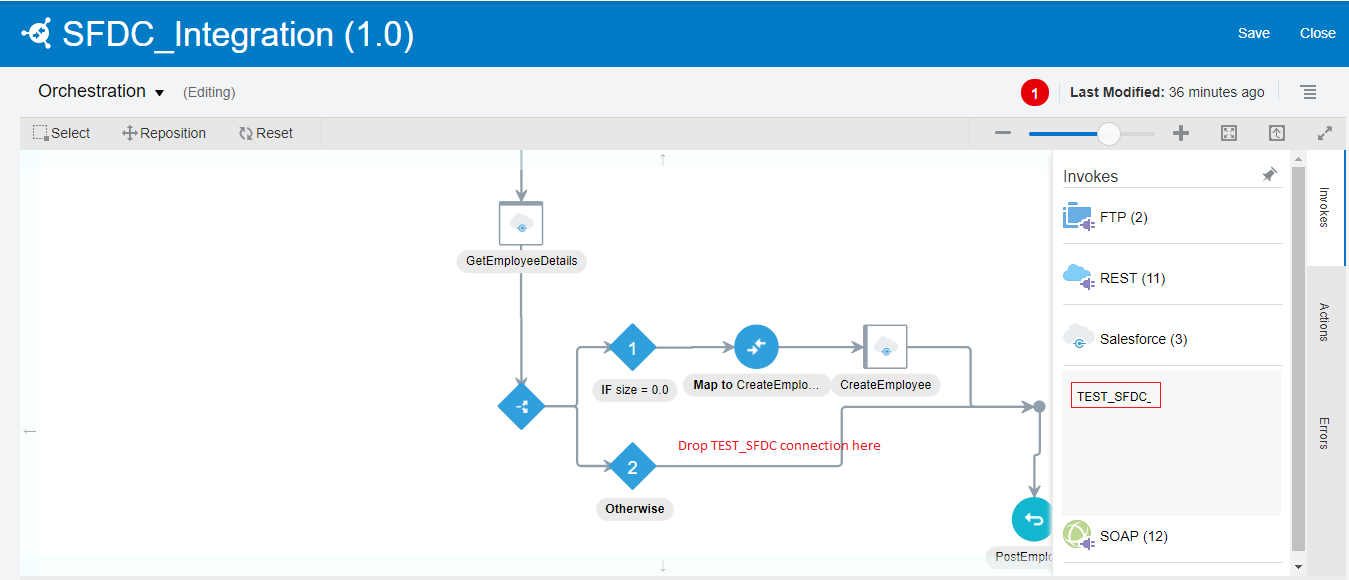
- Let’s drop TEST_SFDC connection that we created in the blog just below the PostEmployee Map
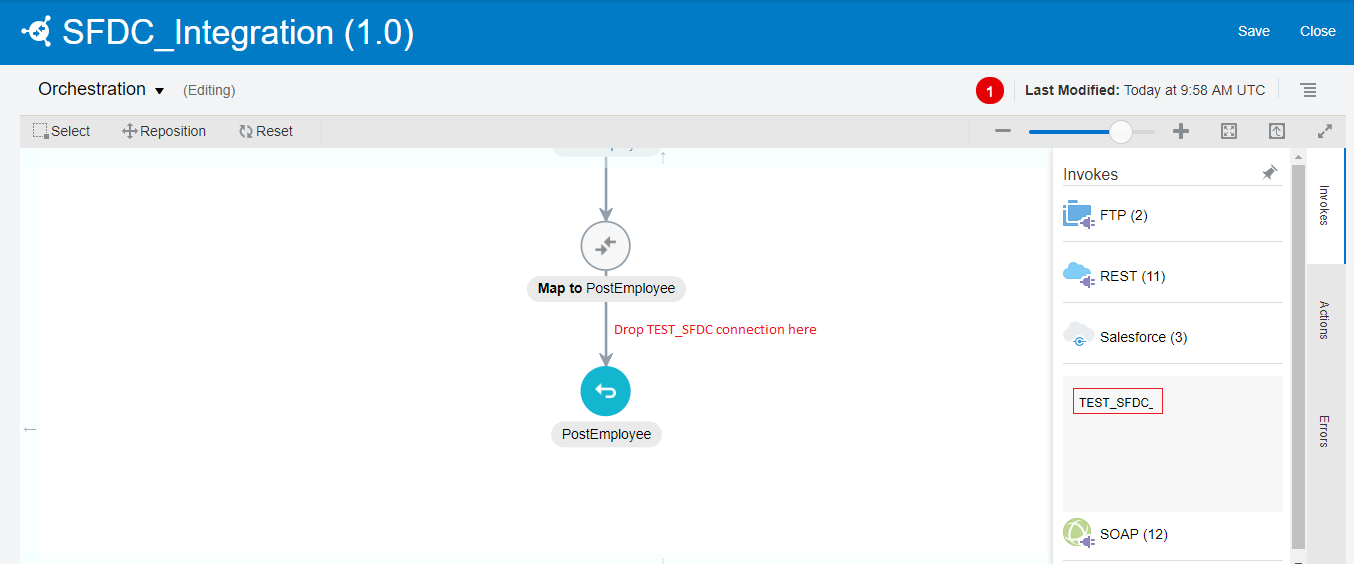
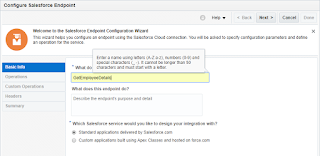
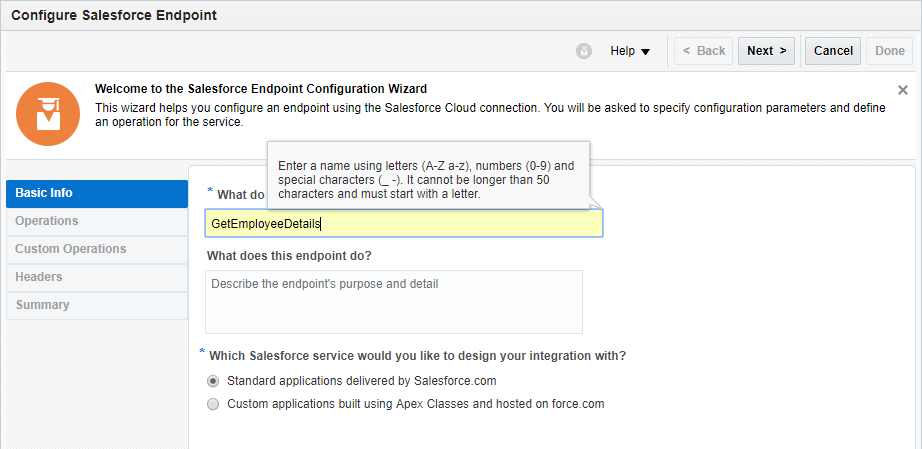
- Enter Name in What do you want to call this endpoint text box and leave other option as it is and click Next button
- Enter below information as below
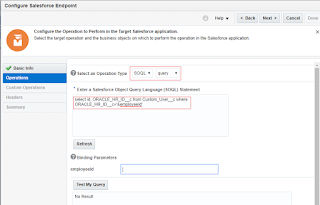
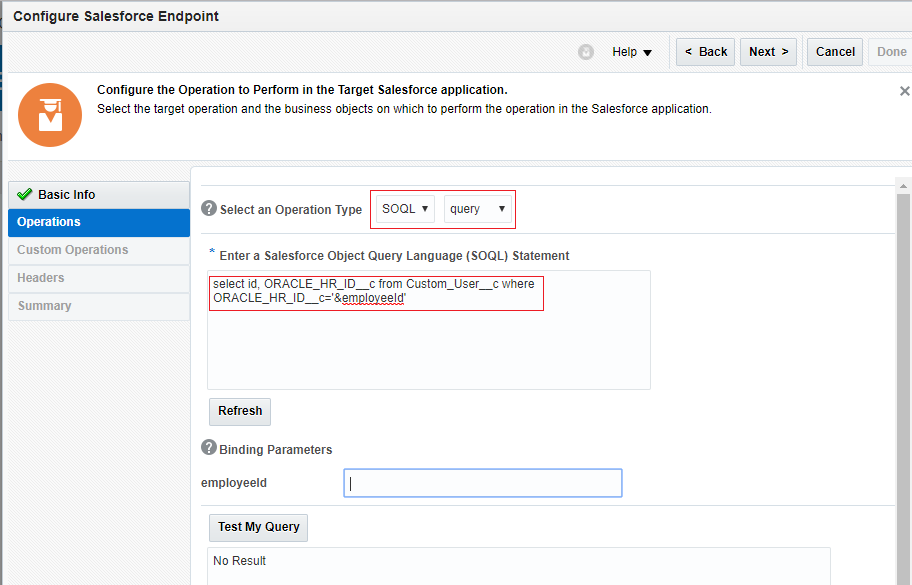
- Select SOQL(Salesforce Query Language) from Select an Operation Type drop down. We have selected this option as we would like to enter the Salesforce query to check whether the employee already exist or not
- Enter below SOQL query. Custom_User__C is the Salesforce custom object which is used to store employee details. Id is the unique id of each record generated by Salesforce on new record inserted. Oracle_HR_ID__C is the field which is used to store employee id.
select id, ORACLE_HR_ID__c from Custom_User__c where ORACLE_HR_ID__c=’&employeeId’
- Click Next and Done button
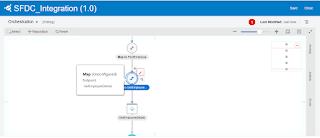
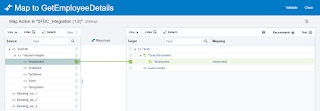
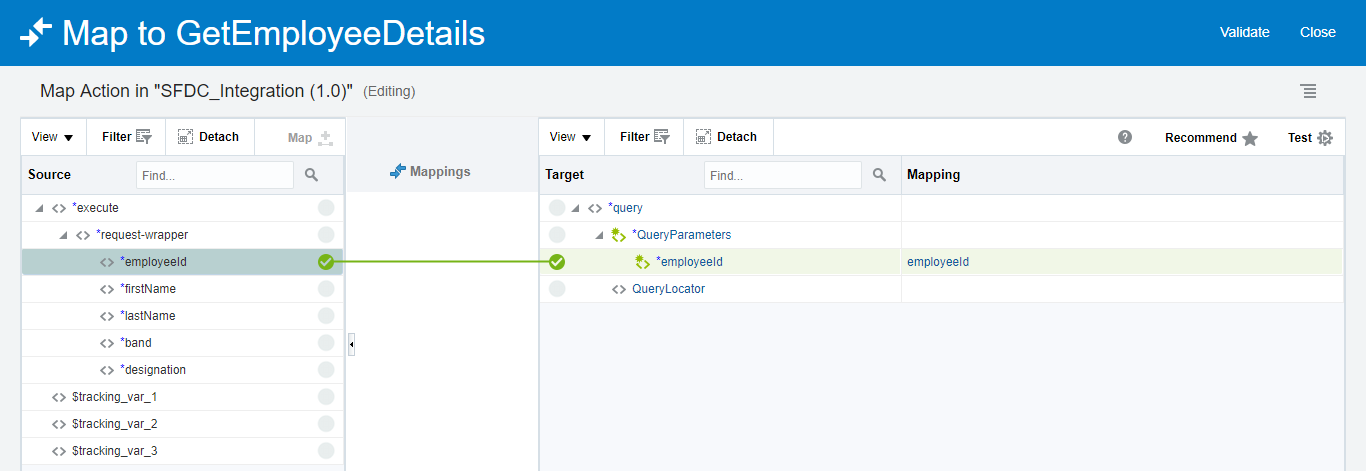
- Click on GetEmployeeDetails map and click Edit button
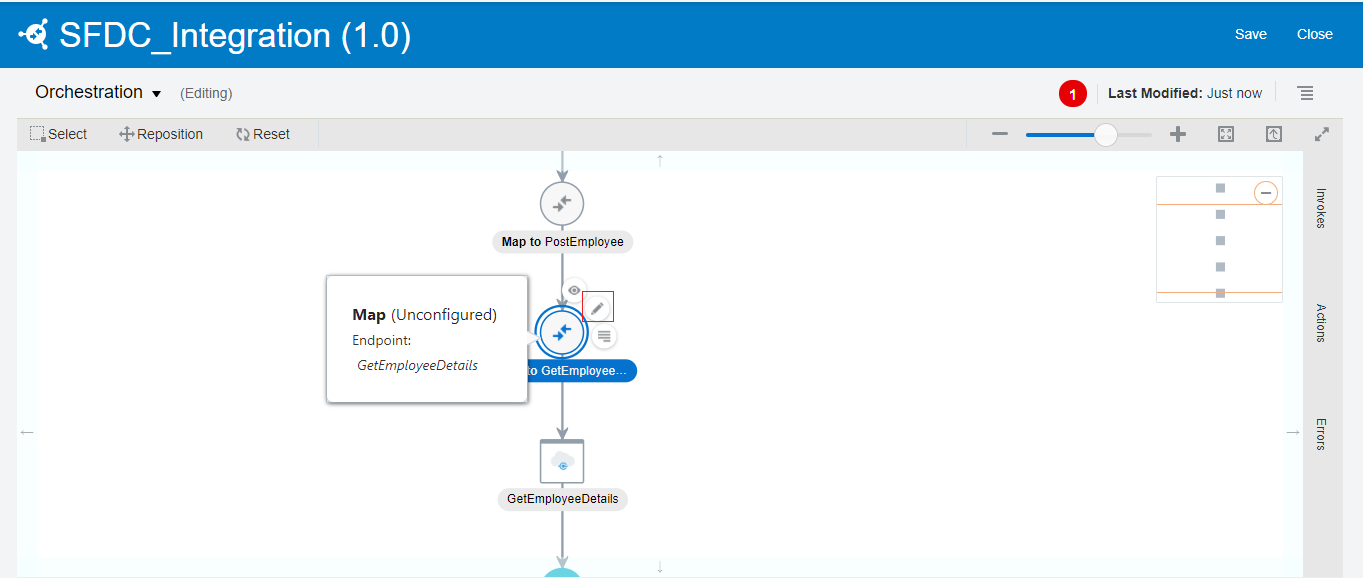
- Map employeeId to employeeId as shown in the below screenshot. Click the Validate and Close button
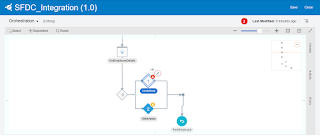
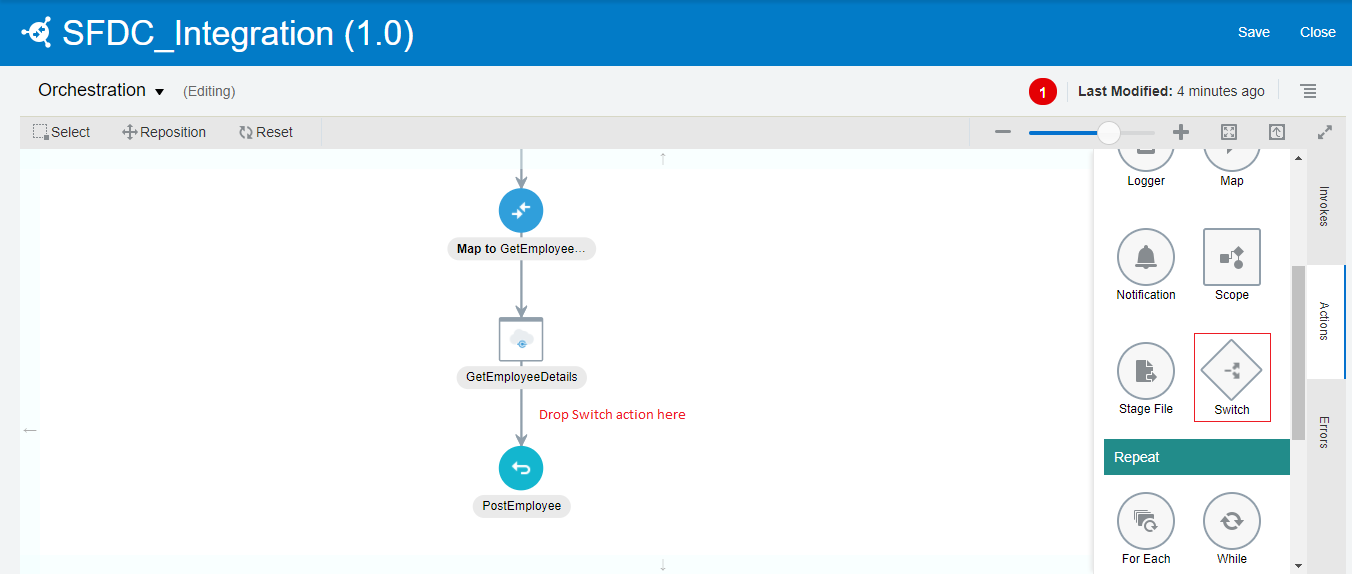
- Drop Switch activity from Action tab and drop just below the GetEmployeeDetails connection
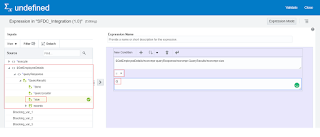
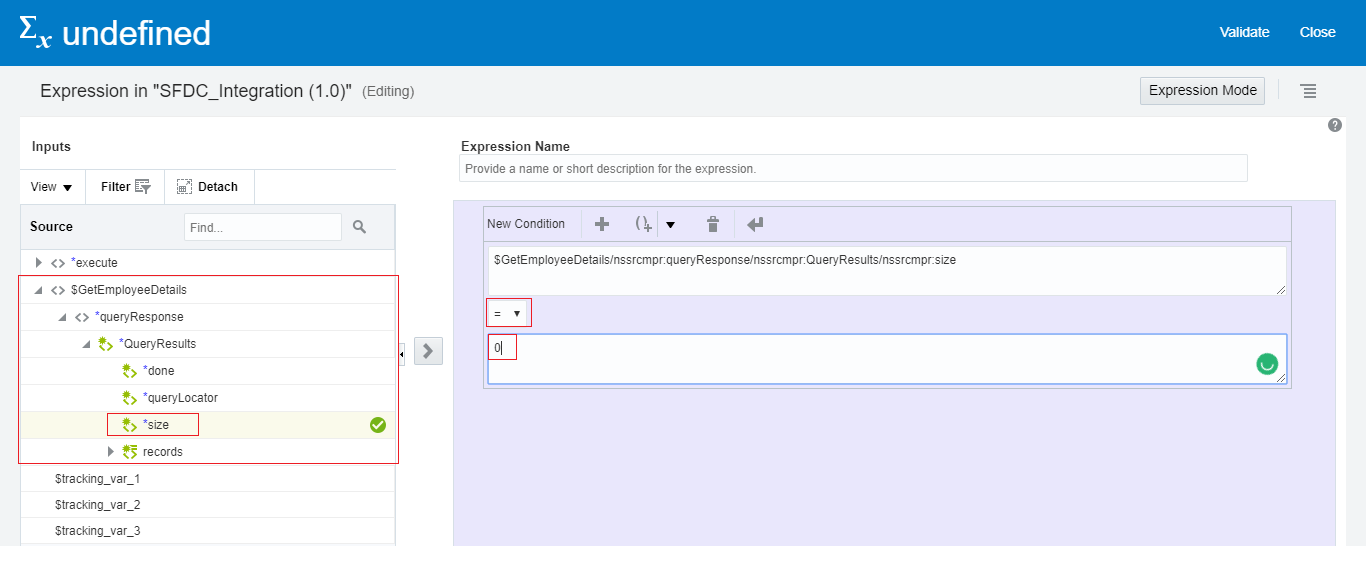
- Click on 1st activity and click Edit button

- Expand $GetEmployeeDetails -> queryResponse -> QueryResults and drop size parameter to New condition input box. Enter 0 as the value. It means, if the employee will not exist in the Salesforce, the value of size will be 0. Click the Validate button and Close
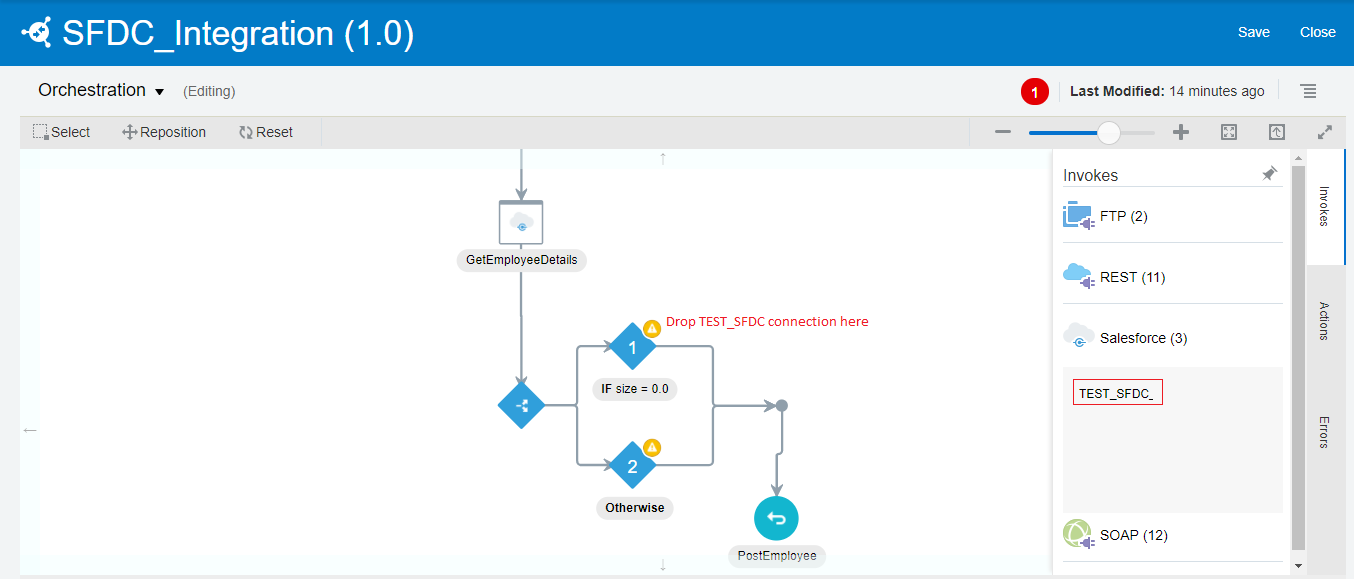
- Drop TEST_SFDC connection from Invoke tab as shown in the below screen shot
- Enter Name in What do you want to call this endpoint text box and leave other option as it is and click Next button
- Enter below information and click Next button
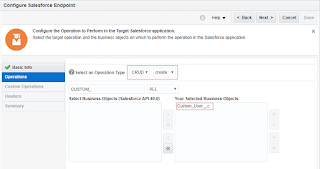
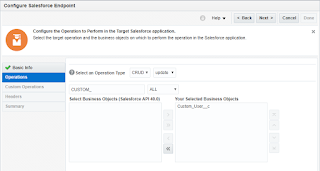
- Select CRUD, create option from Select an Operation Type drop down
- Search Custom_User__C object and Move to the right pane
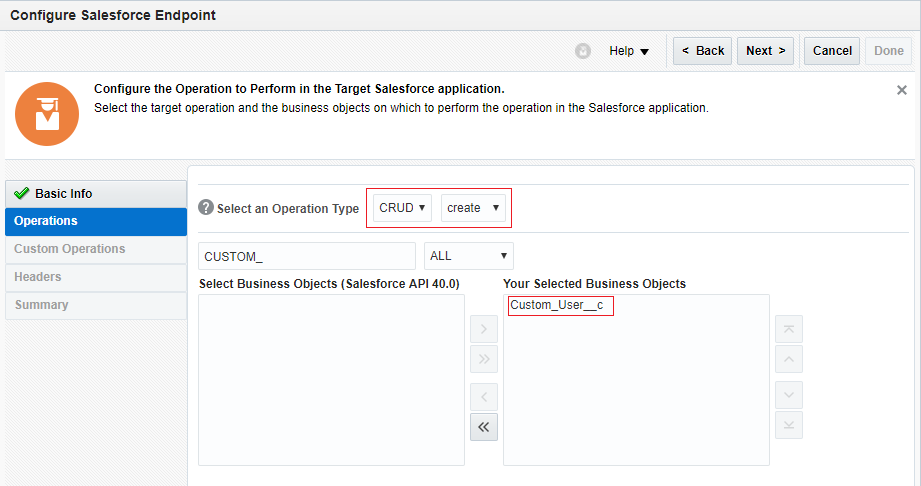
- Click Next and Done button
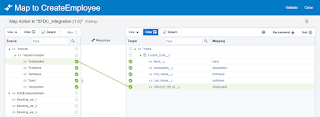
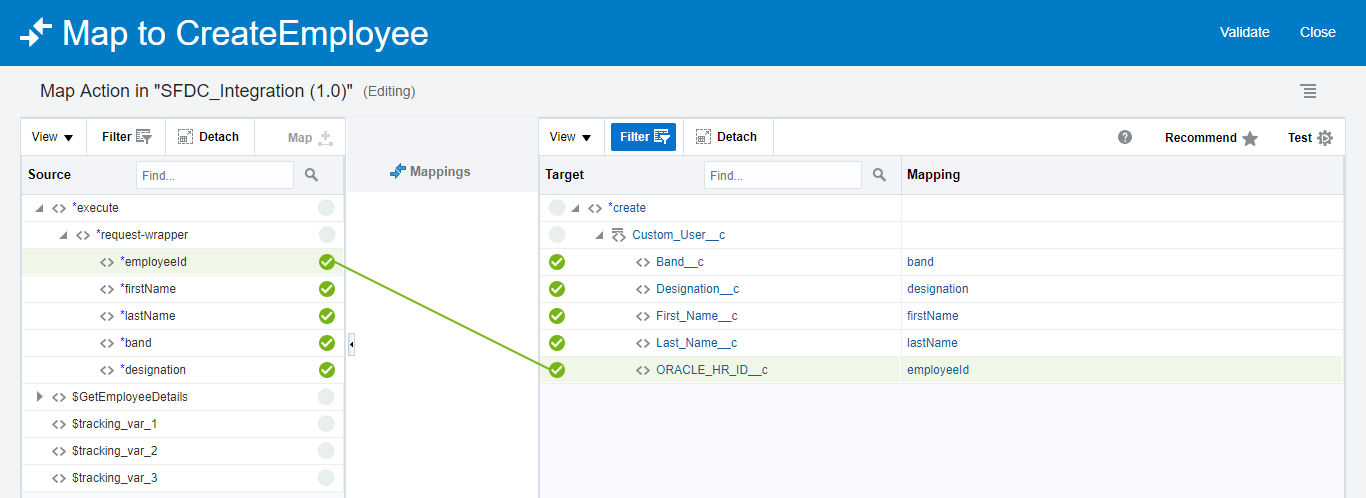
- Click CreateEmployee map and edit button
- Map source and target fields as shown below
- Drag & Drop TEST_SFDC connection from Invoke panel as shown below
- Enter Name in What do you want to call this endpoint text box and leave other option as it is and click Next button
- Enter below information and click Next button
- Select CRUD, update option from Select an Operation Type drop down
- Search Custom_User__C object and Move to the right pane

- Click Next and Done button
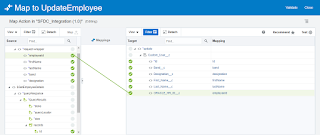
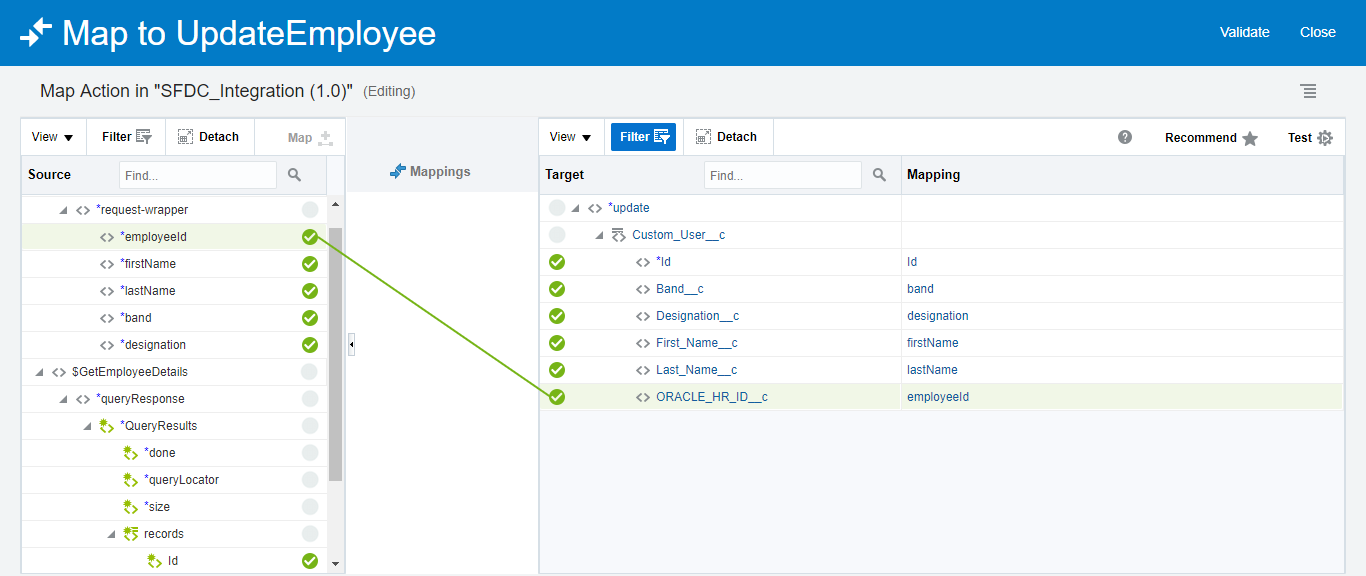
- Click UpdateEmployee map and edit button
- Map source and target fields as shown below
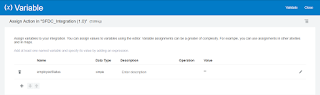
- Drop an Assign activity just below the PostEmployee connection and create a variable named employeeStatus. This variable will be used to set the employee status(created or updated)

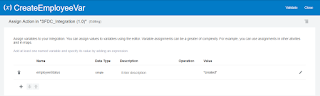
- Again, drop an Assign activity in if block and select the same variable employeeStatus that we created in the previous step and assign the value created as shown in the screen shot
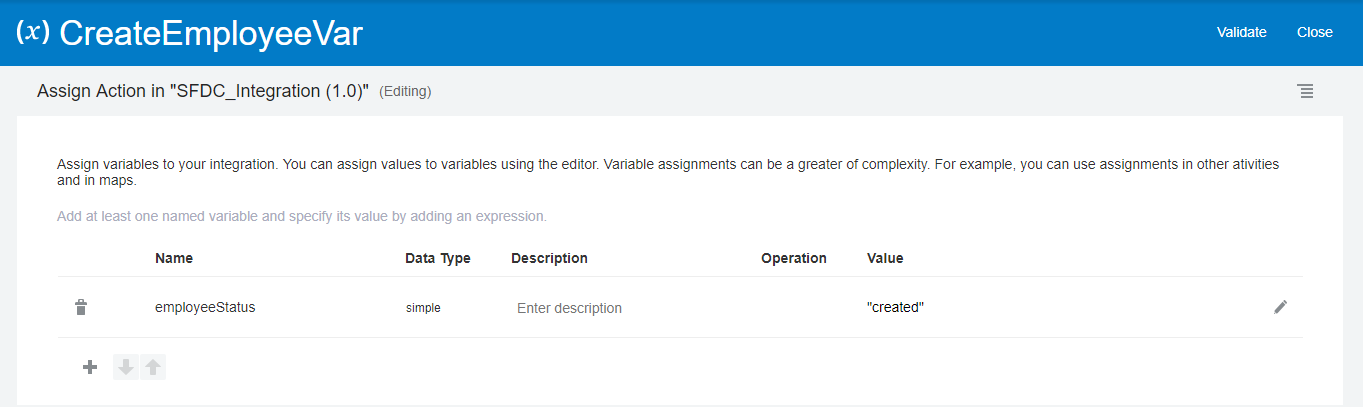
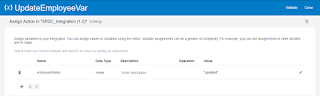
- Again, drop an Assign activity in Otherwise block and select the same variable employeeStatus that we created in the previous step and assign the value updated as shown in the screen shot

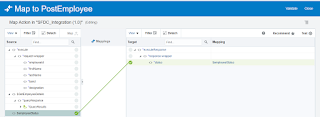
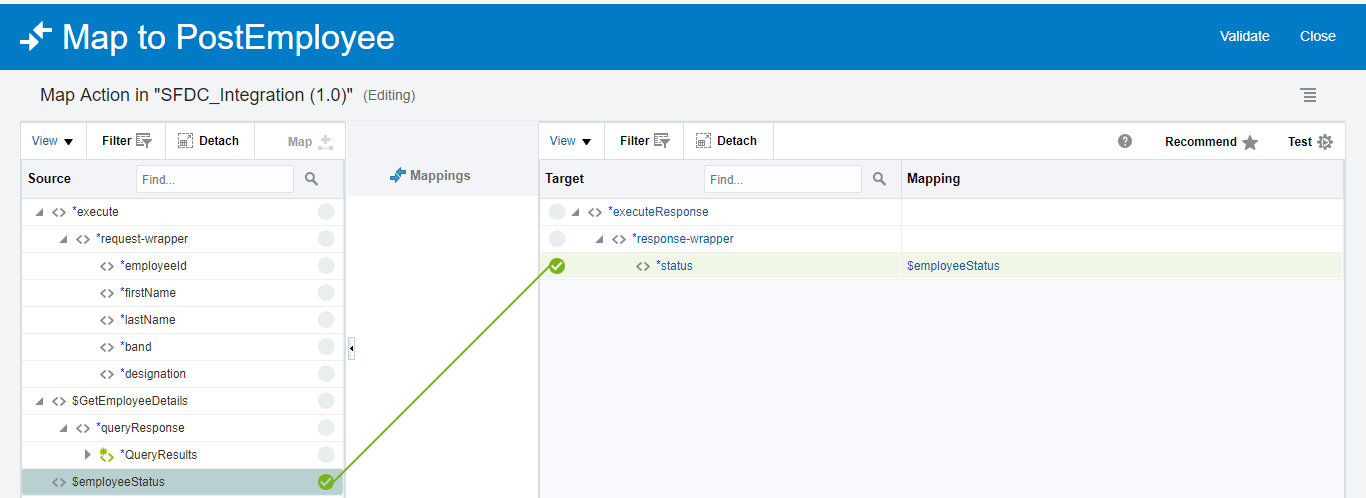
- Drop a Map activity just above the PostEmployee response
- Edit the mapper and map employeeStatus to status
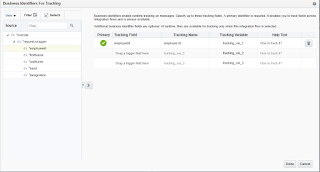
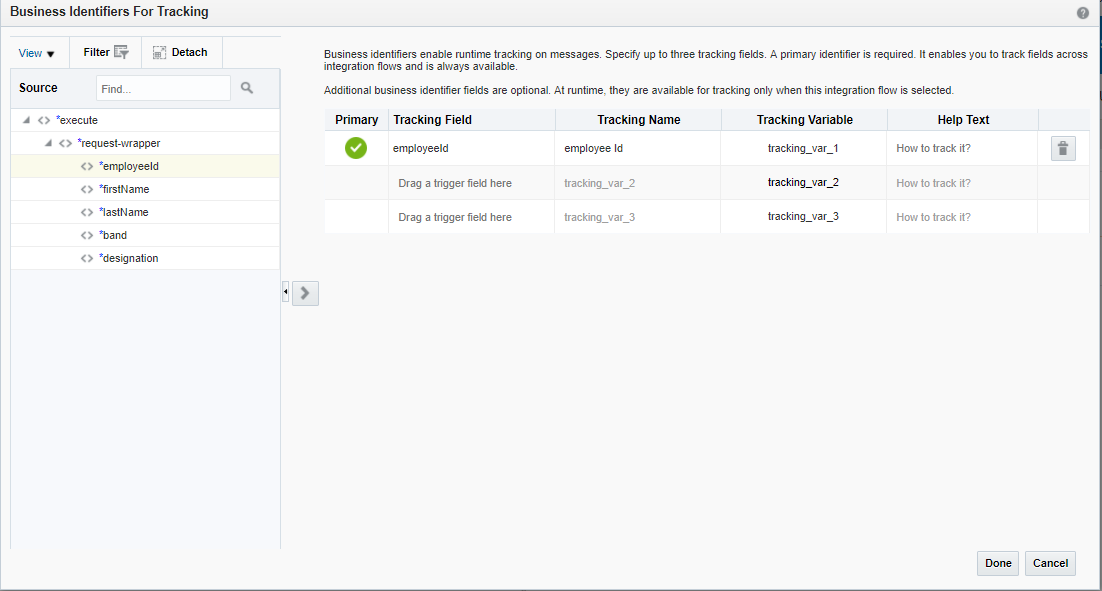
- This is the last step to complete our integration. Let’s add a tracking field as we always do in all the integration to track the Integration instance.
- Click on Action menu and select Tracking option
- Drag employeeId to the right panel and click Done button
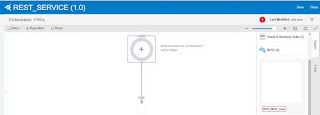
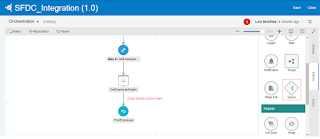
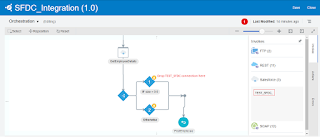
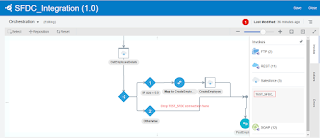
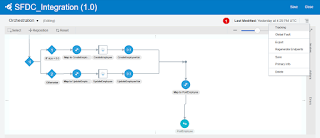
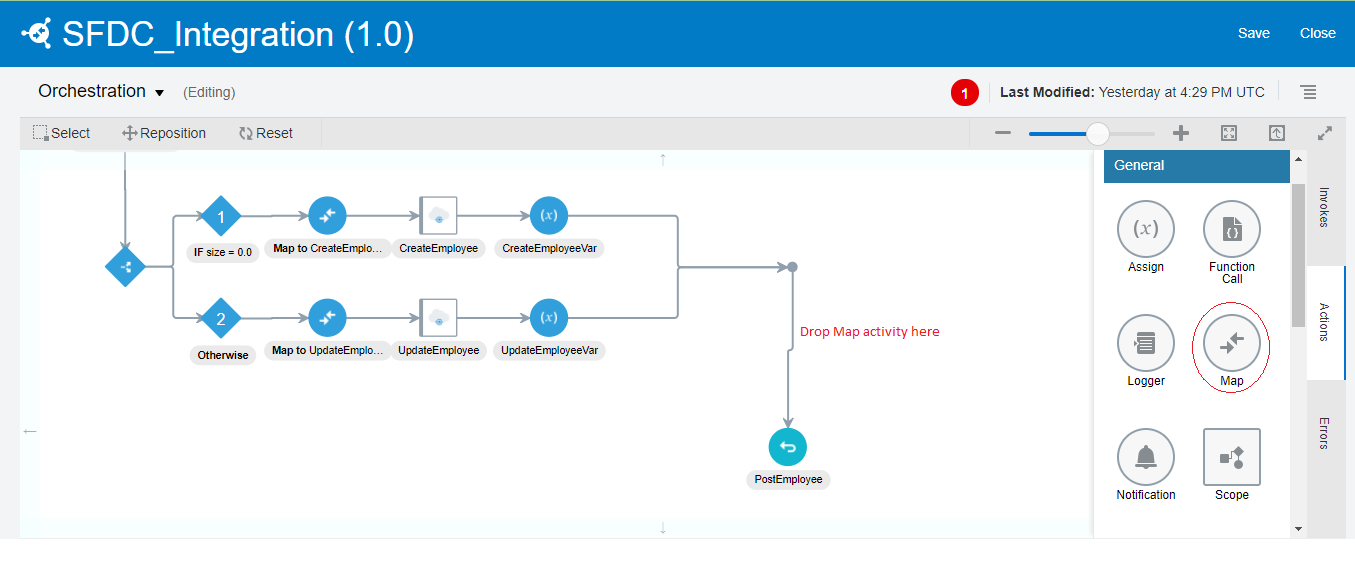
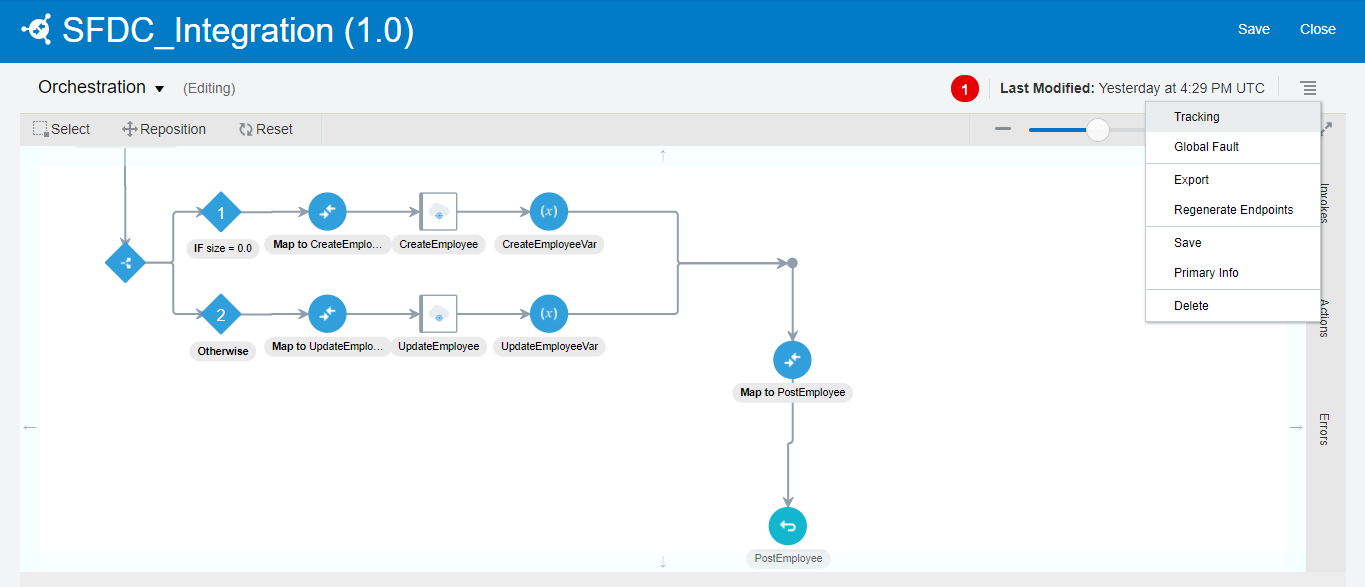
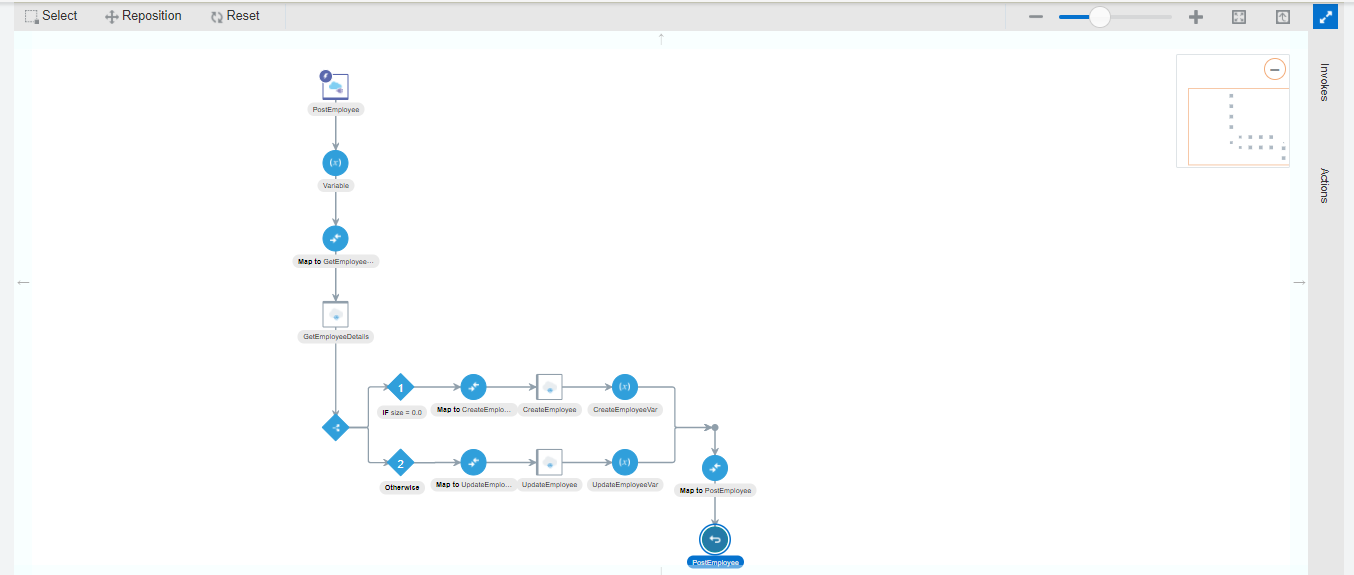
- This completes our integration and it looks like below
- Let’s activate the integration and test it using POSTMAN tool. If you don’t’ know how to activate the integration then please see Activate Integration step in the blog
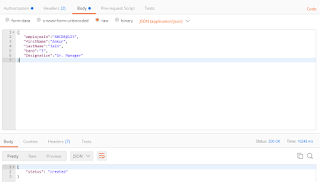
- Let’s test it using POSTMAN tool
- Open POSTMAN tool
- Enter Service end point
- Add Basic Auth as ICS service is by default secured. We need to provide ICS console credentials.
- Enter payload and hit Submit button
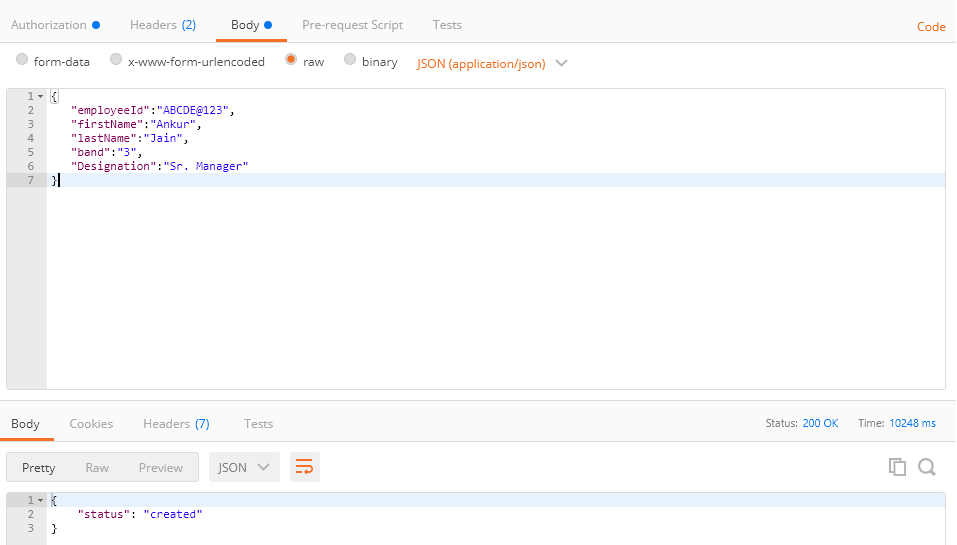
See the response, it say’s created. It means a new employee has been successfully created.
- Let’s hit the same request again and see the response
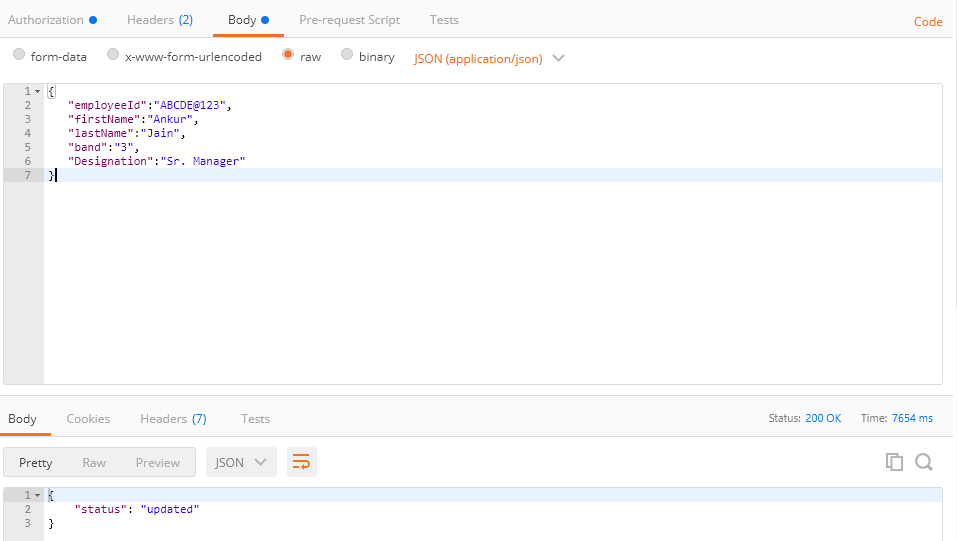
See the response, it say’s updated. It means already existing employee has been updated.

Salesforce CRM tool helps business to track customer information of your business and the tool provides the detailed information of customer activities related to your business….You provide us detailed information on the complete guidance of Salesforce CRM tool.
Regards:
Salesforce Administrator 211 Training in Chennai
Salesforce Developer 401 Training in Chennai
Thanks for sharing this blog with screenshots. It gives lots of information to me. I would like to read more about Oracle.
Oracle Training in Chennai | Oracle course in Chennai | Oracle DBA Training in Chennai
Great article! The way of this blog explanation is good. Thank you so much for gathering all this information in one post with examples, it’s very clever and will be extremely helpful for all people. Learn more about Salesforce Service Cloud for that mindmajix offering trainings on salesforce Service Cloud with live projets.
Salesforce Service Cloud training at Mindmajix
The information which you have provided is very good. It is very useful who is looking for salesforce Online Training Bangalore
Techonolgy is updated day to day
Thanks for sharing the info, Salesforce is best platform for all organisations to perfom the muliple tasks at a time
Best Salesforce Training
Best Salesforce Online Training
Salesforce Online Training
Its Very a useful post to everyone and learn AWS from best IT training institute TO register Now
Amazon web Services Training
Salesforce training in Hyderabad
Salesforce training in Hitech city
Technology is updated day to day
Thanks for sharing the information
keep posting
Salesforce training in kukatpally
Salesforce training in Madhapur
Technology is updated day to day
Thanks for sharing the information
Salesforce training in kukatpally
Salesforce training in Madhapur
Salesforce training in KPBH
Thanks for posting such a great article.you done a great job salesforce Online Training Bangalore
Good technology related post
software testing training with palcement
Great post! I am actually getting ready to across this information, It’s very helpful for this blog.Also great with all of the valuable information you have Keep up the good work you are doing well.
AWS training in chennai
I really like your post. Thanks for sharing such a valuable post. Please keep sharing such kind of post. It will be helpful for other.
best python institute in delhi
best python institute in Noida
best python institute in Gurgaon
I have been following your post for a long time. I always found it very interesting and valuable. keep posting it is really helpful.
cloud computing course in delhi
cloud computing course in Noida
cloud computing course in Gurgaon
Good contentcustomized erp solutions in india