SSL Certificate in WebLogic Server 8 – 12x
The default WebLogic Server installation uses a demo certificate to support SSL. Oracle recommends installing a certificate from a well-known third party to strengthen the security of the environment.
Below are the steps to configure SSL in WebLogic
- Create Java KeyStore (JKS) and generate key
- Generate a Certificate Signing Request (CSR)
- Send the CSR file to CA to issue the certificate
- Import Certificates (Root, Intermediate(if any) & Server)
- Configure SSL in WebLogic Server
- Change KeyStore type in WebLogic Server
- Specify path of Identity KeyStore and Trust KeyStore
- Specify Private Key Alias in WebLogic Server
- Enable SSL in WebLogic Server
- Test SSL
Create Java KeyStore (JKS) and generate key
Keytool utility is a Key and Certificate Management Tool and is available in $JAVA_HOME/bin. Before we start, set JAVA_HOME and PATH variables. For this blog, we are using Linux so use below two command to set JAVA_HOME and PATH variables
export JAVA_HOME=/usr/jdk1.8.0_171
export PATH=$JAVA_HOME/bin:$PATH
In this step, we’ll create Key Store and private key. Use below command to generate Key Store
keytool -genkey -alias <alias> -keyalg RSA -keysize 2048 -keypass <private_key_password> -keystore <keystore_name>.jks -storepass <keystore_password> -storetype pkcs12
|
Option
|
Description
|
|
genkey
|
Generate private keys
|
|
alias
|
Represent alias name of the keys
|
|
keyalg
|
Represent key algorithm. If not specified DSA algorithm will be used as default
|
|
keysize
|
Size of the private key
|
|
keypass
|
Represent the private key password
|
|
keystore
|
Used to provide keystore name
|
|
storepass
|
Used to provide keystore password
|
|
storetype
|
Used to give key store type
|
For example:
keytool -genkey -alias myweblogic -keyalg RSA -keysize 2048 -keypass welcome1 -keystore mystore.jks -storepass welcome1 storetype pkcs12
Note: When we’ll import signed certificate (issued by CA) in KeyStore then same alias myweblogic must be used.


Once we run the command, enter below information
- First Name and Last Name (CN): It should be server name for which certificate is being generated. For example (techsupper.com)
- Organization Unit (OU): Represent the Company organizational unit. For example (AnkurBlog)
- Organization (O): Represent the Organization. For example (Techsupper)
- City or Locality (L): Represent the organization city. For example (Delhi)
- State or Province (ST): State of the organization. For example (Delhi)
- Country (C): Represent of the organization country. For example (IN)
Generate a Certificate Signing Request (CSR)
Next step is to create a Certificate Signing Request (CSR).
Use the same alias (myweblogic) which was used to generate keystore (mystore.jks)
keytool -certreq -alias <alias> -keystore <keystore_name>.jks -storepass <keystore_password> -file <certificate_request>.csr
Option certreq signifies that we are generating certificate signing request (CSR) file.
For example:
keytool -certreq -alias myweblogic -keystore mystore.jks -storepass welcome1 -file myweblogiccsr.csr
mystore.jks is the kyestore which was created in the first step and welcome1 is the password which was used to create mystore.jks file
Send the CSR file (myweblogic.csr to CA to issue the certificate
Send CSR file to certifying authority to issue the certificate.
Import Certificates (Root, Intermediate(if any) & Server)
Once we receive the certificate for the server then we must import certificate of Authority issued the certificate (before importing certificate issued by CA).
- Use below command to import root certificate into Keystore file (mystore.jks)
keytool -import -trustcacerts -alias <rootcacert_alias> -keystore <keystore_name>.jks -file <rootCA_file>.crt -storepass <keyStorePassword>
For example:
keytool -import -trustcacerts -alias rootcacert -keystore mystore.jks -file AddTrustExternalCARoot.crt -storepass welcome1
- import is used to import the certificate in keystore
- trustcacerts signifies that we are importing the trusted certificate
- alias must be different as used while generating keystore file
- file AddTrustExternalCARoot.crt is the file that contains the certificate of Root Certifying Authority
- Use below command to import intermediate certificate into Keystore file (mystore.jks) if any
keytool -import -trustcacerts -alias <intermediatecacert_alias> -keystore <keystore_name>.jks -file <intermediateCA_file>.crt -storepass <keyStorePassword>
For example:
keytool -import -trustcacerts -alias intermediatecacert -keystore mystore.jks -file USERTrustRSAAddTrustCA.crt -storepass welcome1
- Finally import server certificate. Below command will be used to import the server certificate
keytool -import -alias <myAlias> -keystore <keystore_name>.jks -file <servercert>.crt -keypass <keyPassword> -storepass <keyStorePassword>
For example:
keytool -import -alias myweblogic -keystore mystore.jks -file techsupper_com.crt -keypass welcome1 -storepass welcome1
alias myweblogic should match with Alias used during generation of Key
file techsupper_com.crt is a file that contains the certificate of server issue by CA
The certificate chain has been added into the keystore file (mystore.jks). To list certificate stored in Keystore, use below command
keytool -list -v -keystore mystore.jks -storepass welcome1
Configure SSL in WebLogic Server
In this blog, we have created a trust store and identity store in the same file (mystore.jks)
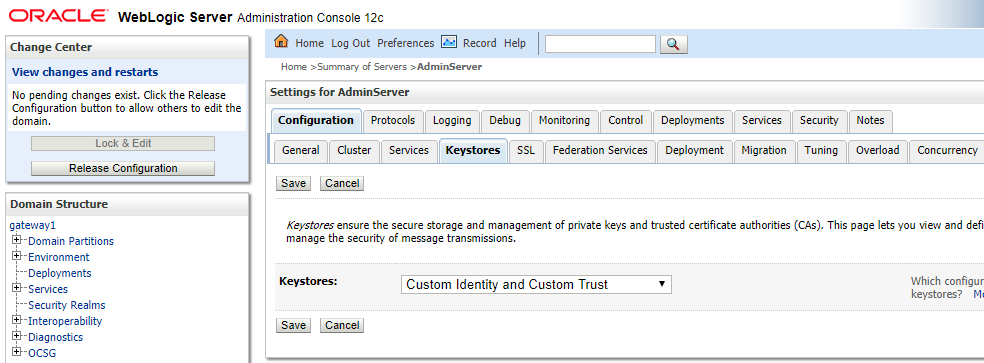
- Change KeyStore type in WebLogic Server
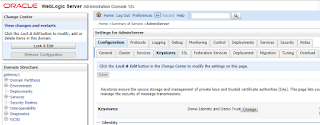
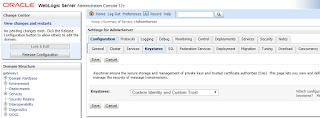
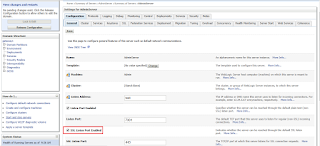
Login into the WebLogic server and navigate to Servers -> <Click on the Server on which SSL will be applied> -> Configuration -> Keystore
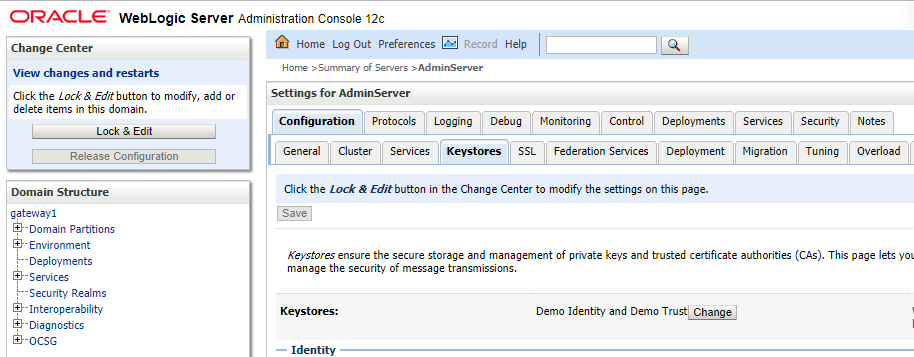
Click on Change button and select Custom Identity and Custom Trust. Once selected Click on Save button
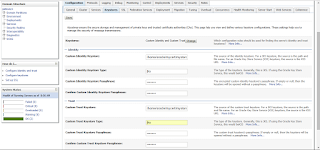
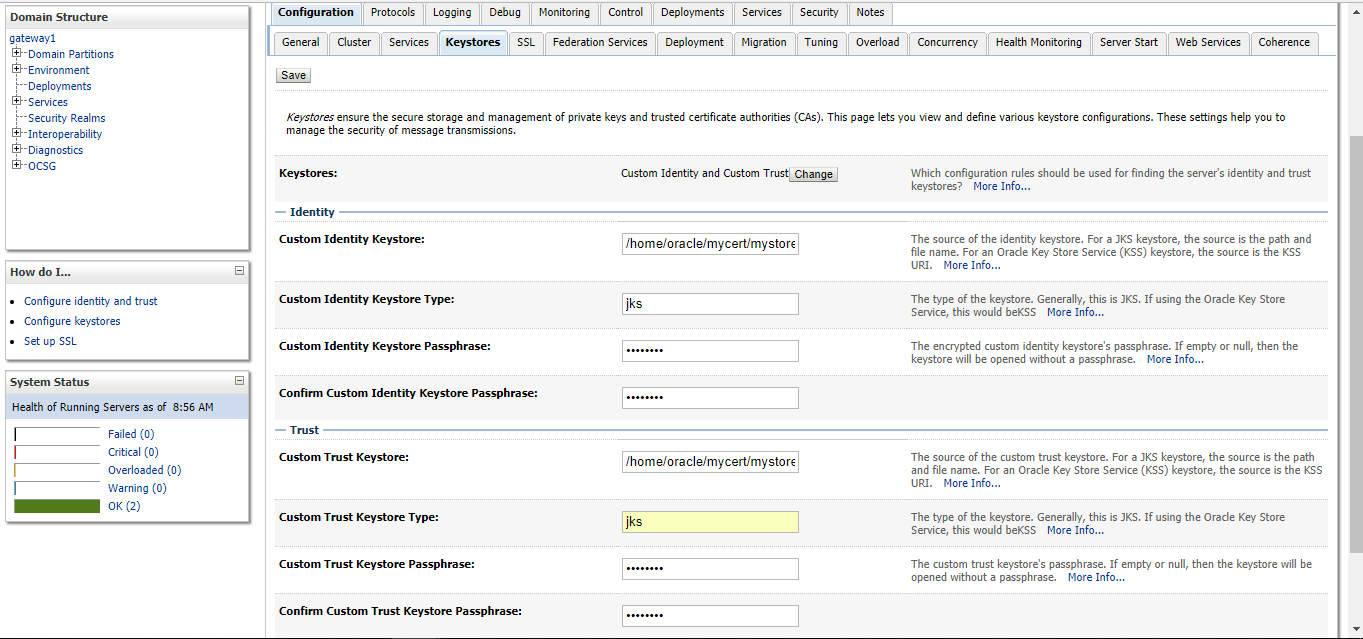
- Specify path of Identity KeyStore and Trust KeyStore
In our case Trust Store (store containing Root and Intermediate CA) and Identity Store (store containing server certificate) are same i.e. <keystore_name>.jks (mystore.jks in our case).
Again Navigate to Servers -> <Click on the Server on which SSL will be applied> -> Configuration -> Keystore tab
Enter below information and click on Save button
Custom Identity Keystore: Path of Keystore. In our case this is /home/oracle/mycert/mystore.jks
Custom Identity Keystore Type: jks
Custom Identity Keystore Passphrase: Password of Keystore. In our case this is welcome1
Confirm Custom Identity Keystore Passphrase: Password of Keystore. In our case this is welcome1
Custom Trust Keystore: Path of Keystore. In our case this is /home/oracle/mycert/mystore.jks
Custom Trust Keystore Type: jks
Custom Trust Keystore Passphrase: Password of Keystore. In our case this is welcome1
Confirm Custom Trust Keystore Passphrase: Password of Keystore. In our case this is welcome1
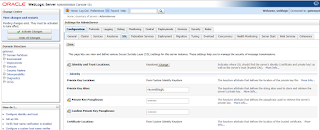
- Specify Private Key Alias in WebLogic Server
Navigate to Servers -> <Click on the Server on which SSL will be applied> -> Configuration -> SSL tab
Enter below information and click on Save button
Private Key Alias: Alias of the Private key. In our case this is myweblogic
Private Key Passphrase: Password of Private Key. In our case this is welcome1
Confirm Private Key Passphrase: Password of Private Key. In our case this is welcome1

- Enable SSL in WebLogic Server
Finally, enable SSL in WebLogic Server. Navigate to Servers -> <Click on the Server on which SSL will be applied> -> Configuration -> General
Check the SSL Listen Port Enabled checkbox

TEST SSL
Deploy sample application on Server and see the application is served on https
