Split a CSV file into multiple based on a column in OIC
When I was implementing AP Invoices FBDI Integration for one of my clients, I noticed that they were providing Invoices of all Bussiness Units in a single file, But during the FBDI process, we need to process them Business units wise. So I thought to split that single CSV file into multiple files based on the BU.
For Example: If we have n number of Business units in a single source file, then we need to create n number of files per Business Unit.
I thought to make an article around this requirement for other’s benefits, hence we are here.
Considering the source file as shown in the following screenshot has 3 types of Business Units (BU1, BU2, BU3) having multiple records for each Business Unit, so there should be three separate files each for one Business Unit.

To complete this article, you must have the following pre-requisites:
- Oracle Integration Instance
- FTP Server
You also need to create the FTP connection using the FTP adapter. Look at this blog to know how to create an FTP connection in Oracle Integration.
Let’s get started and see how to achieve this integration.
Steps to Split the file:
- Create a scheduled orchestration and provide the name Split_File_Based_on_Column
- Drag and drop the FTP adapter and use the Read a File operation. Look at this video to know, how to read the file.
- Drag and drop the Stage File action just after the FTP adapter, and configure the Write a File operation. Use the below code inside the mapper to fetch all distinct BUs.
(Use schema with a single column while configuring the Write operation)
<xsl:template match="/" xml:id="id_11">
              <nstrgmpr:Write xml:id="id_12">
                    <ns22:RecordSet>
                          <xsl:for-each-group select="$ReadFile_from_FTP/nsmpr1:SyncReadFileResponse/ns21:FileReadResponse/ns20:RecordSet/ns20:Record" group-by="ns20:BU">
                                <ns22:Record>
                                      <ns22:BU>
                                            <xsl:value-of select="ns20:BU"/>
                                      </ns22:BU>
                                </ns22:Record>
                          </xsl:for-each-group>
                    </ns22:RecordSet>
              </nstrgmpr:Write>
</xsl:template>- Again, Drag and drop the Stage File action just after the first Stage File action and configure the Read a File operation to read the distinct BU file. See this blog on how to read files using Stage File action.
- Drop a for-each action and use the repeating element from the Stage File read action.
(Since it contains only one column with a distinct BU, the loop will iterate based on the number of distinct BU available)
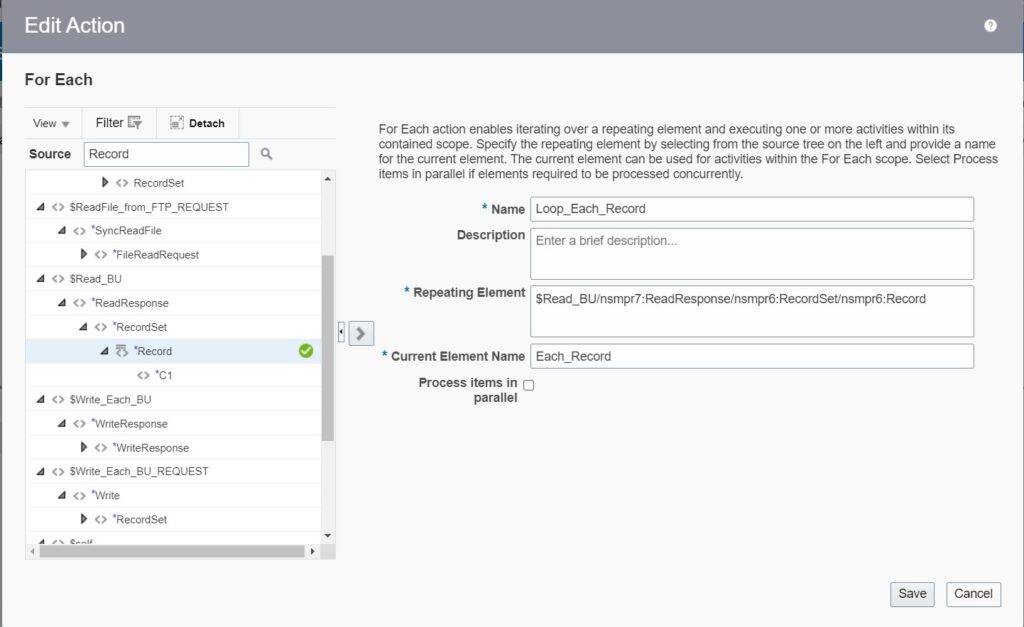
- Drag and drop an FTP connection inside this loop to write the records of each BU independently.
- Following is the XSLT code inside the Write File mapper to map the fields:
<xsl:template match="/" xml:id="id_11">
<nstrgmpr:WriteFile xml:id="id_12">
<nstrgmpr:OutboundFTPHeaderType>
<ns31:fileName>
<xsl:value-of select="concat ($Each_Record/nsmpr1:Record/nsmpr1:C1, ".csv" )"/>
</ns31:fileName>
</nstrgmpr:OutboundFTPHeaderType>
<ns33:RecordSet>
<ns33:Record xml:id="id_71">
<ns33:Name xml:id="id_85">
<xsl:value-of xml:id="id_86" select=""NAME""/>
</ns33:Name>
<ns33:Emp_ID xml:id="id_87">
<xsl:value-of xml:id="id_88" select=""EMP_ID""/>
</ns33:Emp_ID>
<ns33:BU xml:id="id_89">
<xsl:value-of xml:id="id_90" select=""BU""/>
</ns33:BU>
<ns33:Salary xml:id="id_91">
<xsl:value-of xml:id="id_92" select=""Salary""/>
</ns33:Salary>
<ns33:Location xml:id="id_93">
<xsl:value-of xml:id="id_94" select=""Location""/>
</ns33:Location>
</ns33:Record>
<xsl:for-each xml:id="id_73" select="$ReadFile_from_FTP/nsmpr2:SyncReadFileResponse/ns26:FileReadResponse/ns25:RecordSet/ns25:Record[ns25:BU=$Each_Record/nsmpr1:Record/nsmpr1:C1]">
<ns33:Record xml:id="id_74">
<ns33:Name xml:id="id_75">
<xsl:value-of xml:id="id_76" select="ns25:Name"/>
</ns33:Name>
<ns33:Emp_ID xml:id="id_77">
<xsl:value-of xml:id="id_78" select="ns25:Emp_ID"/>
</ns33:Emp_ID>
<ns33:BU xml:id="id_79">
<xsl:value-of xml:id="id_80" select="ns25:BU"/>
</ns33:BU>
<ns33:Salary xml:id="id_81">
<xsl:value-of xml:id="id_82" select="ns25:Salary"/>
</ns33:Salary>
<ns33:Location xml:id="id_83">
<xsl:value-of xml:id="id_84" select="ns25:Location"/>
</ns33:Location>
</ns33:Record>
</xsl:for-each>
</ns33:RecordSet>
</nstrgmpr:WriteFile>
</xsl:template>After completing all the steps, the integration designer will look like as per the below screenshot:

Finally, enable business identifiers, activate the integration, and test the flow which should give you the desired result.
That’s all about this article.
Also, please subscribe to our YouTube channel to get the latest updates.
Further References


