Read CSV/Excel and insert data to business objects in Oracle Visual Builder
This article demonstrates how to read CSV/Excel file data and push it into Oracle Visual Builder Business Objects.
Following are the steps involved in the complete use case:
- Creation of a Business Object and required fields
- File Picker component to upload file
- Adding event for File Picker component
1. Creation of Business object and required fields
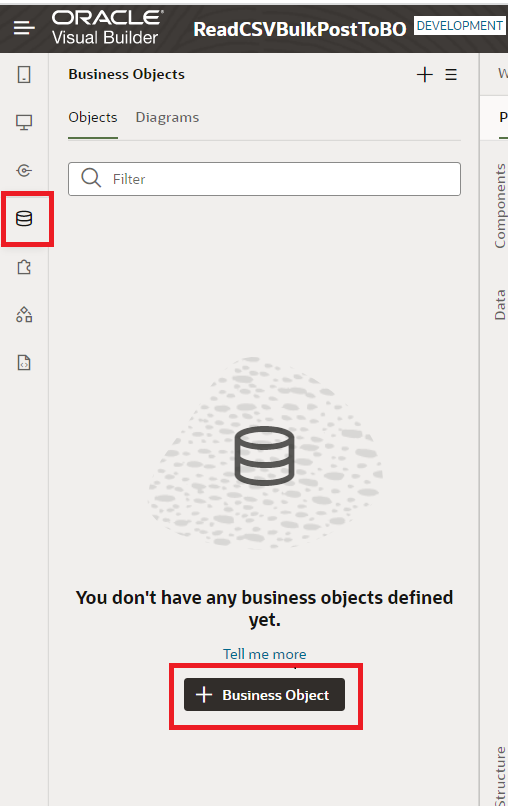
- Go to Business Objects in the Navigator and click on + Business Object.
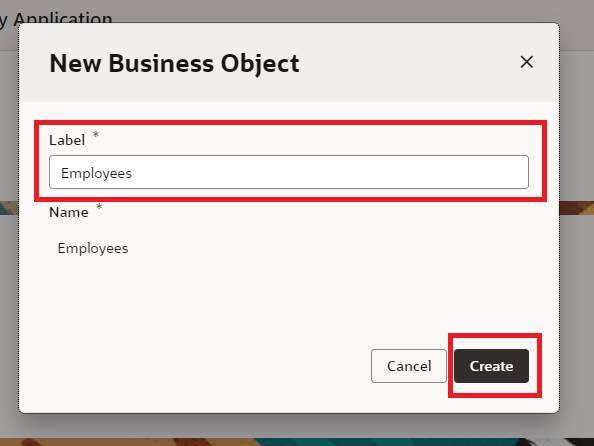
- Enter the Label of the business object and click on Create.
- Once the business object is created, go to the fields tab and there we can see some fields already created for us. We have to add the fields based on our requirements.
To add a field, click on the “ +” icon and when we click on that a popup opens where we need to specify the field name and the respective data type and then click on Create Field button.
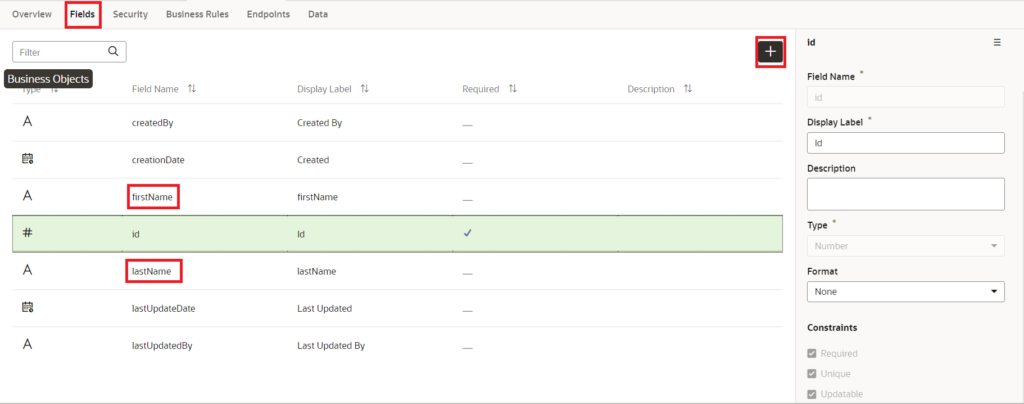
I have created two fields in the Employee Business Objects with the following Label:
- First Name
- Last Name
2. File Picker component to upload file
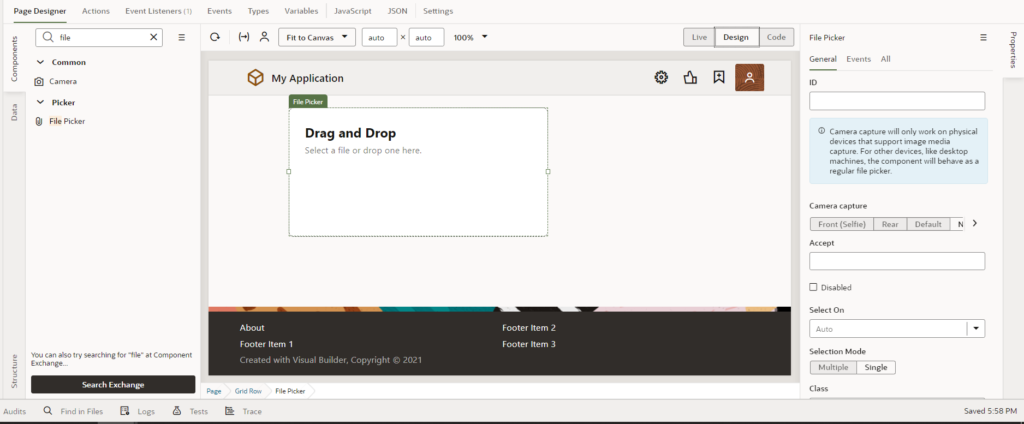
- Open the web page where you want to use the drop the File Picker component.
- Drag and drop the File Picker component from the component on the designer as shown in the following screenshot:
3. Adding event for File Picker component
The event will be triggered when you select any file using the File Picker component. The following are the steps to generate the event:
Select the file picker component in the design pane to see the Events tab in the properties panel.
- Select the File Picker component in the design pane
- Go to the Events tab under properties from the right panel, click on + New Event and select “On Selected Files” event.
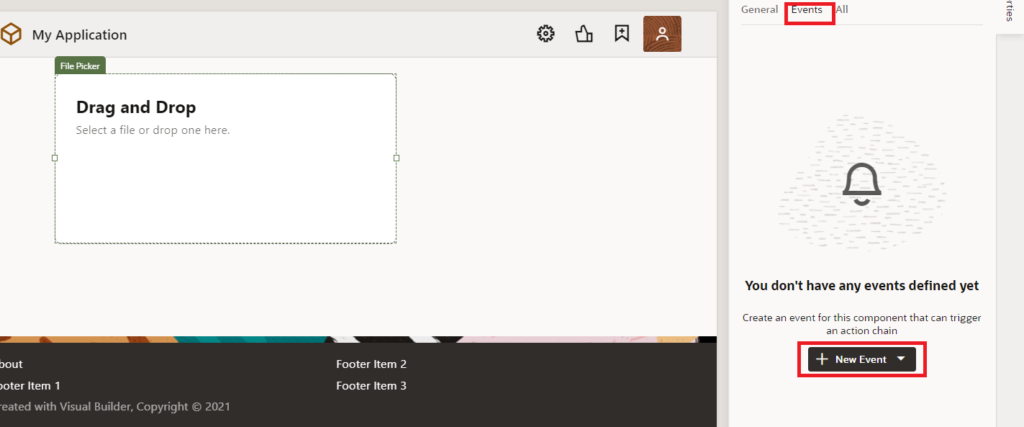
The previous action will create an action chain.
We’ll configure the following actions in the action chain:
- Process the file to get the CSV/Excel data
- Convert the CSV/Excel data to JSON format
- Prepare the JSON payload for post request
- Push the prepared JON payload to the Business Object
1. Process the file to get the CSV/Excel data
To Process the binary file, the following JavaScript function is written on the page:
  PageModule.prototype.processFile = function (fileSet) {
    var reader = new FileReader();
    return new Promise(function (resolve, reject) {
      var reader = new FileReader();
      reader.onloadend = function (e) {
        var data = e.target.result;
        var workbook = XLSX.read(data, { type: 'binary' });
        var first_worksheet = workbook.Sheets[workbook.SheetNames[0]];
        var jsonArr = XLSX.utils.sheet_to_json(first_worksheet, { header: 1 });
        resolve(jsonArr);
      };
      reader.readAsBinaryString(fileSet[0]);
    });
  };
This js will work only when we import the xlsx library into the application by adding this code snippet in index.html
<script src = "https://cdnjs.cloudflare.com/ajax/libs/xlsx/0.16.0/xlsx.full.min.js"></script>In the action chain, drag and drop the Call Function action, and call the processFile function.
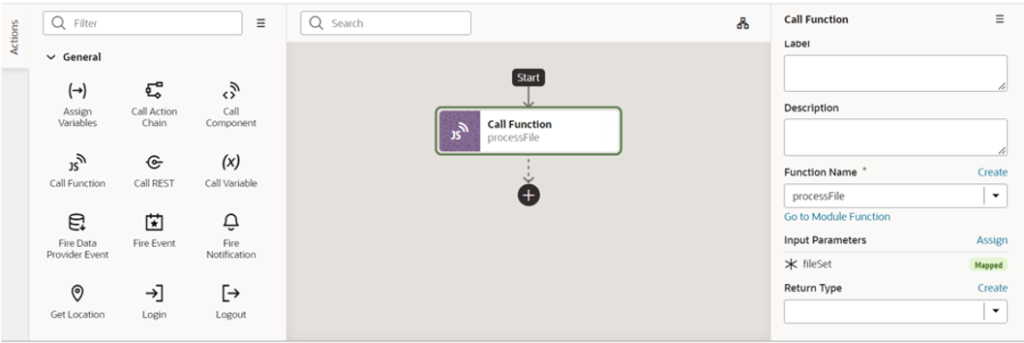
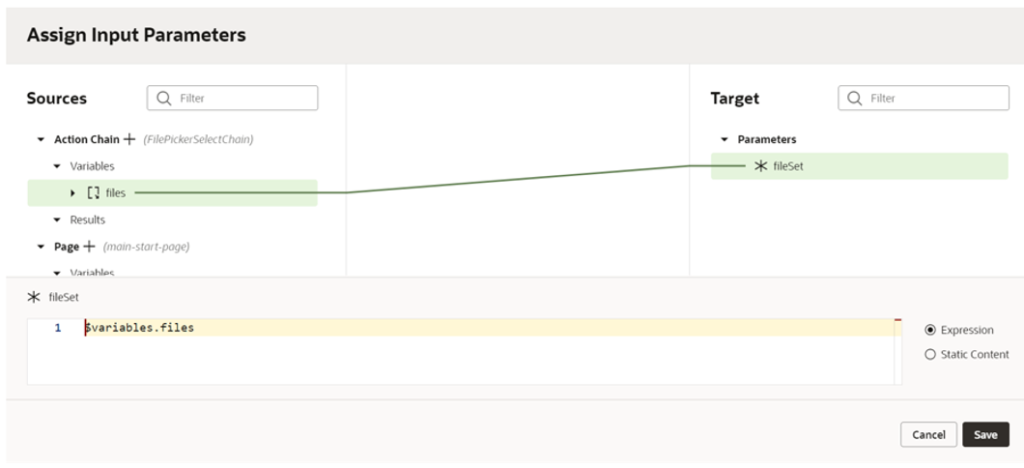
Map the files to the fileSet as shown in the following screenshot:
2. Convert the CSV/Excel data to JSON format
Once the CSV file data is fetched we need to convert that to JSON format. For that we need to create a module function that will be taking the CSV file data as an input parameter and the mapping will be as follows.
 PageModule.prototype.populateData = function (jsonArr) {
    var data = jsonArr;
    var objData = [];
    for (var i = 1; i < data.length; i++) {
      objData[i - 1] = {};
      for (var k = 0; k < data[0].length && k < data[i].length; k++) {
        var key = data[0][k];
        objData[i - 1][key] = data[i][k];
      }
    }
    var Json = objData;
    return Json;
  };
In the action chain, drag and drop the Call Function action, and call the populateData function.
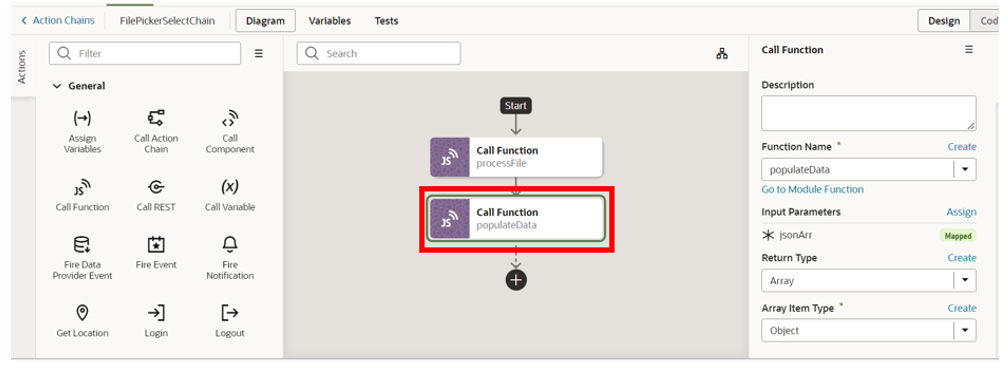
Map the response from the processFile to the jsonArr as shown in the following screenshot:

3. Prepare the JSON payload for post request
To push the JSON converted CSV file data, we need to prepare the JSON payload along with the path, operation, and data in the js module function.
PageModule.prototype.batchpost = function (payload) {
console.log(payload);
var boPath = "/Employees";
var boOp = "upsert";
var data = payload;
return {
parts: data.map((r, idx) => {
return {
id: `part-${idx}`,
operation: boOp,
path: boPath,
payload: r
};
})
};
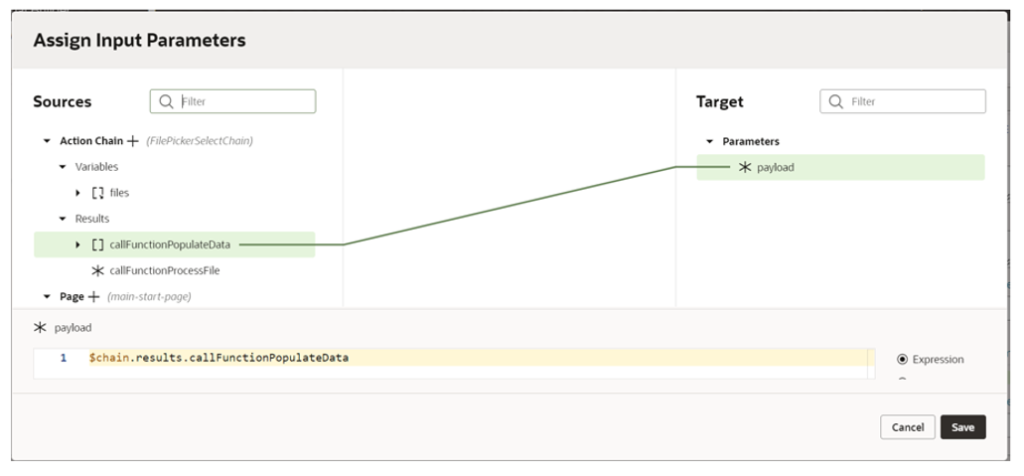
};In the action chain, drag and drop the Call Function action, and call the batchpost function.
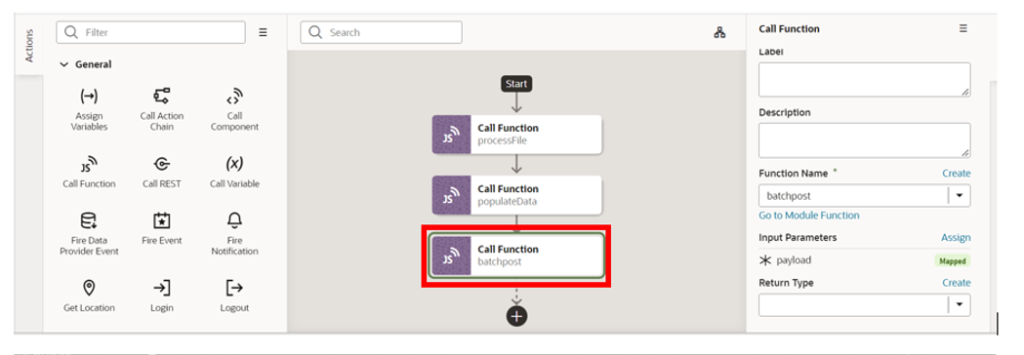
Map the response from the populateData to the payload as shown in the following screenshot:
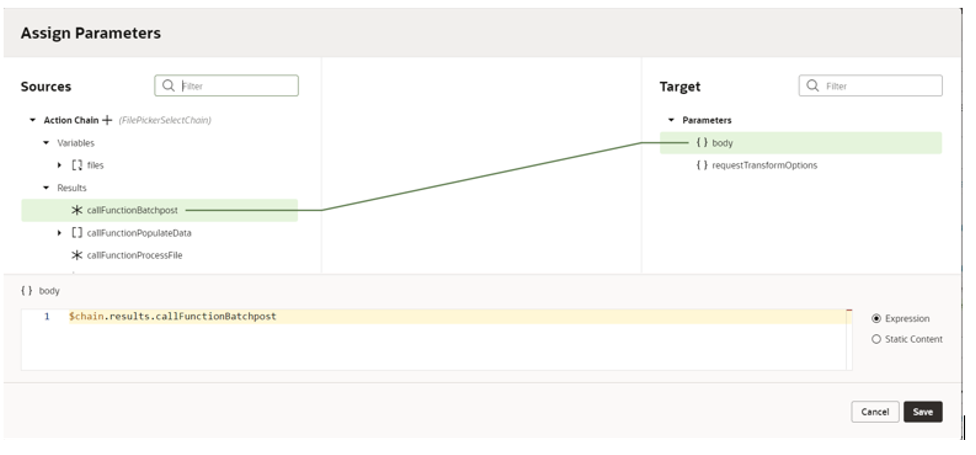
4. Push the prepared JON payload to the Rest Service
After Preparing the JSON payload, drag and drop the call REST action in the action chain and select the POST service from the available endpoints. Make sure that we are setting content type as application/vnd.oracle.adf.batch+json.
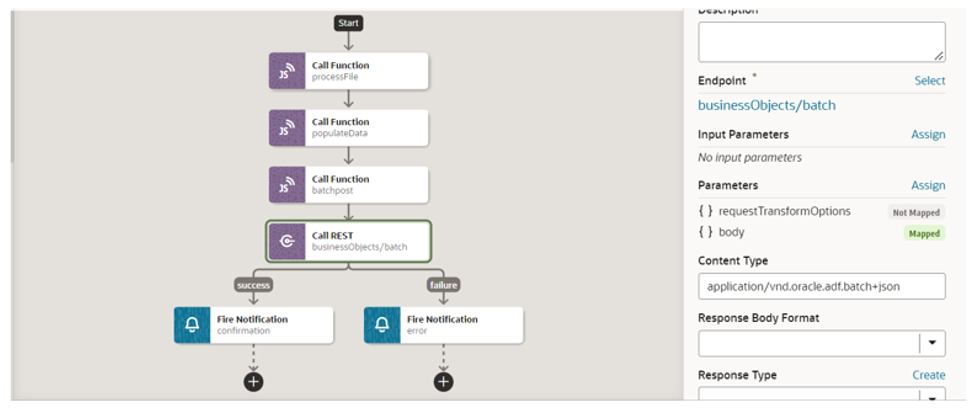
The response from batchpost function should be mapped to the body as shown in the following screenshot:
Now all the required configuration is completed. Let’s test this. Run the page, and select the file using the File Picker component.
Open the BO and see the CSV/Excel data should be inserted into this.
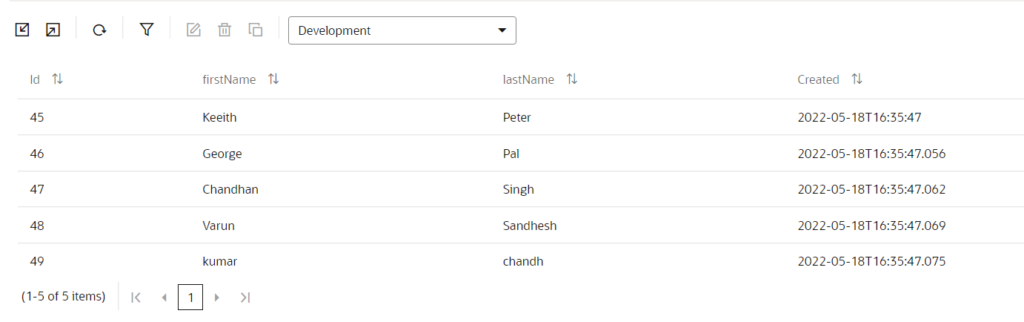
This is how we can post CSV/Excel data to BO in Oracle VB.
If you liked the article, please like, comment, and share.
Please look at my YouTube channel for Oracle Integration-related videos and don’t forget to subscribe to our channel to get regular updates.
Further Readings
Scheduled parameters to maintain Last Run Date Time in Oracle Integration
How to Customize the Lock Screen in Oracle Visual Builder
Merging two CSV files into a single file in Oracle Integration
ERP Integration using File Based Data Import: Oracle Integration


