Fetch tables dynamically using Axios in Oracle Visual Builder
In this article, we are demonstrating how to display tables dynamically using a third-party js library Axios in Oracle Visual builder.
Axios is a third-party library that is a promised-based HTTP client for JavaScript. It has the ability to make HTTP requests from the browser and handle the transformation of request and response data.
Usually, we use Service Connections or business objects to show data in a table in Oracle Visual Builder but now we are using these Axios calls to get the response from the ORDS rest services and populate the table with data.
In this article, I am going to show two tables dynamically and they are:
- Employees
- Departments
Following are the steps to display tables dynamically:
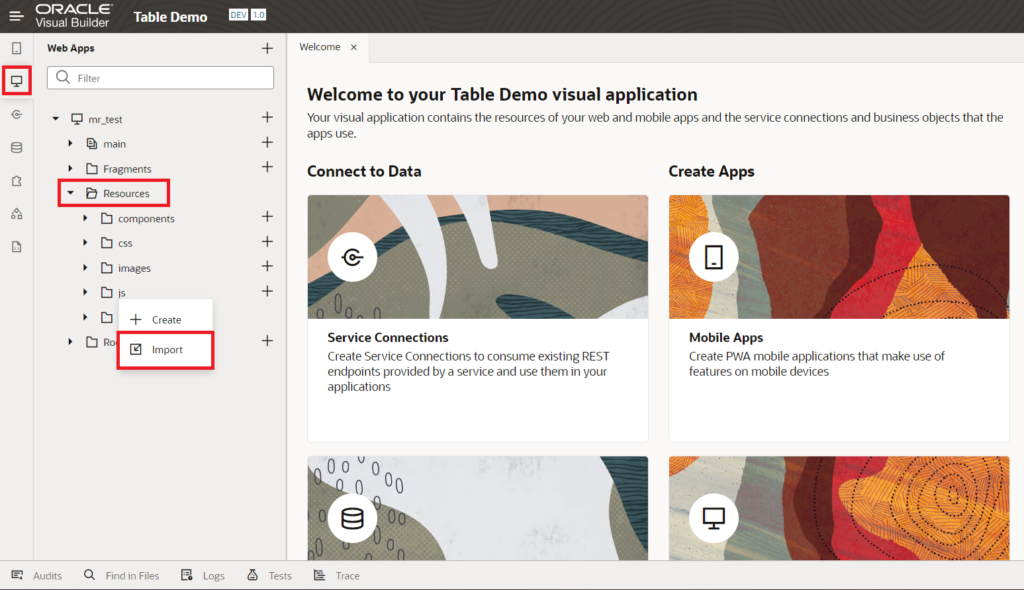
- Import Axios library in the Visual Builder application
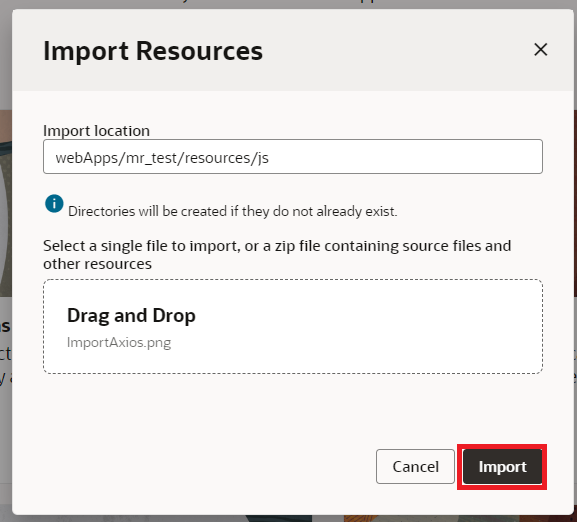
After Creating a web application go to the Resource, right-click on the JS, and select the Import option. Then a popup will open which will allow you to import the library from your local system to the VBCS application. After selecting the file click on Import.
Download the Axios library using this link.
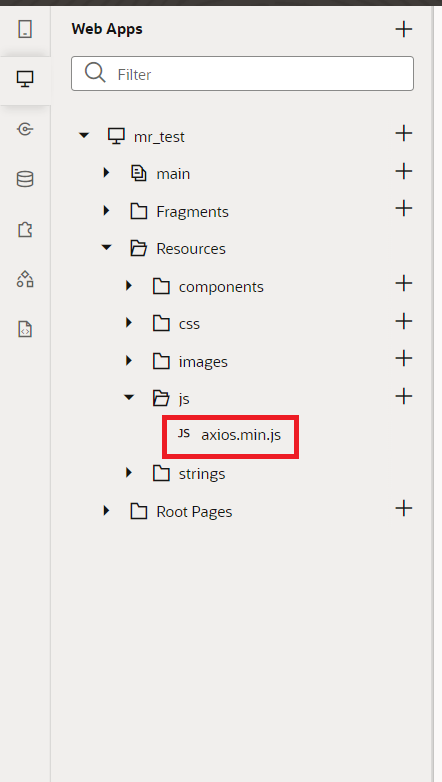
In order to make use of the Axios library in the module function, import the Axios file into the javascript tab by adding the following piece of code in the define block as shown in the below screenshot:

With this, Axios is imported into our VBCS application successfully.
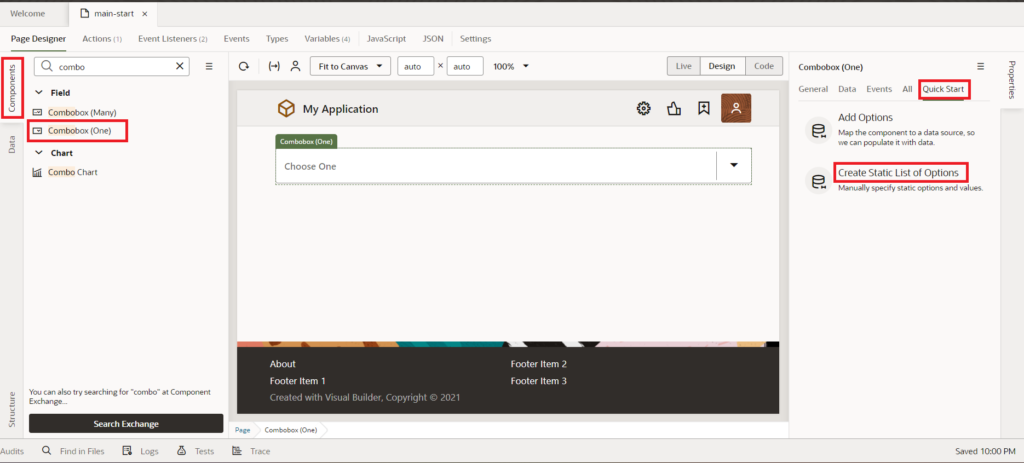
- Adding the selection component to the page
We need to use a selection component to allow the user to select the table of his choice that he wishes to see on the screen. I am taking a Combobox component since I am using static options. Select the Combobox in the component pallet and drag it to the design area. To add the options, Click on Quick Start and select Create Static List of Options.
Then we will see a popup opened which allows us to add labels and values to the options. Therefore, I am providing labels as Employees, Departments, and values as Employees Rest Service URL and Department Rest Service URL as shown in the below screenshot:
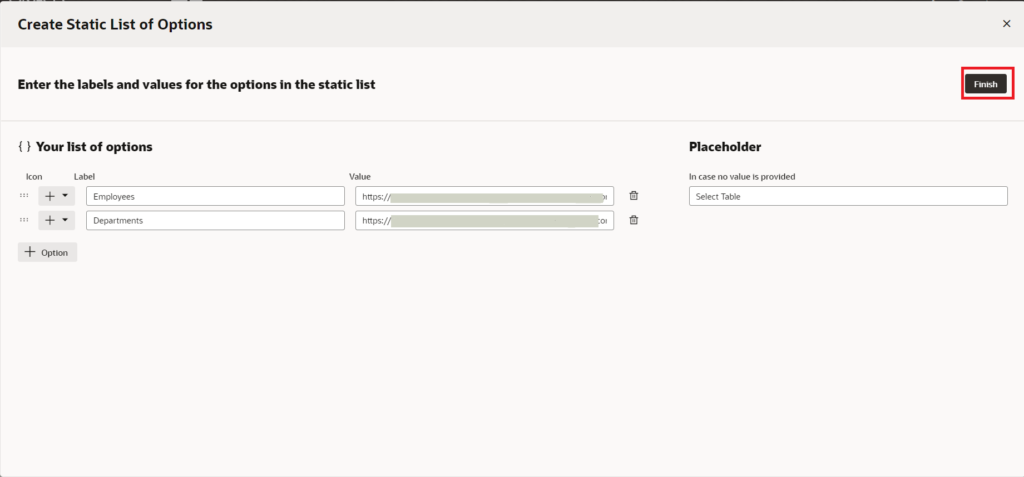
After adding the labels and values click on Finish. With this, adding Selection Component is done.
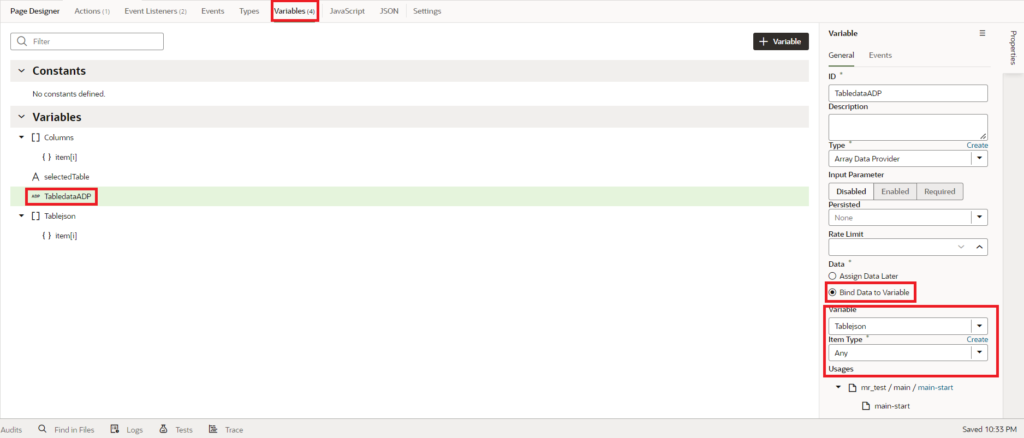
- Creating Variables
In this step, we are going to create the variables for the Combobox that we have created on the page. As discussed above, we are displaying the tables dynamically, so we are not giving the headers, columns, and fields in a static way instead we are adding variables for the data provider, and columns of the table.
For this go to the variables tab and click on + Variable to create variables
So the variables being created in this step are:
- selectedTable – String type for the Combobox
- columns – Array type for table columns and
- Tablejson – Array type which will be bound to TabledataADP for the data provider
as shown in the below screenshot:
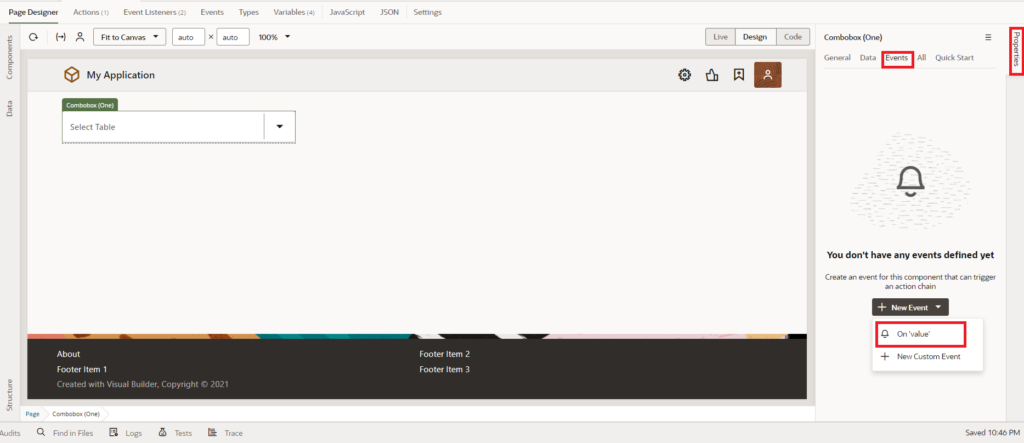
- Adding Action chain to fetch the table data
When the user selects a value (Employees or Departments) in the selection component then an action chain should be triggered and the data should be fetched accordingly. To do this, we need to add an action chain to the selection component as follows.
In the properties pane, click on Events and select on-value action from the drop-down menu.
We’ll configure the following actions in the action chain:
- Retrieve Response from the rest service and segregate columns and JSON
- Columns Array generation
- Assign Variables
- Retrieve Response from the rest service and segregate columns and JSON
To retrieve the response from the rest service, the following JavaScript function is written on the page:
    async retrieveJson(url) {
      const data = {
        "columns": [],
        "data": []
      };
      var config = {
        method: 'get',
        url: url
      };
      await axios(config)
        .then(function (response) {
          var array = [];
          for (var i in response.data.items) {
            var key = i;
            var val = response.data.items[i];
            for (var j in val) {
              var sub_key = j;
              var sub_val = val[j];
              console.log(sub_key);
              array.push(sub_key);
            }
          }
          data.columns = array;
          data.data = response.data.items;
        })
        .catch(function (error) {
          console.log(error);
        });
      return data;
    };
In the action chain, drag and drop the Call Function action, and call the retrieveJson function.
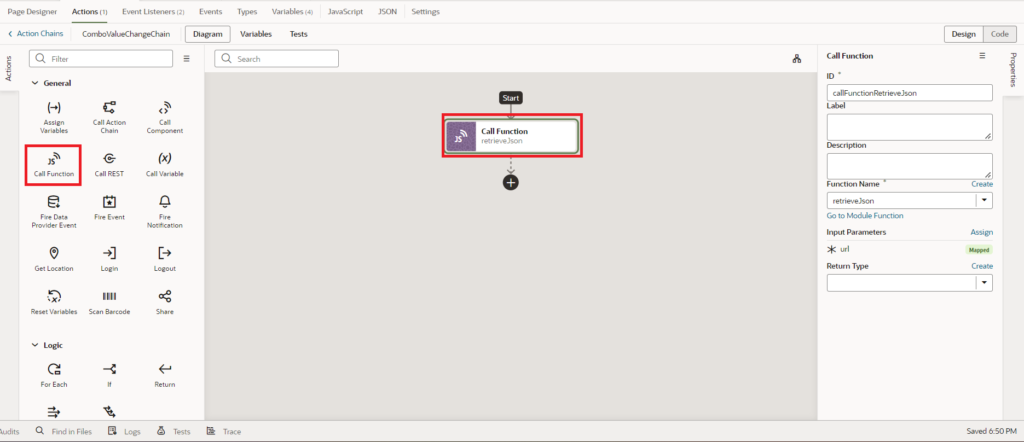
Map the selectedTable to the URL as shown in the following screenshot:

- Columns Array generation
Once the columns and the JSON data are segregated we are checking for duplicates and get the unique keys which we are making use of as columns of the table.
    async columnsArrayGenerator(columnsArray) {
      var columns = [];
      var uparray = columnsArray.filter((item, index) => columnsArray.indexOf(item) === index);
      for (let k = 0; k < uparray.length; k++) {
        if (uparray[k] === "links") {
          console.log("links");
        } else {
          let obj = {
            "headerText": uparray[k],
            "field": uparray[k]
          };
          columns.push(obj);
        }
      }
      return columns;
    }
In the action chain, drag and drop the Call Function action, and call the columnsArrayGenerator function.
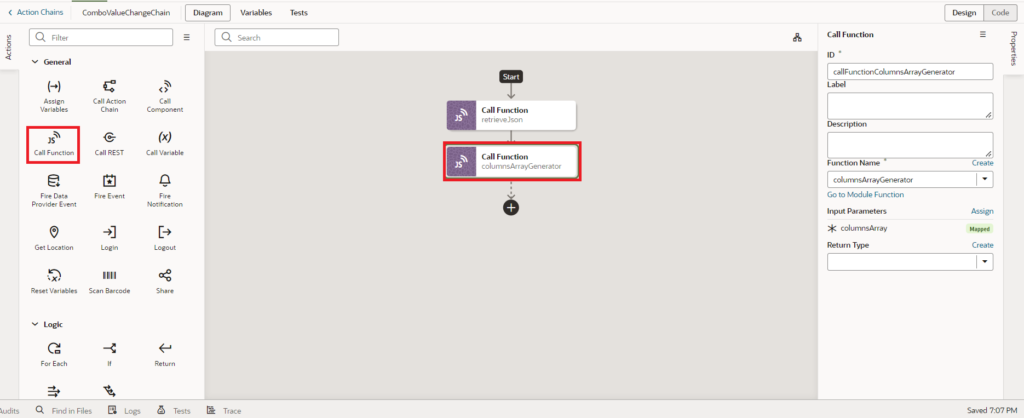
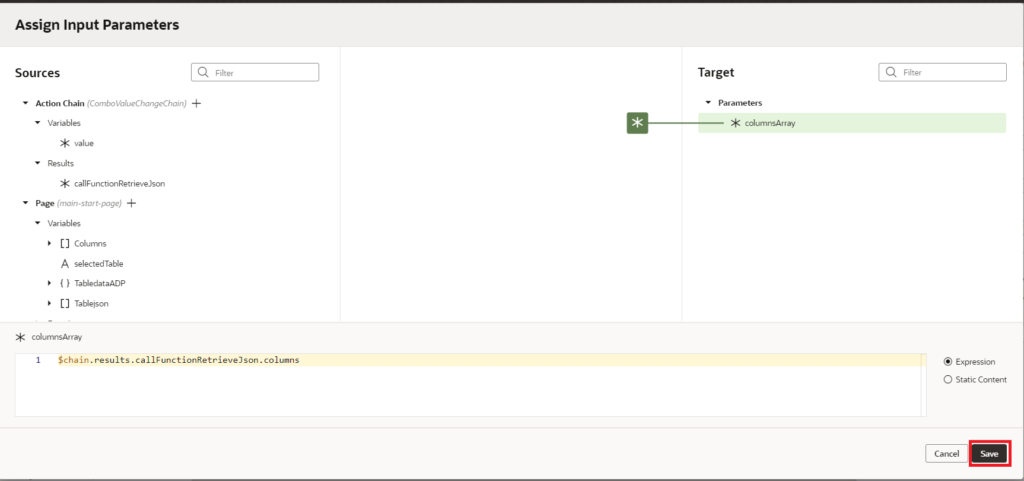
Map the response from the retrieveJson to the columnsArray as shown in the following screenshot:
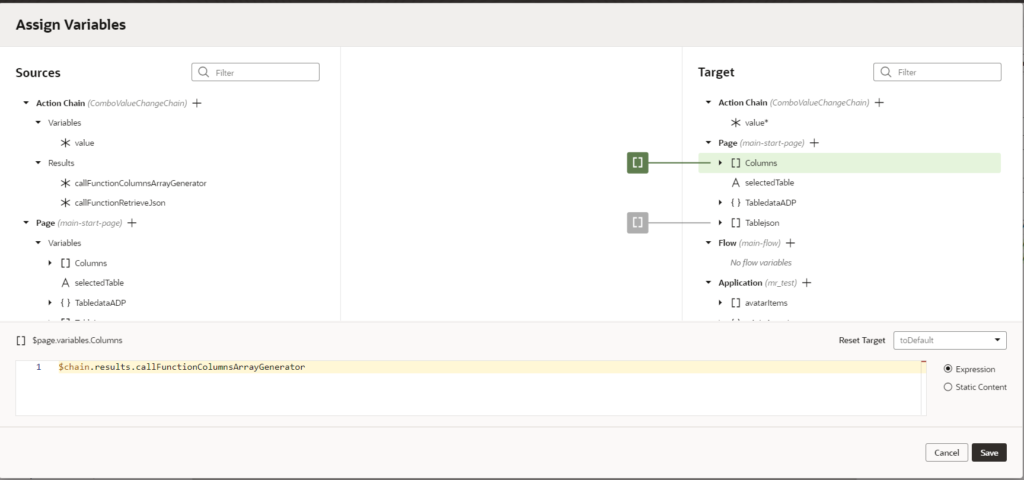
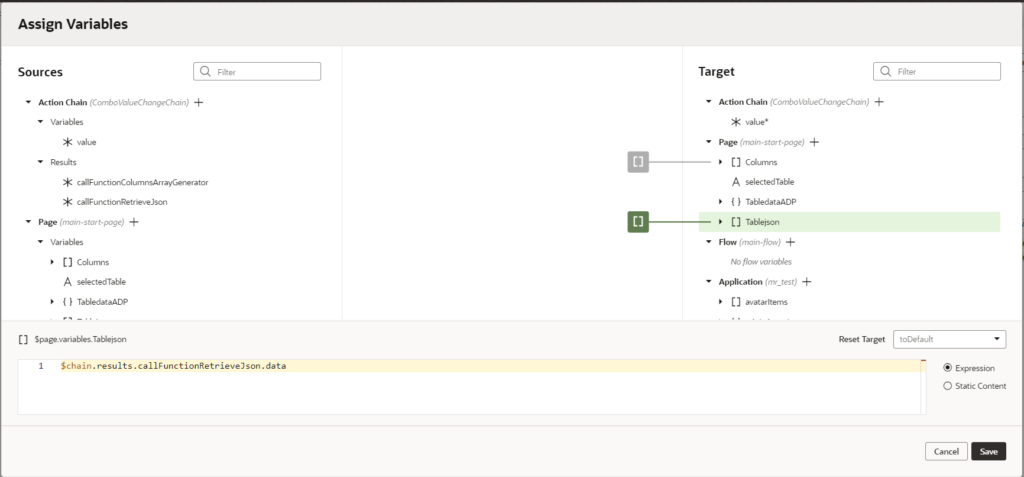
Map response from columnsArrayGenerator to Columns as shown in the screenshot below:
Map response from retrieveJson to TableJson as shown in the screenshot below:
With this, we are done with the configuration of actions to generate the JSON data from the rest service and get the columns of the table.
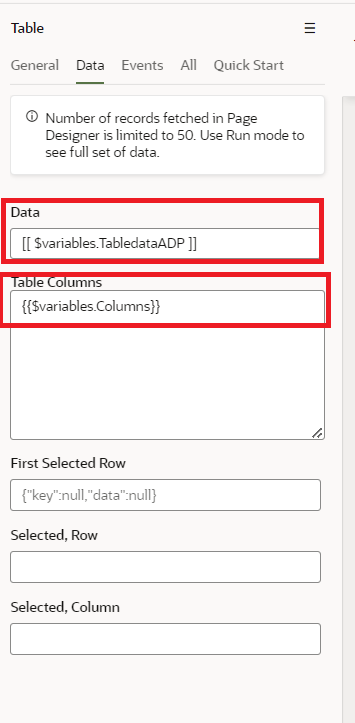
Now go to the design area, drag and drop a table from the component pallet. To add the variables to the table go to the properties pane and select the TabledataADP for Data and the Columns for the Table Columns as shown in the screenshot below.
Now we can go test the functionality and the final output is shown in the below screenshot:
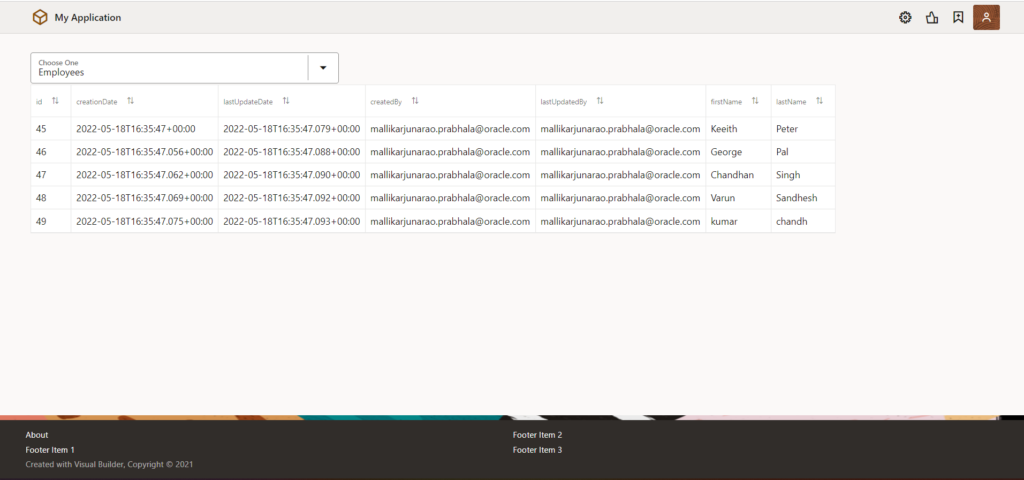
This is how you can show a table dynamically using Axios.
If you liked the article, please like, comment, and share.
Please look at my YouTube channel for Oracle Integration-related videos and don’t forget to subscribe to our channel to get regular updates.
Further Readings
Scheduled parameters to maintain Last Run Date Time in Oracle Integration
How to Customize the Lock Screen in Oracle Visual Builder
Merging two CSV files into a single file in Oracle Integration
ERP Integration using File Based Data Import: Oracle Integration


