
Hide and Show columns in Oracle Visual Builder table
In this article, I am demonstrating how to work with a table and play around with its Columns in Oracle Visual Builder.
Typically a table might have n of columns and the requirement might be to show all the columns coming out from the response of the Rest service. It may fill the screen with many columns and the user has to scroll left or right to see the required data.
In this demonstration, I am going to give the steps to provide an option that will allow the user to select the required columns of his choice to see on the screen and the rest of the columns can be hidden but those will be persisting in the device.
Following are the steps to implement the use case:
-
- Create a VB application along with a web application.
- Create a Students Business object with the following fields:
- Student Name
- Class
- Marks
- Grade
- Go to the Data tab and click on + Row to add some rows to Business Object.
For more detail on the creation of Business Objects please refer to our antecedent blog which includes the steps to create Business Objects.
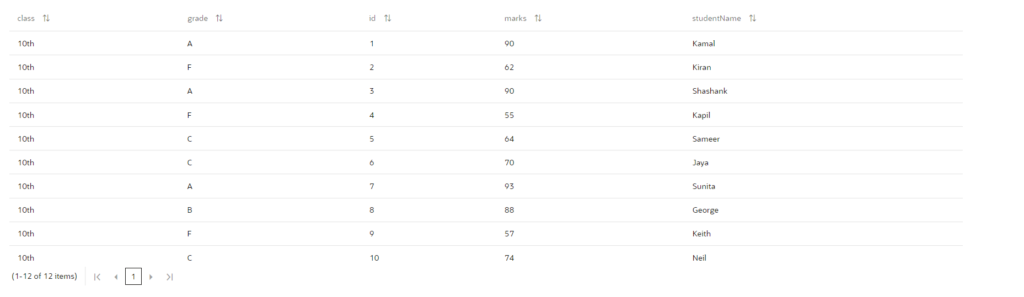
Inserted a couple of records for student data with different grades such as A, B, C, and F as shown in the following screenshot:
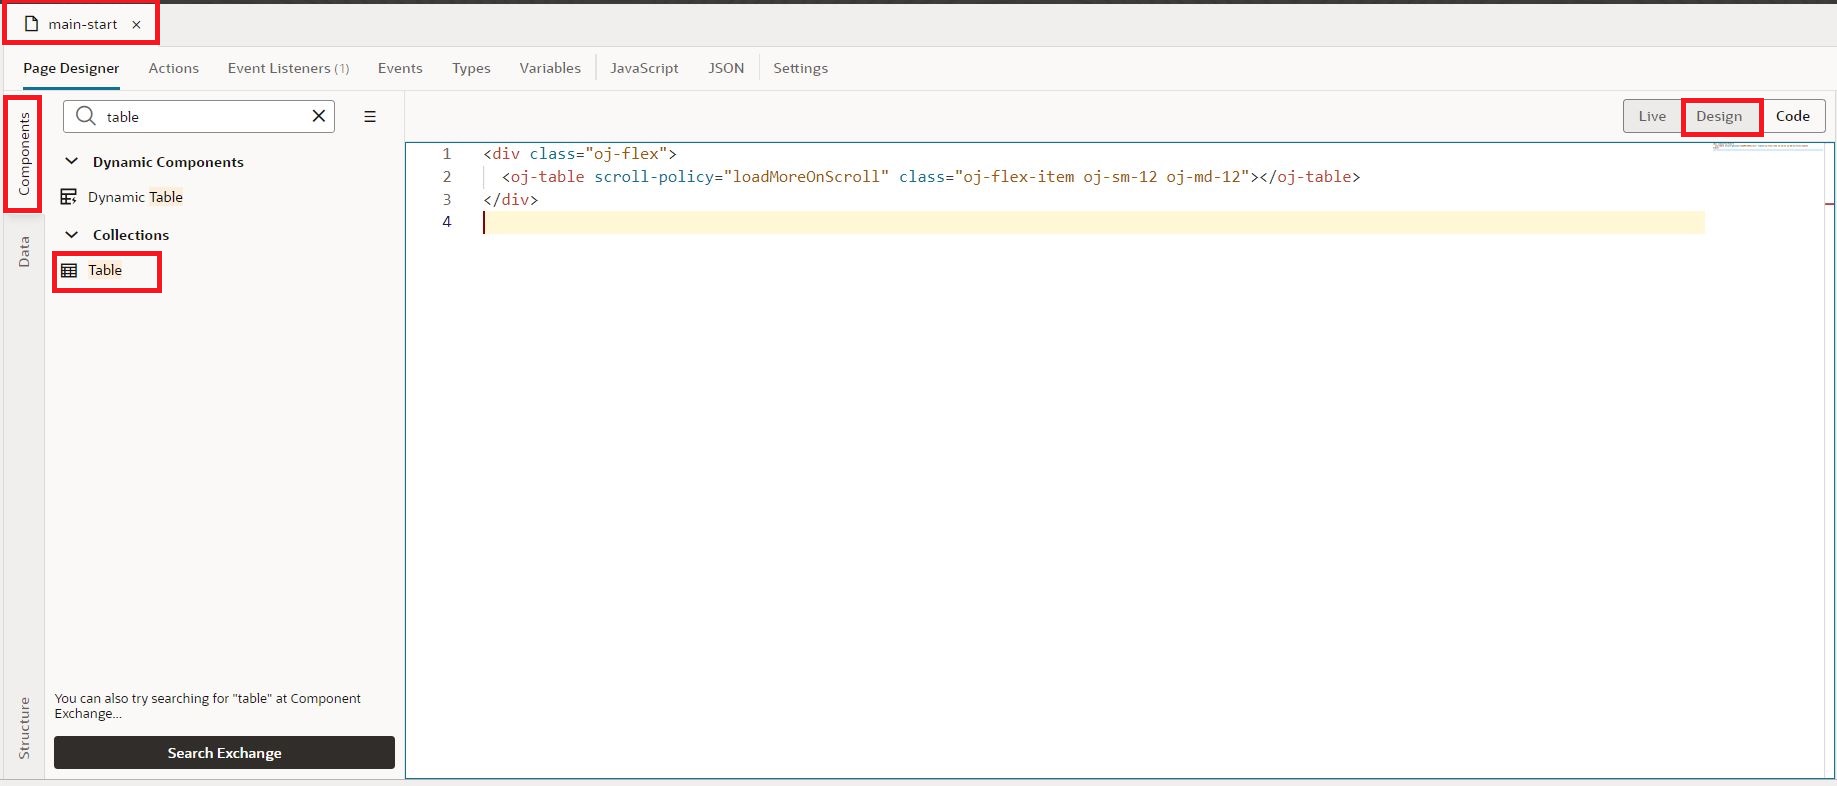
- click on main-start, switch to the Designer tab, and drag and drop a table from the component pallet to the Design area as shown in the following screenshot.
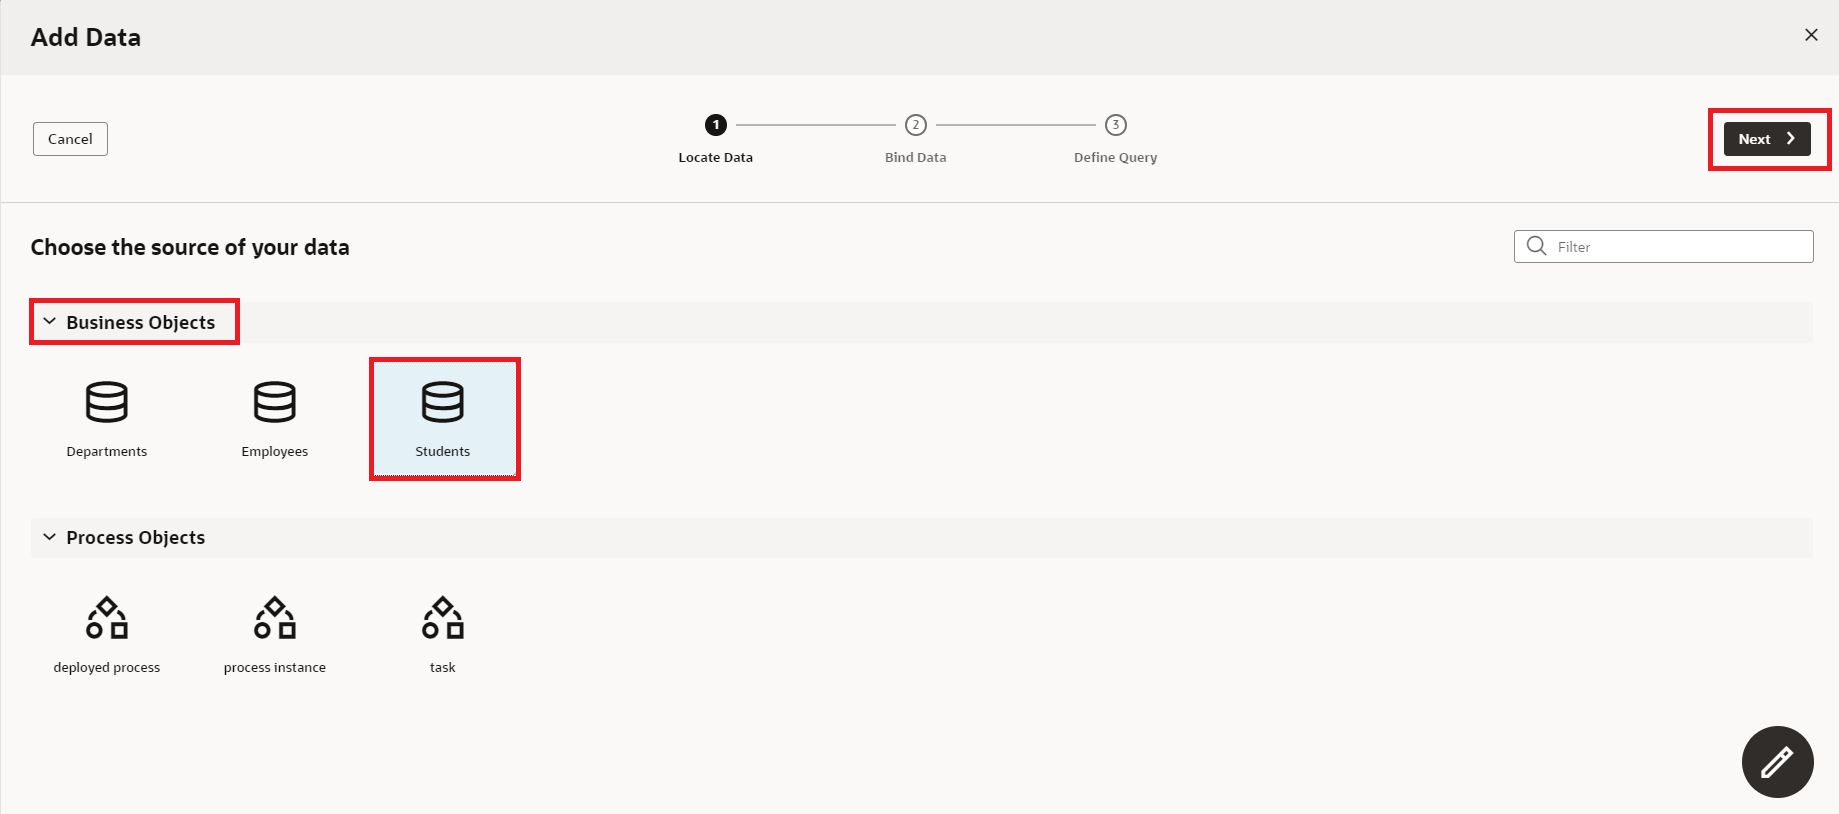
3. In the properties of the table Switch to Quick Start and click on Add Data which will open all the available data sources from which we need to select Students Bo under Business Objects Section and click on the Next button as shown in the following screenshot: 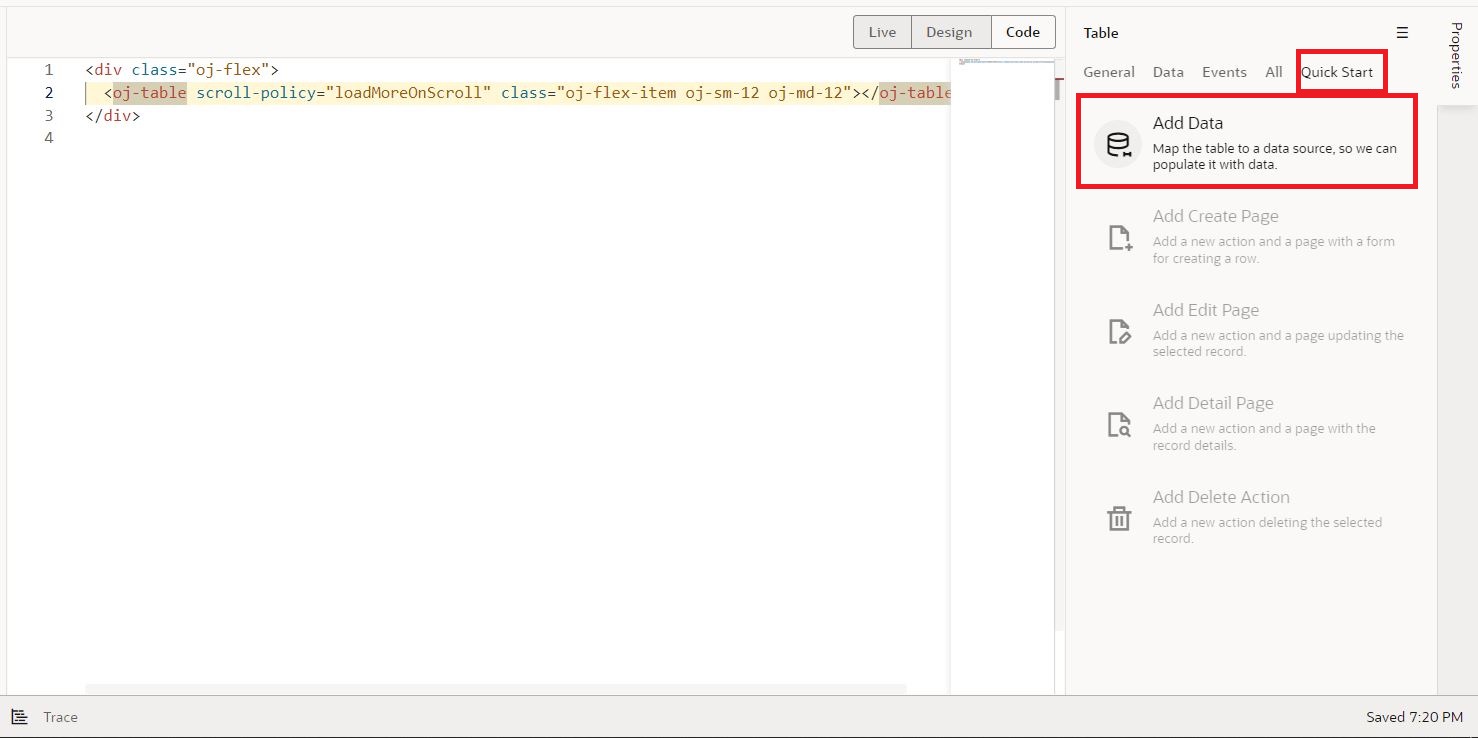
4. Select all the required Columns followed by clicking on the Finish button. 
With this, we are done with the table configuration and the table looks as shown in the following screenshot: 
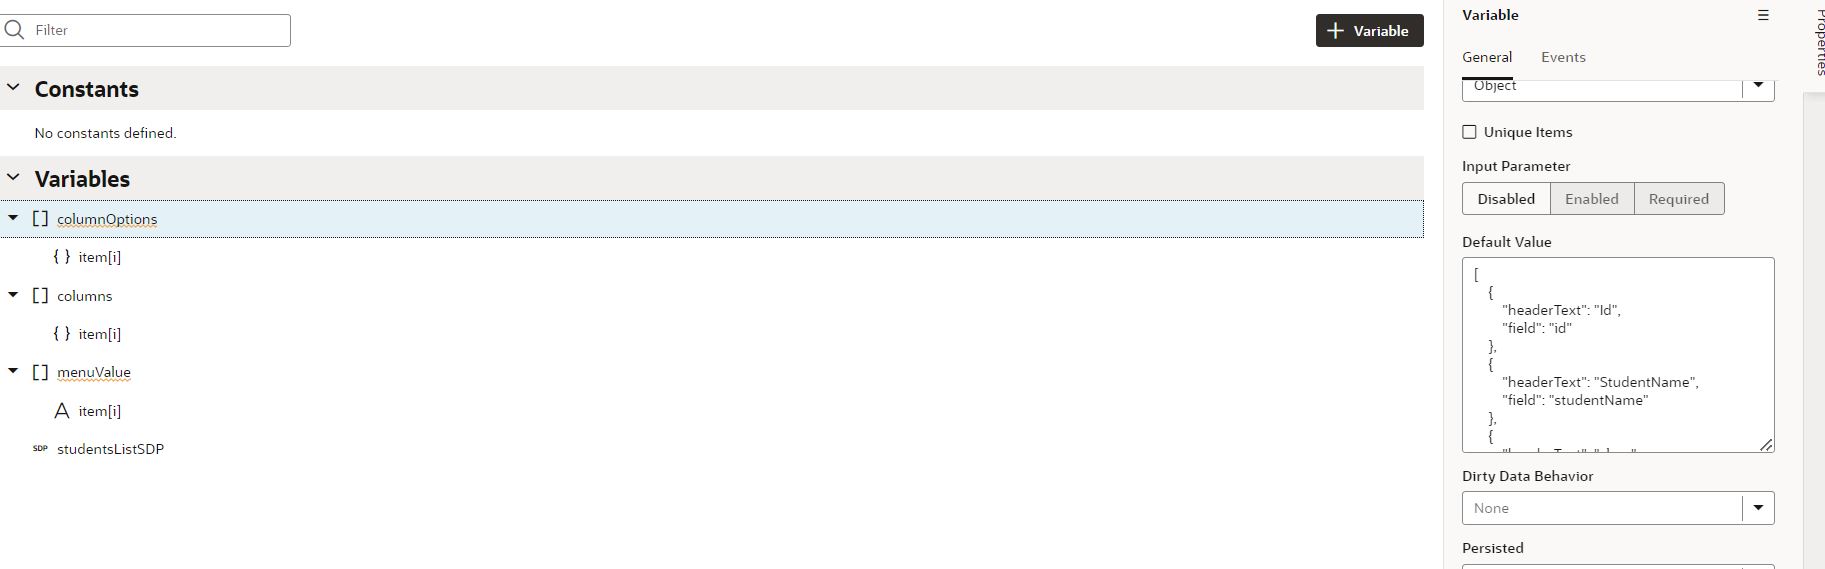
5. Now to make the column selection, we need to create variables to hold all the columns, another variable to hold the selected Columns, and another variable to update the table columns using an event. So click on the Variables tab in the main-start and create 3 variables namely columns, columnOptions of Array of Objects, and menuValueof Array of String type as shown in the following screenshot.

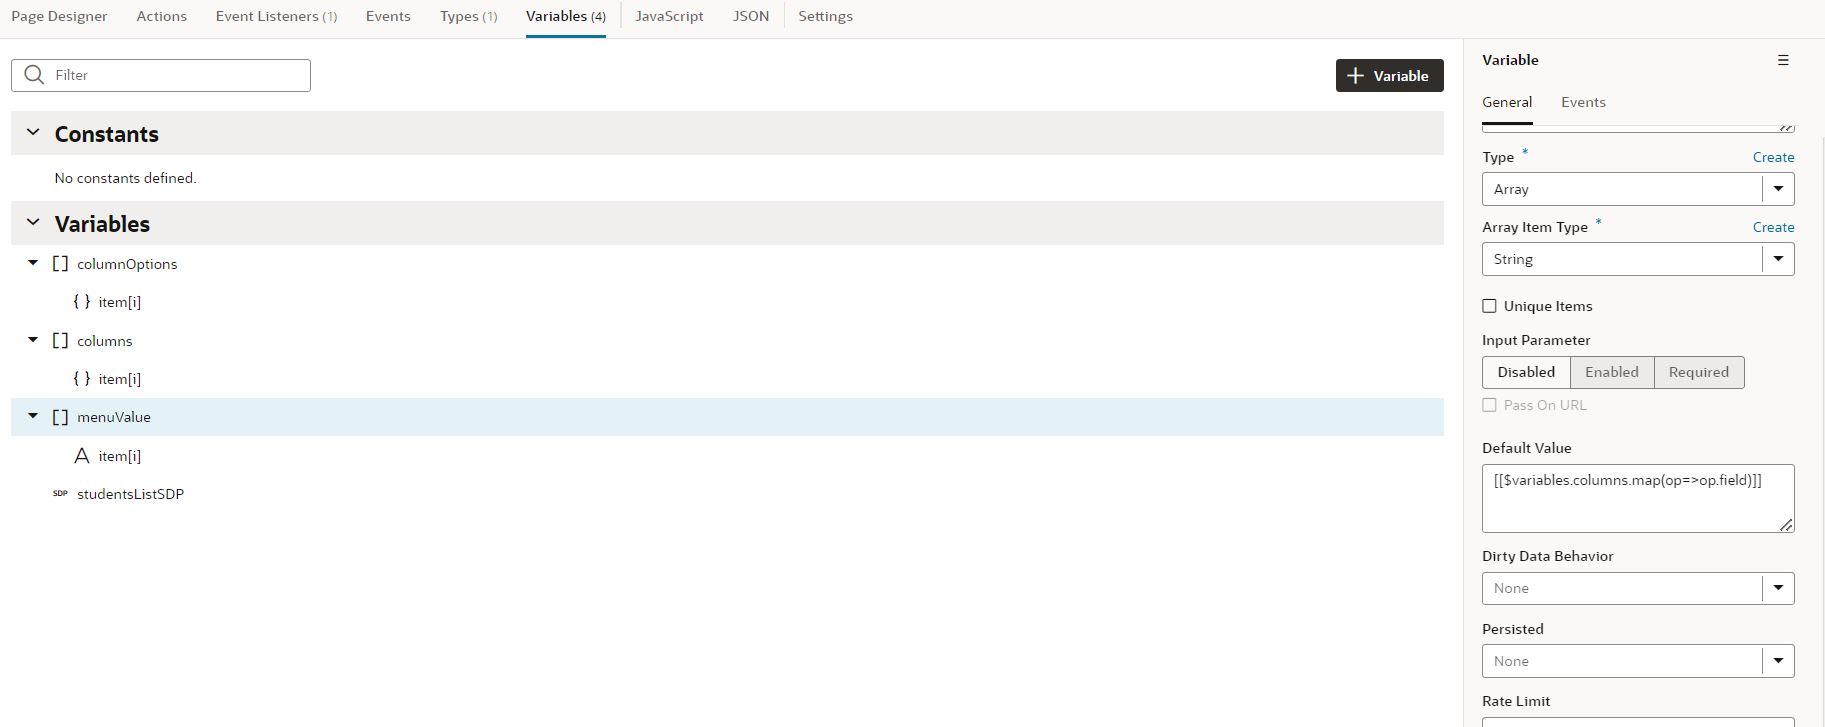
6. We need to replace the columns property of the table with the columns variable. Set the columns and columnOptions variables with all the columns as the default value.
After changing the columns the table code and setting default values to the columns and columnOptions the changes will be as follows:
Table Code:
<div class="oj-flex">

  <oj-table scroll-policy="loadMoreOnScroll" class="oj-flex-item oj-sm-12 oj-md-12"

    data="[[$variables.studentsListSDP]]" columns="{{ $variables.columns}} "></oj-table>

</div>
 7. To select the columns I am using a toolbar that will have <oj-menu-button> and <oj-menu-select-many> which will help the user to select columns of his choice and the code is as follows:
<div class="oj-flex">

  <oj-toolbar chroming="solid" class="oj-flex-item oj-sm-flex-initial">

    <oj-menu-button class="oj-button-sm" style="height:26px !important;background-color:white !important"

      id="select-columns-menu-button" chroming="borderless">View

      <oj-menu style="display:none;" slot="menu" id="selectsub-columns-menu">

        <oj-option> Columns

          <oj-menu style="display:none;" id="select-columns-menu">

            <oj-menu-select-many value="{{ $variables.menuValue }}"

              options="[[ $variables.columnOptions.map(function(op){return {'value':op.field,'label':op.headerText,'id':'option-'+op.field}}) ]]"

              id="select-columns-menu-select-many">

            </oj-menu-select-many>

          </oj-menu>

        </oj-option>

        <oj-option> <span>Select All </span></oj-option>

      </oj-menu>

    </oj-menu-button>

  </oj-toolbar>

</div>

9. To update the selected columns in the menu, we should add an event on the variable so that any change will automatically be updated in the menu list. So after setting a default value for menuValue, switch to the Events tab of the variable and click on +Event Listener as shown in the following screenshot: 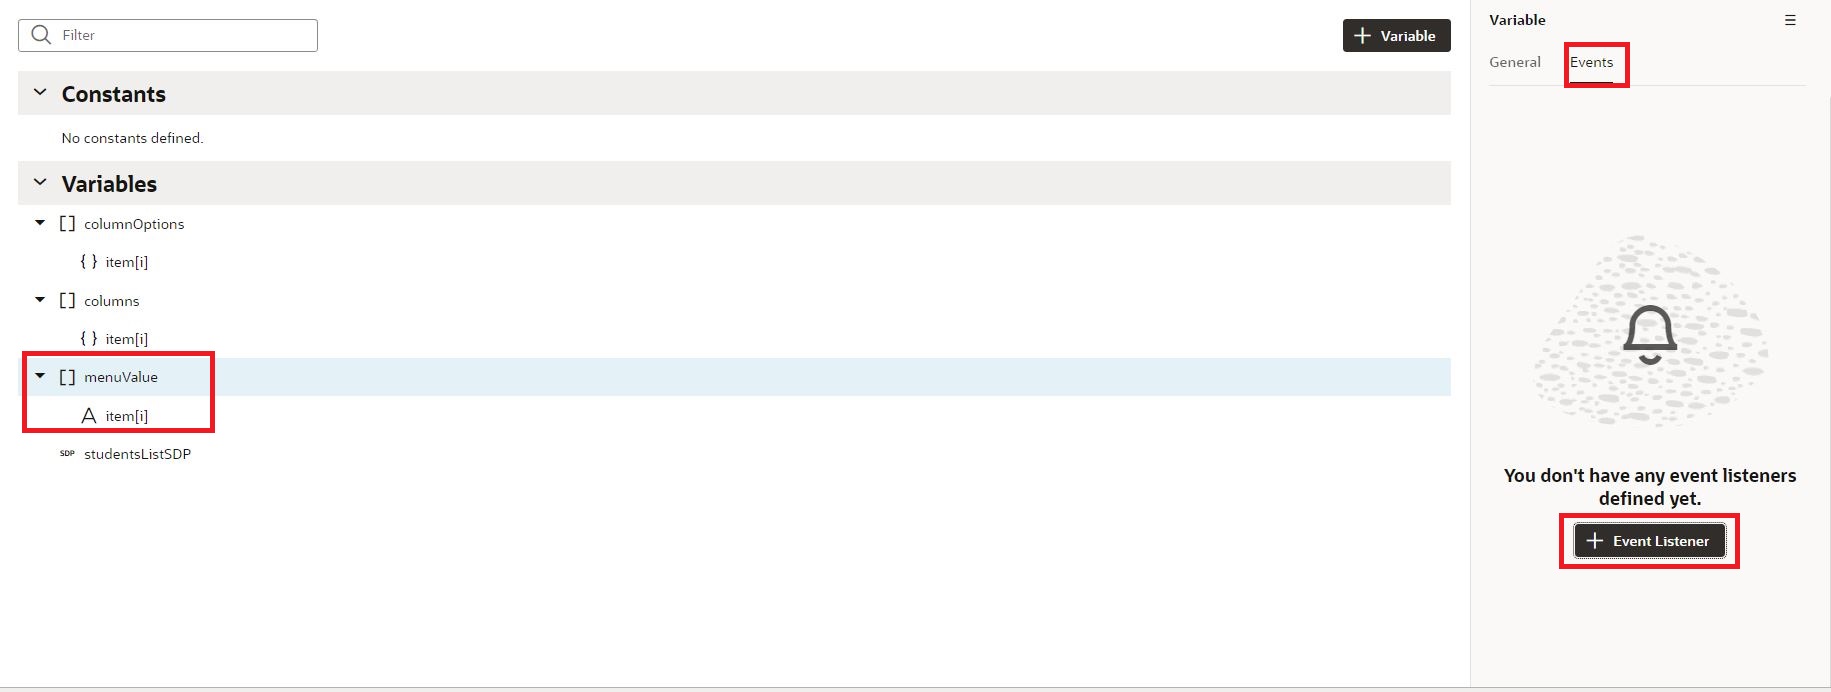
10. Click on +icon, provide a name for the Action chain, and click on the Select button as shown in the following screenshot: 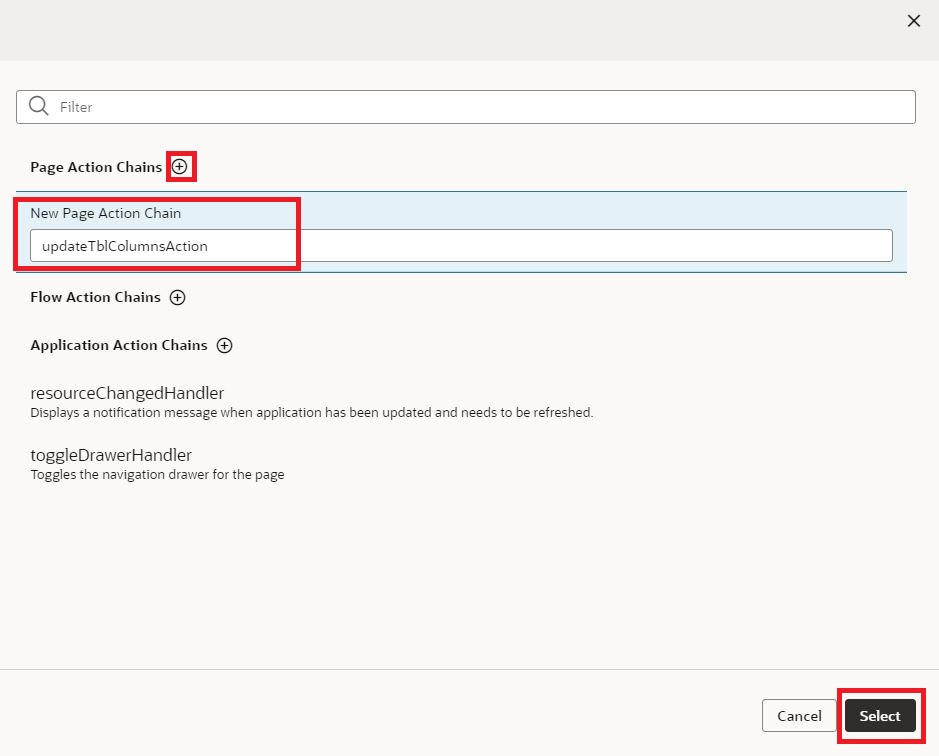
11. Drag and drop the Assign Variables action to the start node and click on the Assign link to step into the mapping area as shown in the following screenshot: 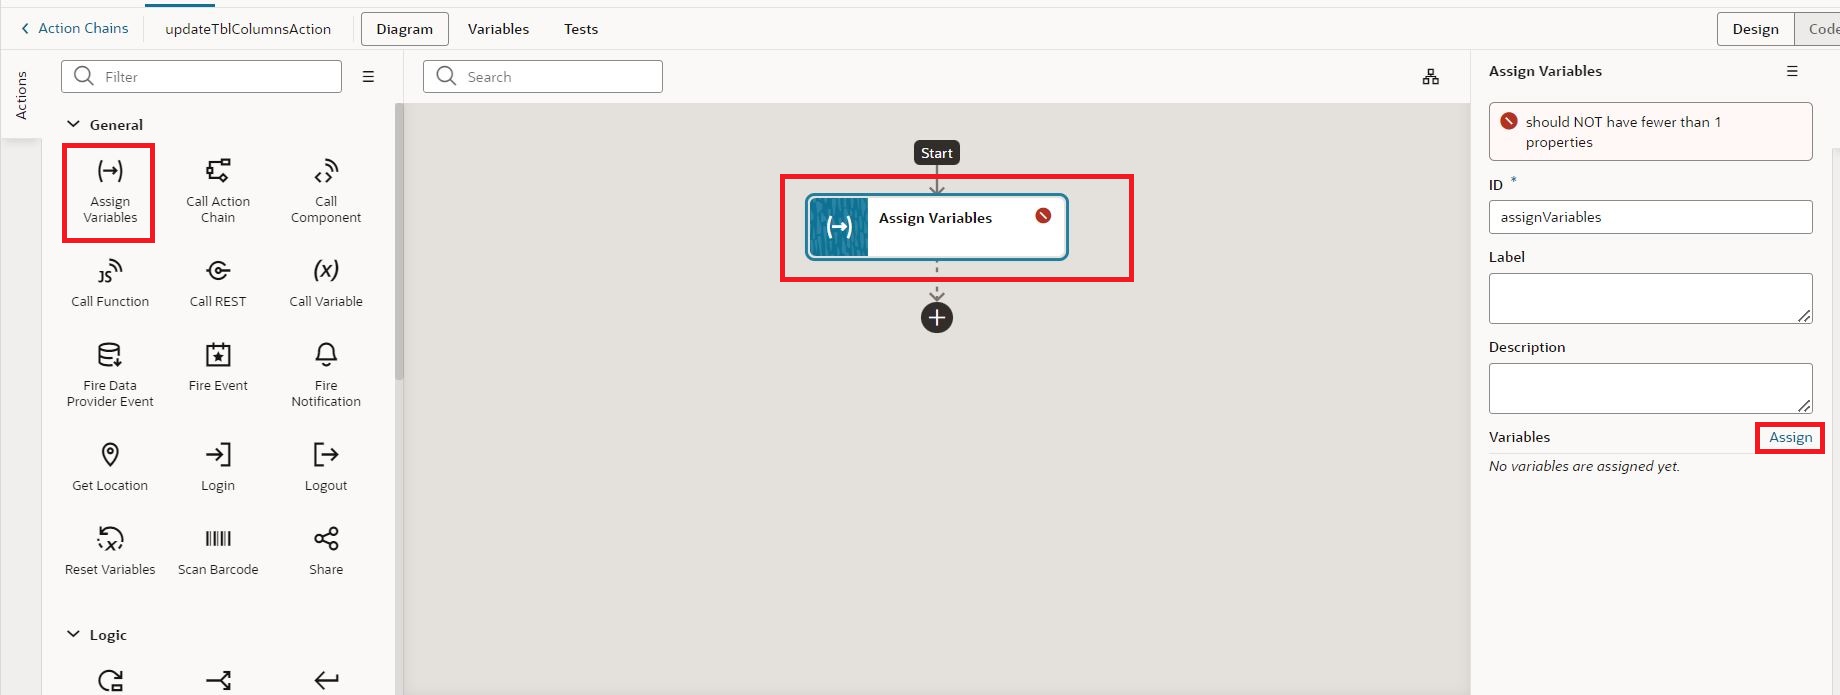
to columns and click on the Save button as shown in the following screenshot:
12. Now we are going to add functionality to select all columns. To do this click on the Select All span element, switch to the Events tab in the properties section, click on +New Event, and select on ‘click’ action as shown in the following screenshot:

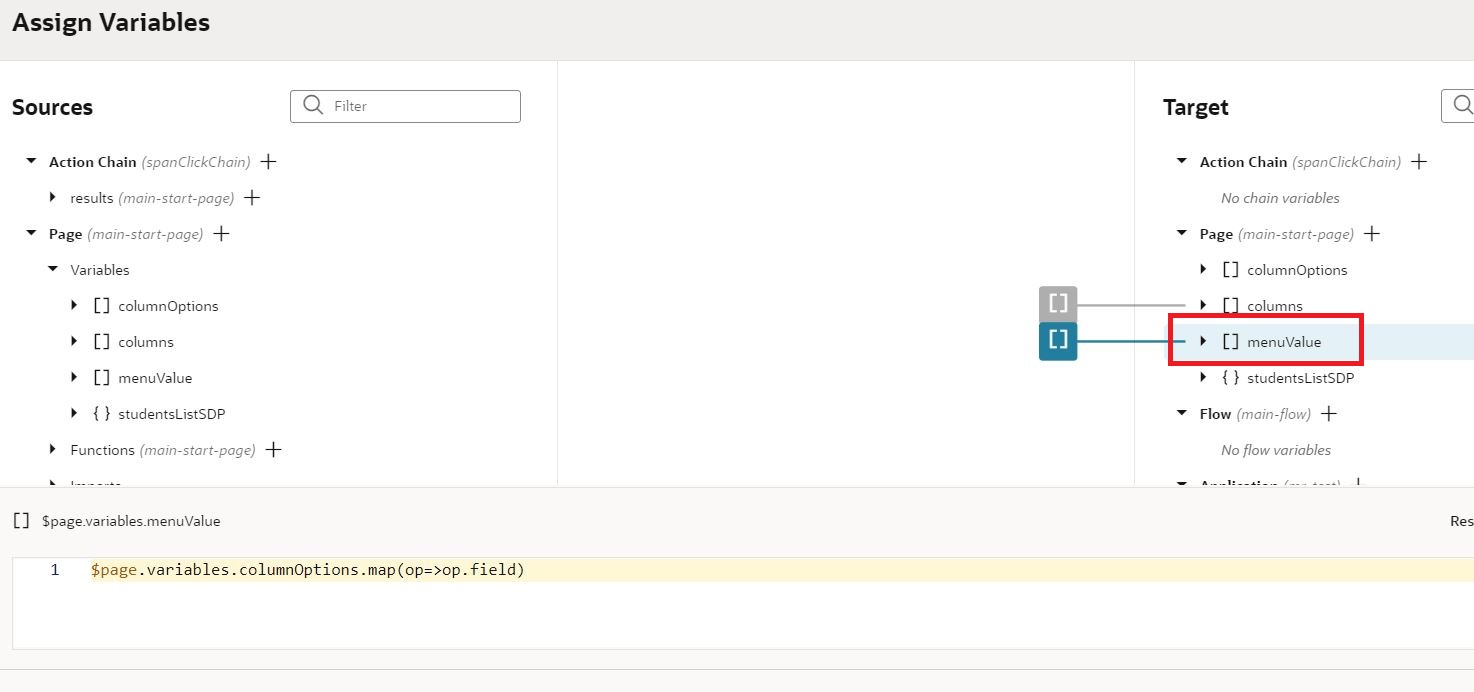
13. Drag and drop Assign Variable action to the start node and click on the Assign link to enter the mapping area as shown in the following screenshot:
Map $page.variables.columnOptions to columns and $page.variables.columnOptions.map(op=>op.field) to menuValue as shown in the following screenshot: 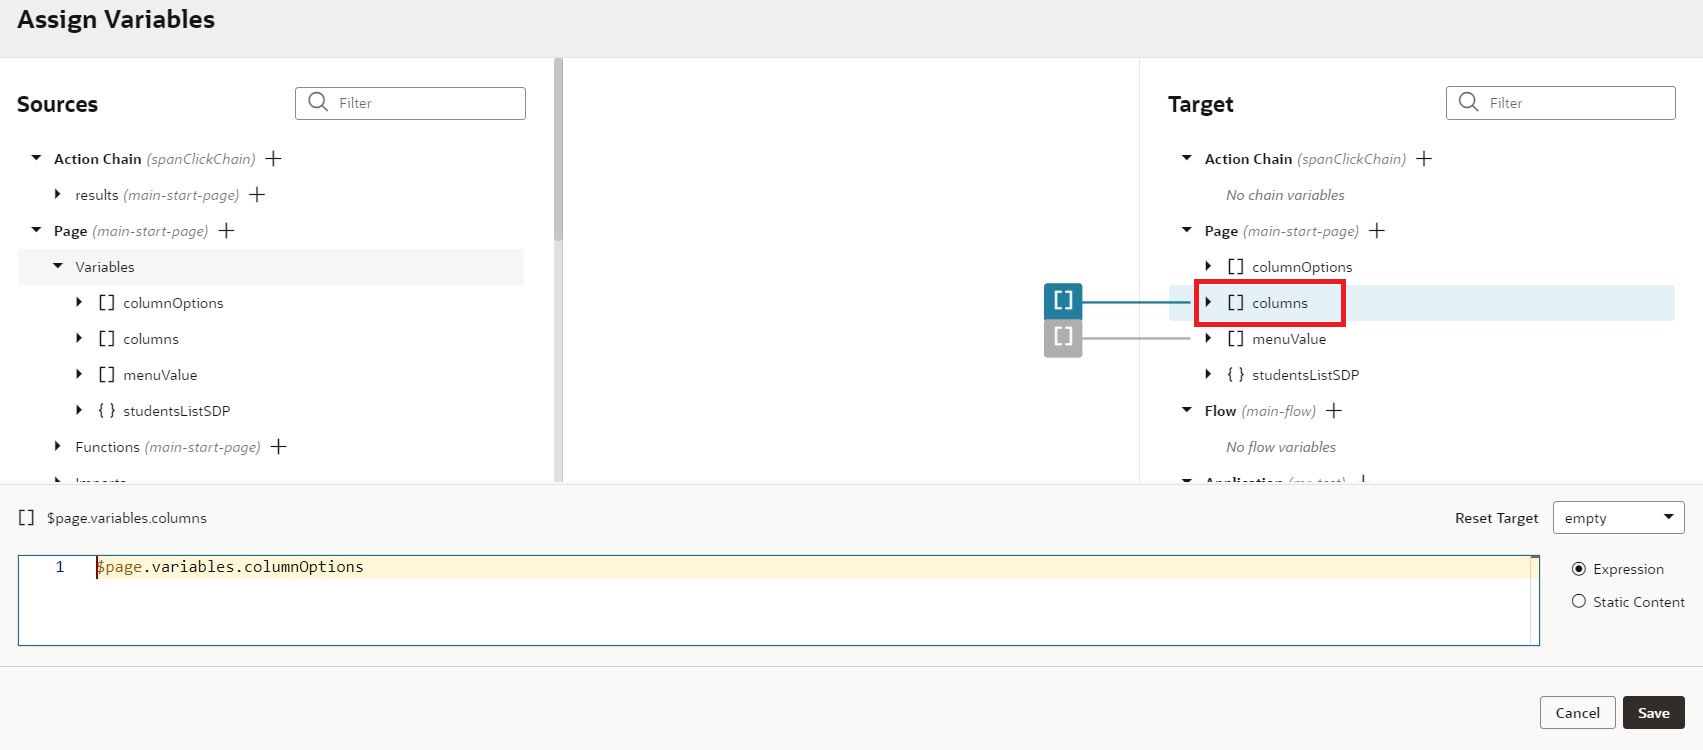
Now if we preview the application and check the application in the browser we should be able to select the columns of our choice and do select all operations on the table columns: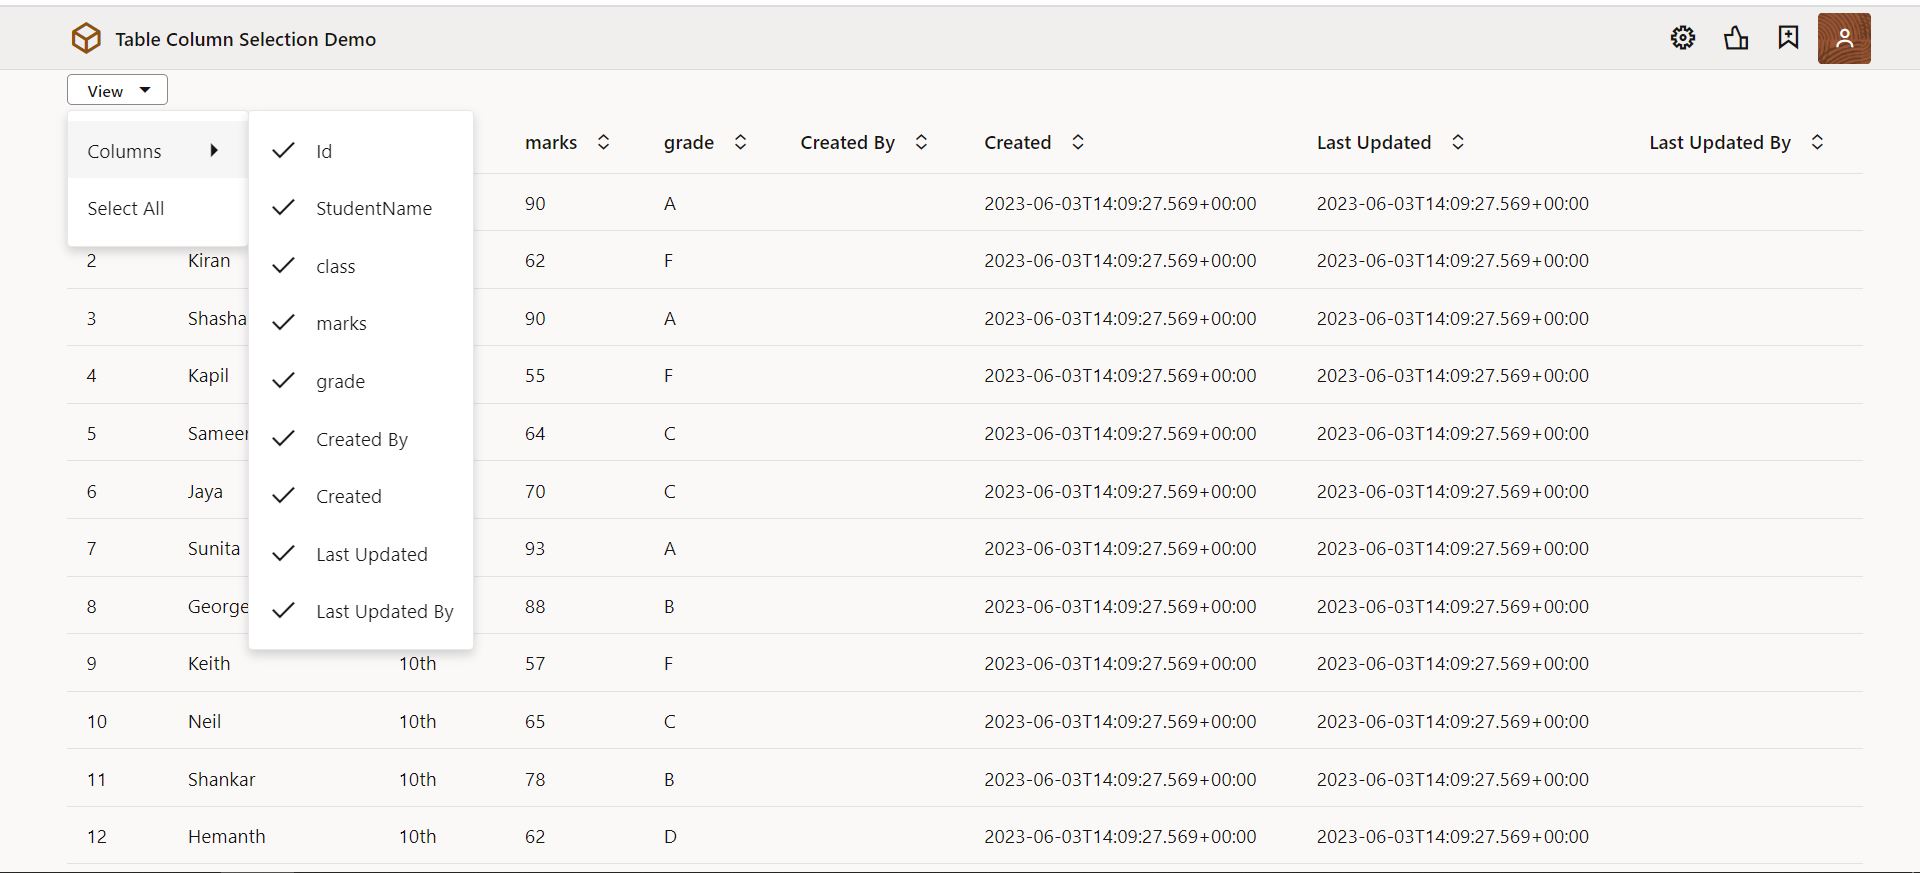 This is how we can implement Table Column Selection in Oracle Visual Builder
If you liked the article, please like, comment, and share.
Please look at my YouTube channel for Oracle Integration-related videos and don’t forget to subscribe to our channel to get regular updates.
Further Readings
Scheduled parameters to maintain Last Run Date Time in Oracle Integration
How to Customize the Lock Screen in Oracle Visual Builder
Merging two CSV files into a single file in Oracle Integration
ERP Integration using File Based Data Import: Oracle Integration


