
Working with Indexer in Oracle Visual Builder
This article demonstrates what an Indexer is, and how to work with Indexer in Oracle Visual Builder.
An indexer generates a structured list where each entry corresponds to a section of content, and each section is organized under headings that organize thematically related information.
Within a larger dataset or document, this makes it easier for users to navigate and access specific topics or categories.
To understand how indexers work, follow these steps:
- First, create an Employees Business Object with the required fields
- Go to the Data tab and click + Row to add some rows to the Business Object. For more detail on Business Objects please refer to our antecedent blog which includes the steps to create Business Objects.
- Go to the Variables Tab in the navigation tab, click on the + Variable button, Enter the ID select the Type as Any, and click on the Create button.

- We need to create an action to fetch the data from the Rest service. Hence, go to the Actions tab, click on the + Action Chain button, Enter Id of the Action chain, and click on Create Button as shown in the following screenshot:

-
Go to the FetchIndexerData action chain, and add call Rest action to the start node.
 Select the GET /Employees BO endpoint from the Employees BO and click on the Select button.
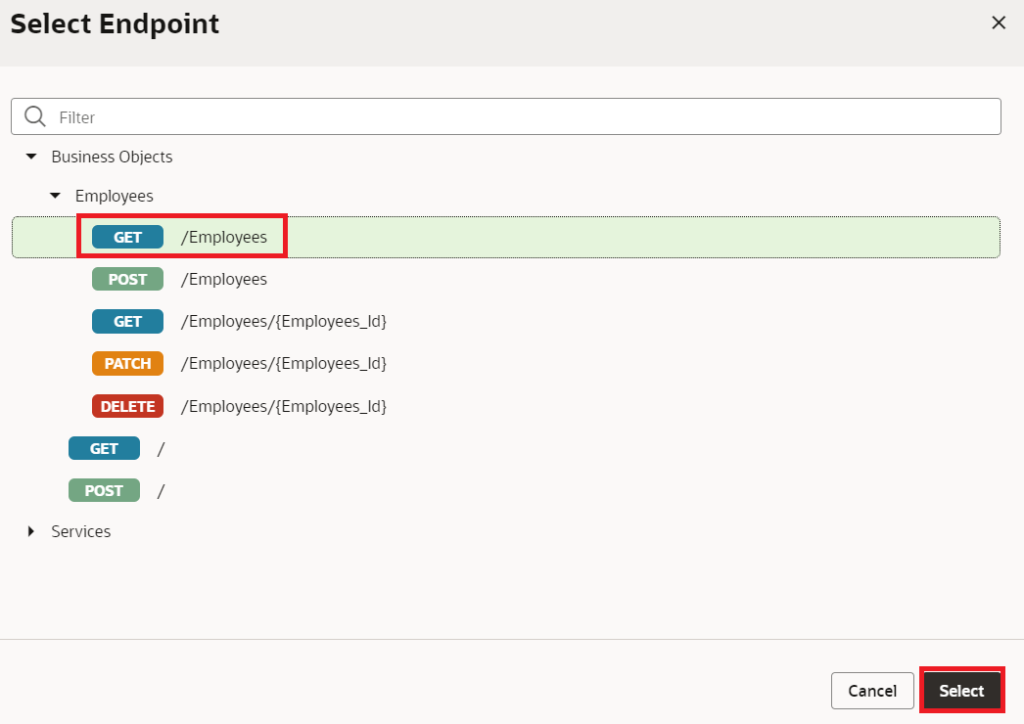
-
Before going to the next step go to the code part of the Action chain and then in the define section import ‘ojs/ojindexermodeltreedataprovider‘ and IndexerModelTreeDataProvider as shown in the following screenshot:

-
In the code create a constructor and paste the below code:
constructor() { super() this.mypageVar = null; this.handleSectionClick = this.handleSectionClick.bind(this); } -
Now after the Call Rest action, we will paste the code below which will create a new IndexerModelTreeDataProvider and call the functions for performing the scrolling when we click on the indexer.
this.mypageVar = new IndexerModelTreeDataProvider(callRestBusinessObjectsGetallEmployeesResult.body.items, { keyAttributes: 'EMPLOYEE_ID', groupingAttribute: 'FIRST_NAME', sectionChangeHandler: this.handleSectionClick }); $page.variables.EmployeesVar = this.mypageVar; -
Finally, the action chain code would be as following:
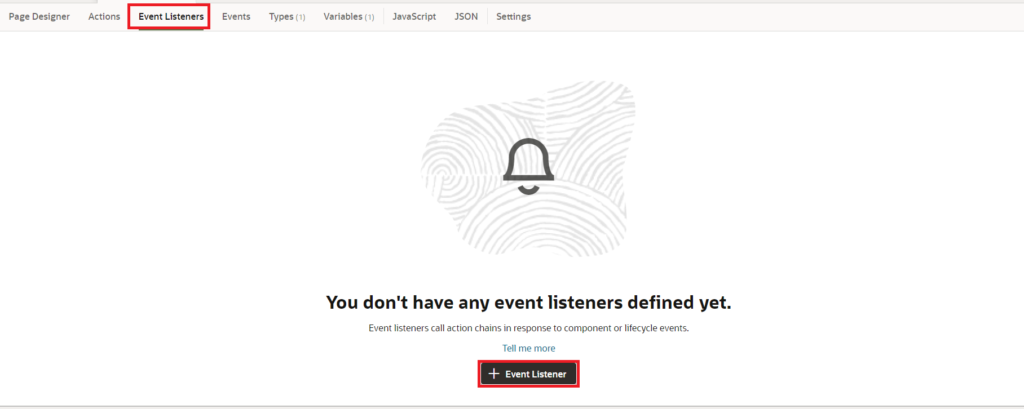
define([

  'vb/action/actionChain',

  'vb/action/actions',

  'vb/action/actionUtils',

  'ojs/ojindexermodeltreedataprovider',

], (

  ActionChain,

  Actions,

  ActionUtils,

  IndexerModelTreeDataProvider

) => {

  'use strict';

  class FetchIndexerData extends ActionChain {

    constructor() {

      super();

      this.mypageVar = null;

      this.handleSectionClick = this.handleSectionClick.bind(this);

    }

    async run(context) {

      const { $page, $flow, $application } = context;

      const callRestBusinessObjectsGetallEmployeesResult = await Actions.callRest(context, {

        endpoint: 'businessObjects/getall_Employees',

      });

      this.mypageVar = new IndexerModelTreeDataProvider(callRestBusinessObjectsGetallEmployeesResult.body.items, { keyAttributes: 'EMPLOYEE_ID', groupingAttribute: 'FIRST_NAME', sectionChangeHandler: this.handleSectionClick });

      $page.variables.EmployeesVar = this.mypageVar;

    }

    handleSectionClick(section) {

      return new Promise((resolve, reject) => {

        const findAvailableSection = (section) => {

          let missing = this.mypageVar.getMissingSections();

          if (missing.indexOf(section) > -1) {

            let sections = this.mypageVar.getIndexableSections();

            let index = sections.indexOf(section);

            if (index + 1 < sections.length) {

              section = sections[index + 1];

              return findAvailableSection(section);

            }

            return null;

          }

          return section;

        };

        let availSection = findAvailableSection(section);

        if (availSection != null) {

          let key = availSection;

          let listview = document.getElementById('listview');

          listview.scrollPosition = { key: key };

          resolve(availSection);

        } else {

          resolve(section);

        }

      });

    }

  }

  return FetchIndexerData;

});
10. Go to the Event Listeners tab, and click on the + Event Listener button as shown in the following screenshot:
 11. Select the vbEnter event and click on the Next button:
12. Select the FetchIndexerData Action chain and click on Finish button as shown in the following screenshot:

13. Now go to the Page Designer tab on the main-start page, drag and drop a listview and an Indexer from the component pallet to the Design area of the page.


14. To add data to the listView, click on the Data tab in the properties pane, and select EmployeesVar as shown in the following screenshot:

Set the Indexer also with the same Data variable as the Listview.
The Final HTML Code would look like this:
  <div class="oj-panel oj-flex-item oj-sm-12 oj-md-9">

    <div class="oj-flex">

      <div class="oj-flex-item oj-sm-12 oj-md-1"></div>

      <oj-list-view class="oj-flex-item oj-sm-12 oj-md-6" id="listview" data="[[ $variables.EmployeesVar ]]" style="height:50vh">

        <template slot="itemTemplate">

          <oj-bind-if test="[[$current.leaf]]">

            <span class="oj-typography-bold"><oj-bind-text value="[[$current.item.data.FIRST_NAME]]"></oj-bind-text></span>

            <span></span>

            <span >

                      <oj-bind-text value="[[$current.item.data.LAST_NAME]]"></oj-bind-text>

                    </span>

          </oj-bind-if>

          <oj-bind-if test="[[!$current.leaf]]">

            <oj-bind-if test="[[$current.item.data.EMPLOYEE_ID != null]]">

              <span>

                        <oj-bind-text value="[[$current.item.data.EMPLOYEE_ID]]"></oj-bind-text>

                      </span>

            </oj-bind-if>

            <oj-bind-if test="[[$current.item.data.EMPLOYEE_ID == null]]">

              <span>

                        <oj-bind-text value="[[$current.item.data]]"></oj-bind-text>

                      </span>

            </oj-bind-if>

          </oj-bind-if>

        </template>

      </oj-list-view>

    </div>

  </div>

  <div class="oj-panel oj-flex-item oj-sm-12 oj-md-3">

    <div class="oj-flex" style="height:500px;">

      <oj-indexer id="indexer" aria-label="indexer" aria-controls="listview" data="[[ $variables.EmployeesVar ]]"

        class="oj-flex-item oj-sm-12 oj-md-1"></oj-indexer>

    </div>

  </div>
Note: The Listview Component should be provided with some height to enable scrolling when we click on Indexer.If we preview the application we can view the list view with the employee Details and the Indexer beside it. Now if we click on the Alphabet in the indexer the listview should point to that particular List starting with that Alphabet as shown in the screenshot below:
 This is how we can work with Indexer in Oracle Visual Builder.
If you liked the article, please like, comment, and share. Please look at our YouTube channel for Oracle Integration-related videos and don’t forget to subscribe to our channel to get regular updates.
Further Readings
Scheduled parameters to maintain Last Run Date Time in Oracle Integration
How to Customize the Lock Screen in Oracle Visual Builder
Merging two CSV files into a single file in Oracle Integration
ERP Integration using File Based Data Import: Oracle Integration

