Form layout in an editable table component in Oracle Visual Builder (VBCS)
This article demonstrates how to work with form layout in an editable table component in Oracle Visual Builder Cloud Service.
The key reason to use a Form Layout within a table instead of standard inline editing is to balance the amount of data displayed with the available screen space.
A simple inline table is quick to build, but it starts to break down as your data grows. Here’s how the two approaches compare in practice:
1. Working with large data sets
In a standard inline table, each editable field requires its own column. With many fields, this leads to excessive horizontal scrolling and makes it harder to focus on a single row.
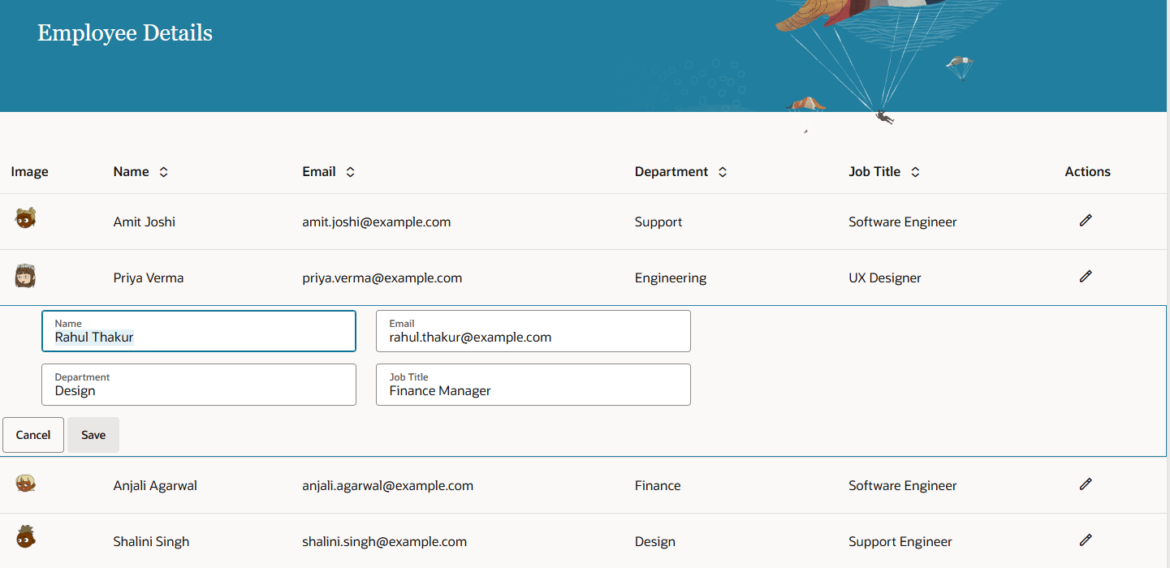
Using a Form Layout, you display only the key columns upfront. When a user selects “Edit,” additional fields appear in a structured form within or below the row—keeping the table clean and reducing the need to scroll.
2. Validation and complex inputs
Inline tables are constrained by column width, which limits space for detailed validation messages or advanced inputs like multi-select dropdowns.
A Form Layout provides more vertical space, allowing clearer validation feedback, helpful instructions, and more flexible input components without disrupting the table layout.
3. Handling hidden or backend fields
Inline tables require all editable fields to be visible as columns, even those not relevant for quick viewing (such as internal IDs).
With a Form Layout, these fields remain hidden until editing, keeping the table simple while still supporting full data access when needed.
4. Grouping related information
Inline tables present all fields in a single row, which can feel cluttered.
A Form Layout allows you to group related fields into sections like “Address Details” or “System Settings,” making the interface easier to understand and use.
In short, Inline tables suit simple datasets, but as complexity grows, a Form Layout offers a cleaner, more scalable editing experience.
Now, let’s get started with the implementation:
1. First, create a web application and add a Welcome page using a standard template.
Next, create an Employee business object and populate it with sample data. Finally, display the employee data on the Welcome page.
For the step-by-step process of implementing the welcome page template, please refer to the Redwood welcome template
So far, we have seen how to make an ADP-based table editable, but in this article, we will see how to implement editability for an SDP-based table.
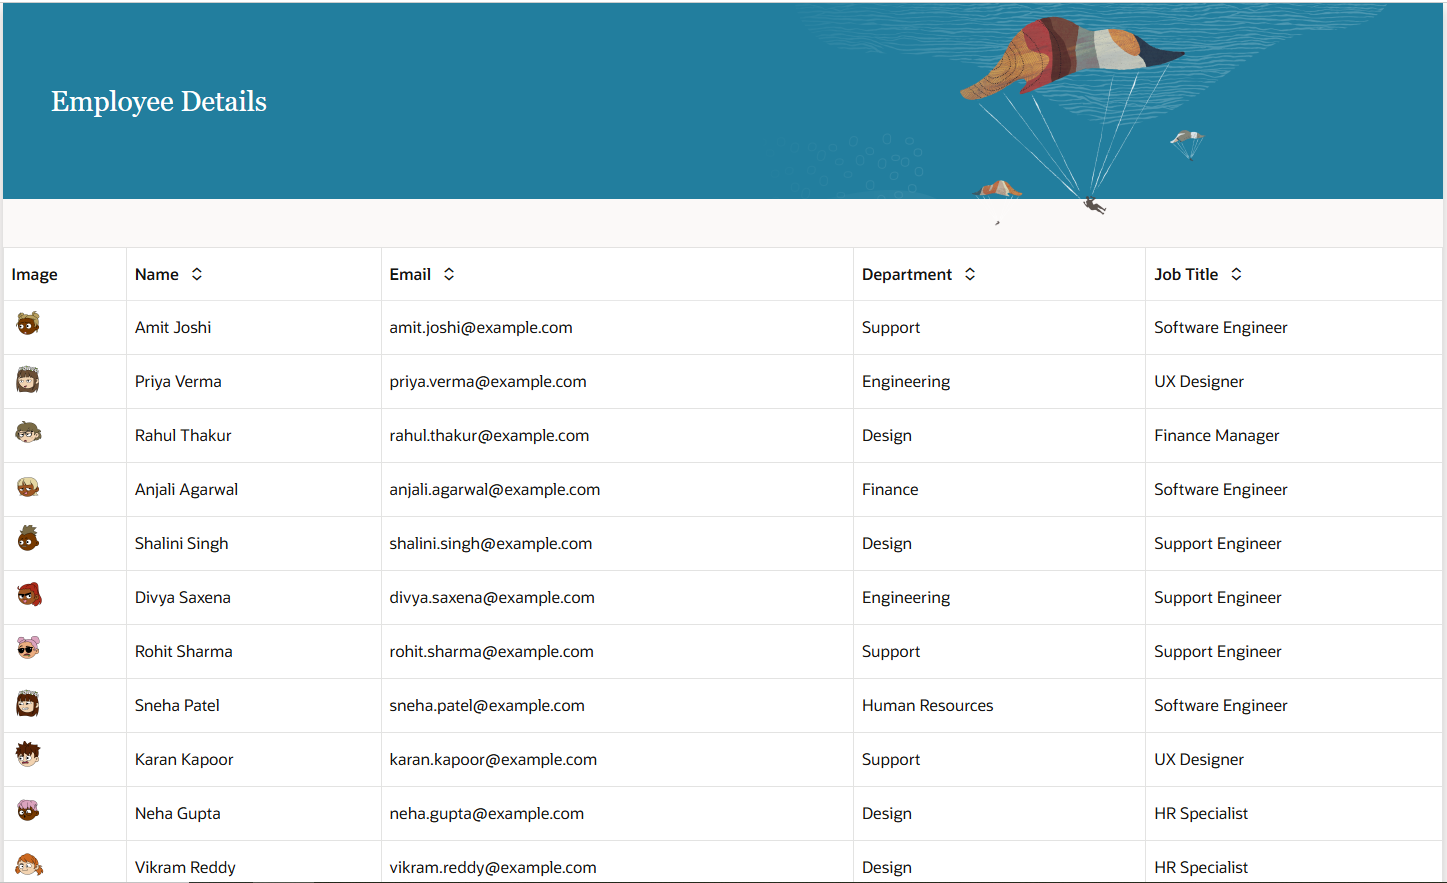
We have the following page implemented using the welcome page template
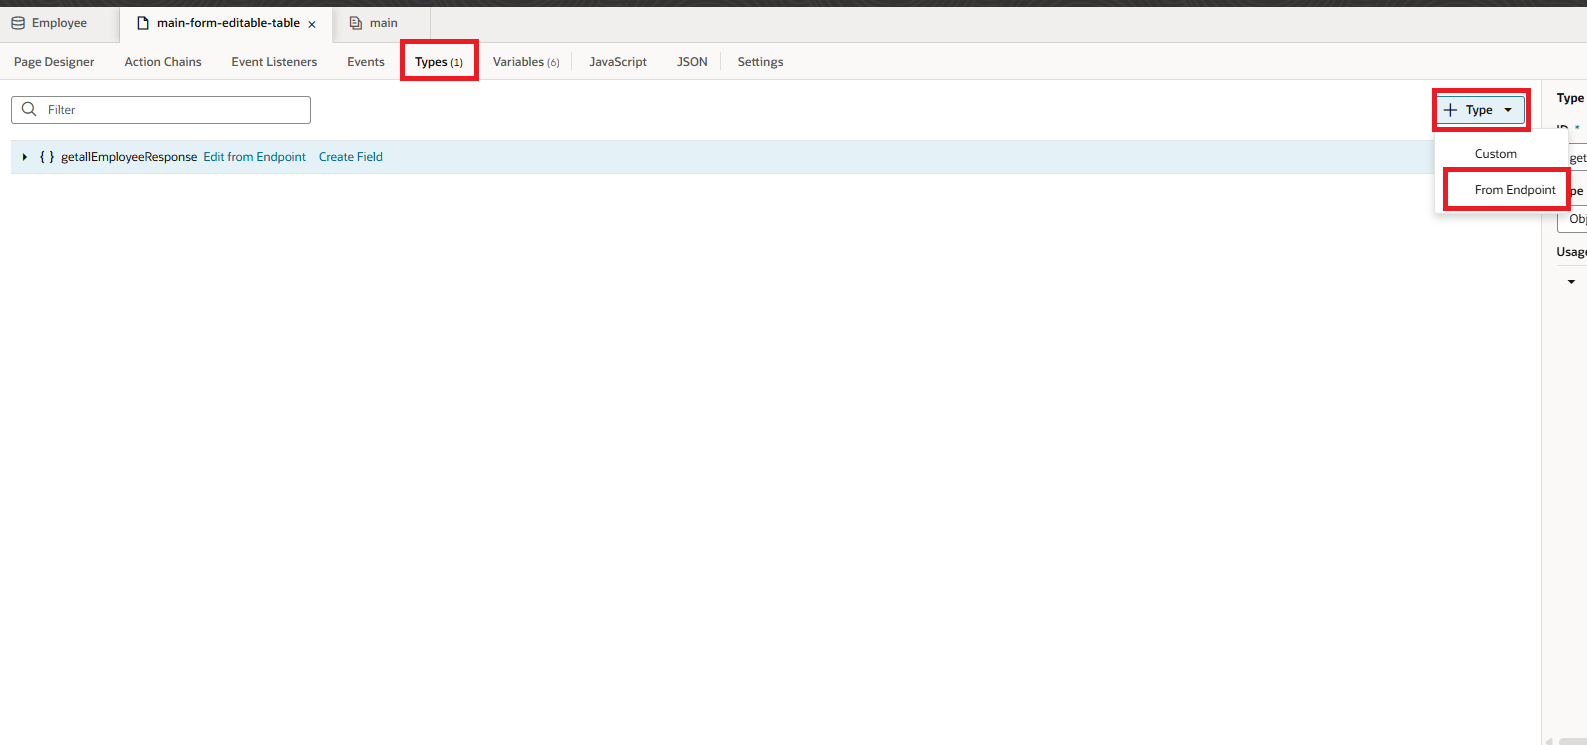
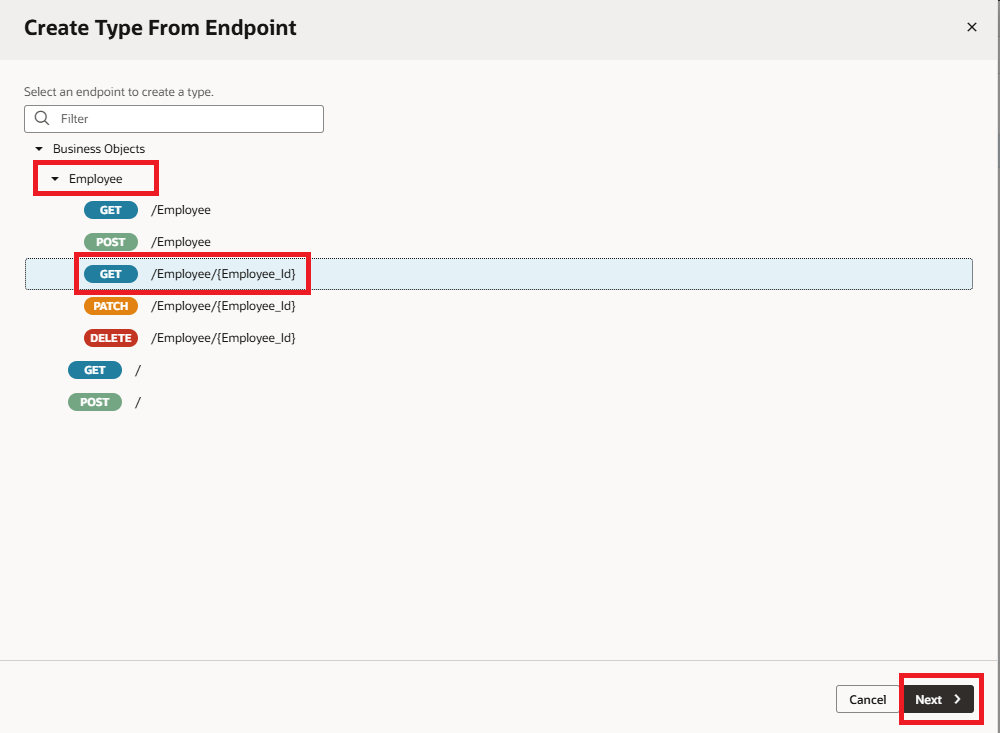
2. Go to the Types tab, click + Types, then choose From Endpoint. Select the Get One endpoint from the Employees business object, and click Next, as shown in the screenshot below.
3. Enter a name in the Type, select the required fields, and click on the Finish button as shown in the following screenshot:
![]() 4. Switch to the Variables tab and create the following variables as shown in the following screenshot:
4. Switch to the Variables tab and create the following variables as shown in the following screenshot:
- cancelEditVar of Boolean Type with Default Value as false
- currentRow of Employee Type
- editRow of any Type
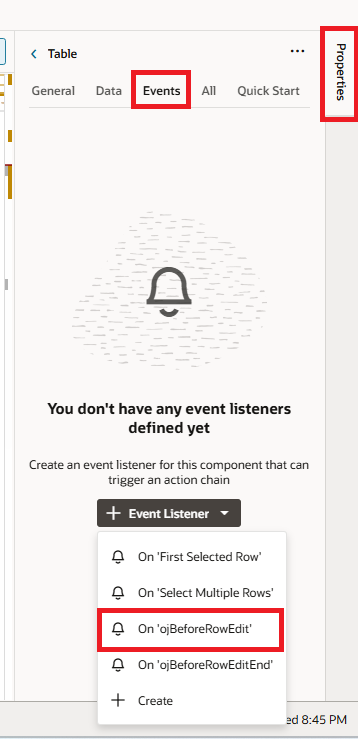
5. Let’s make the table editable. Go to the table properties, open the Events tab, click + Event Listener, and select the on OjBeforeRowEdit action chain, as shown in the screenshot below.
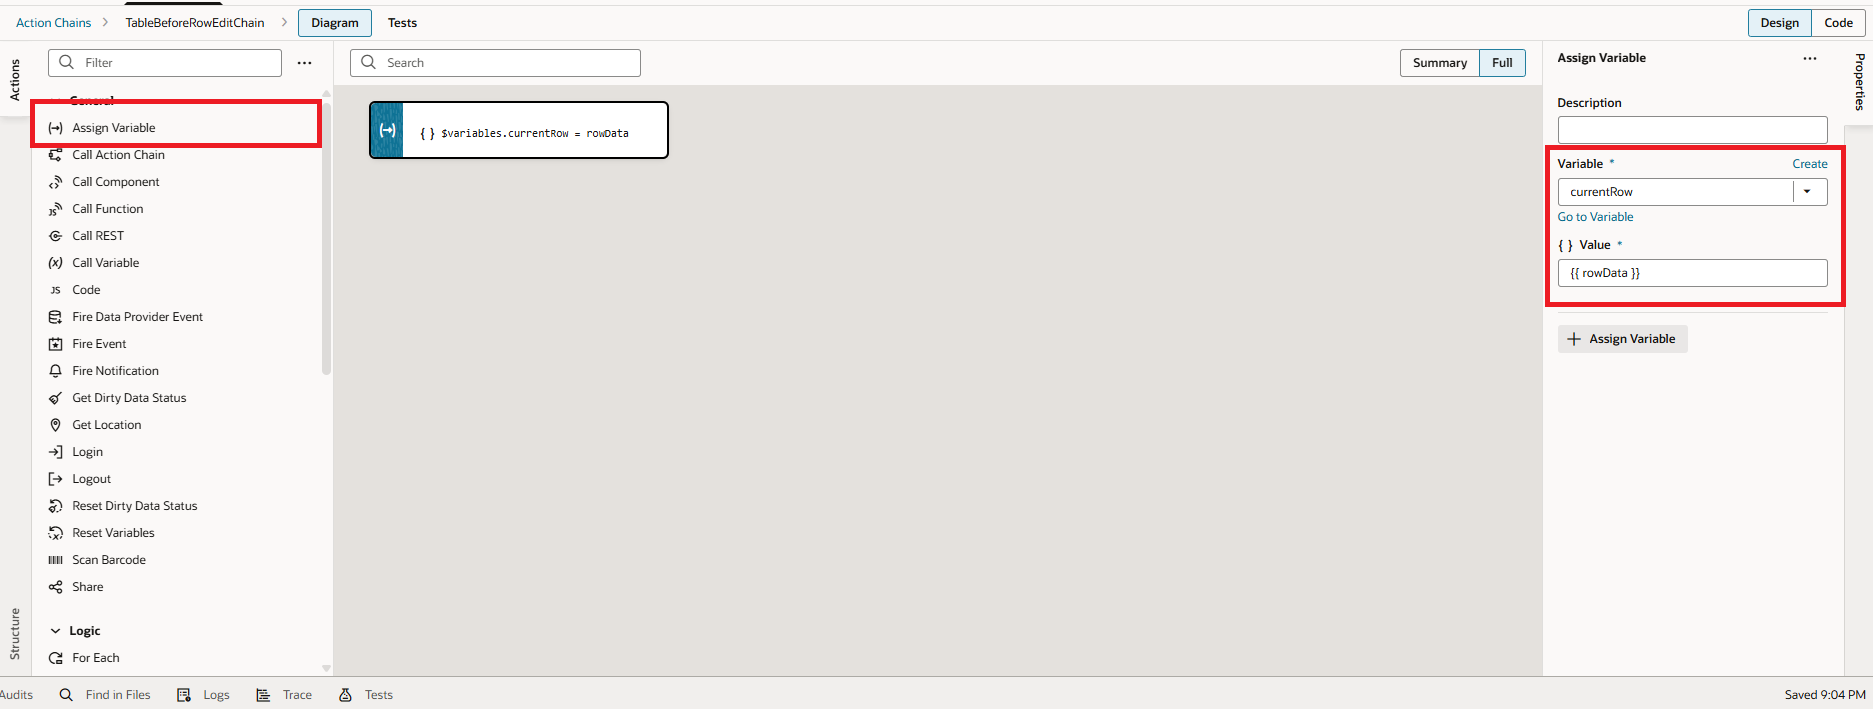
 6. Drag and drop the Assign Variable Action to the start node and map $variables.currentRow to rowData as shown in the following screenshot:
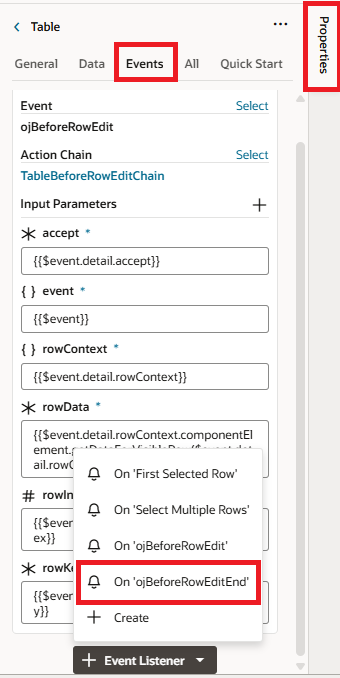
7. Go to table properties, switch to Events tab, click on +Event Listener, select on OjBeforeRowEditEnd action chain as shown in the following screenshot:
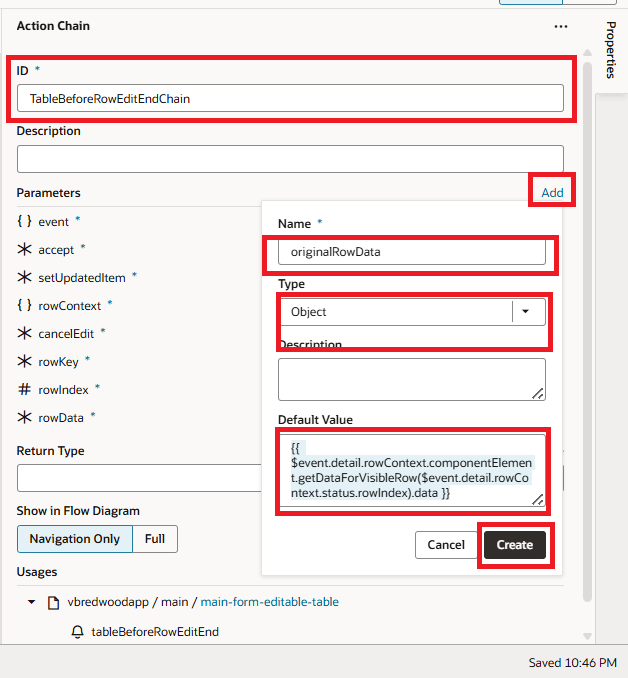
8. Go to the Input Parameters of the action chain, click Add, and enter the name as originalRowData. Set the type to Object, then paste the following code into the Default Value field. Finally, click Create, as shown in the following screenshot:
Default Value:
{{$event.detail.rowContext.componentElement.getDataForVisibleRow($event.detail.rowContext.status.rowIndex).data }}
 9. Drag and drop an If action at the start of the action chain. In the condition, check whether $page.variables.cancelEditVar === true. If the condition is true, reset the variable, as shown in the screenshot below.
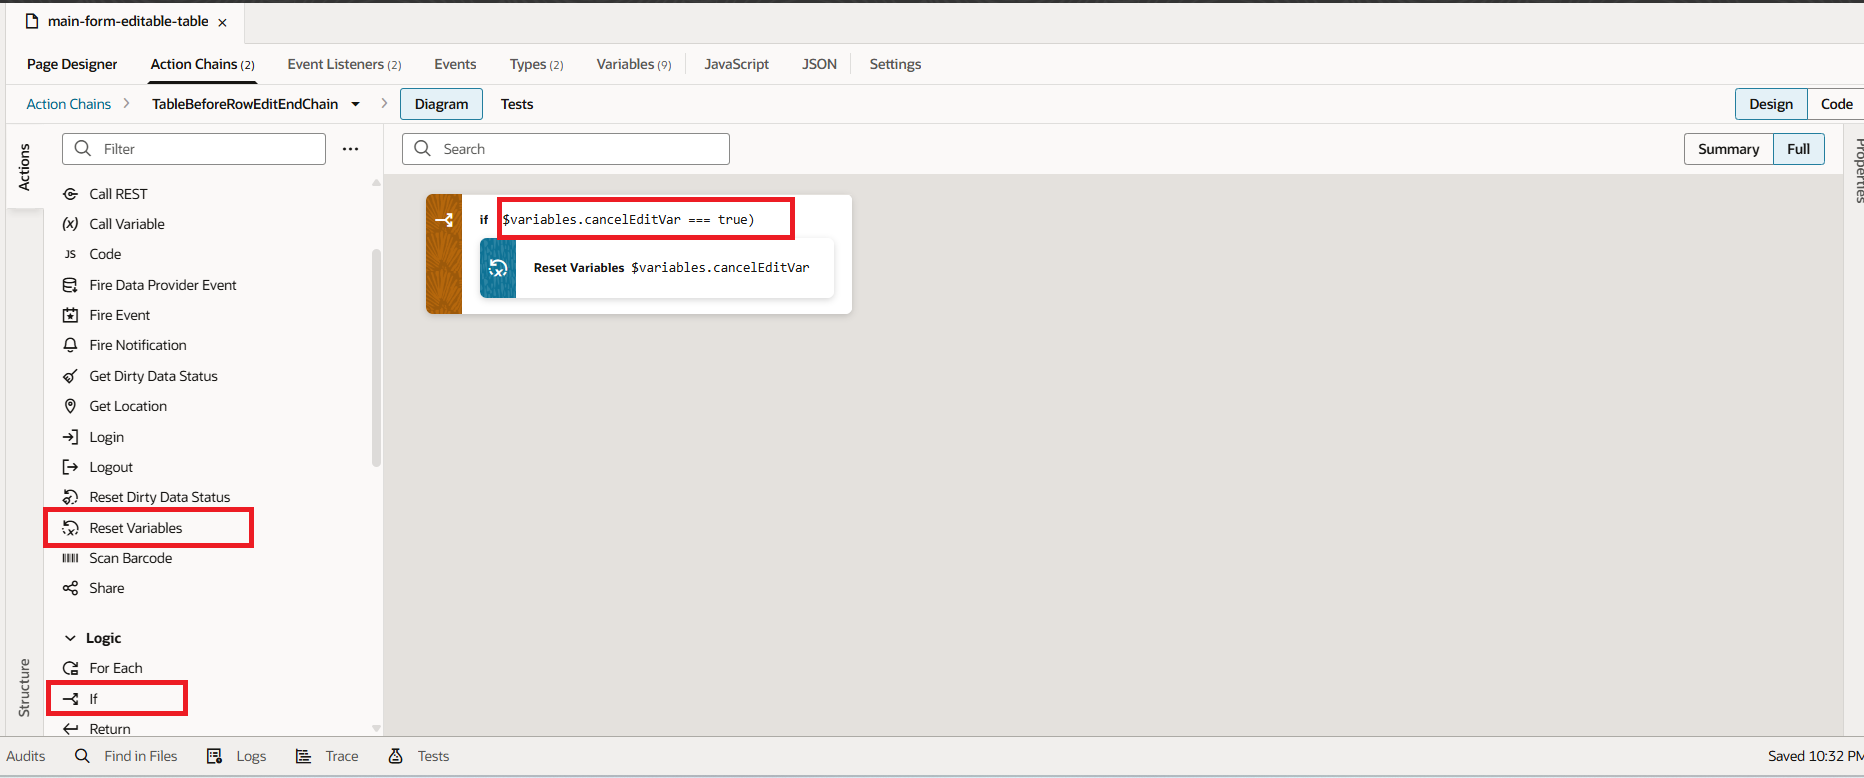
10. In the else case, we’ll be working with some JavaScript. Add the following code to your JavaScript section before proceeding with the else case:
JS:
areDifferent(oldValue, newValue) {
if (JSON.stringify(newValue) === JSON.stringify(oldValue)) return false;
else return true;
    }

    getRowConfig($application, $flow, $page, $current, $listeners, $variables, row) {

      return {

        view: HtmlUtils.stringToNodeArray(template),

        data: {$application, $flow, $page, $current, $listeners, $variables, row}

      };

    }
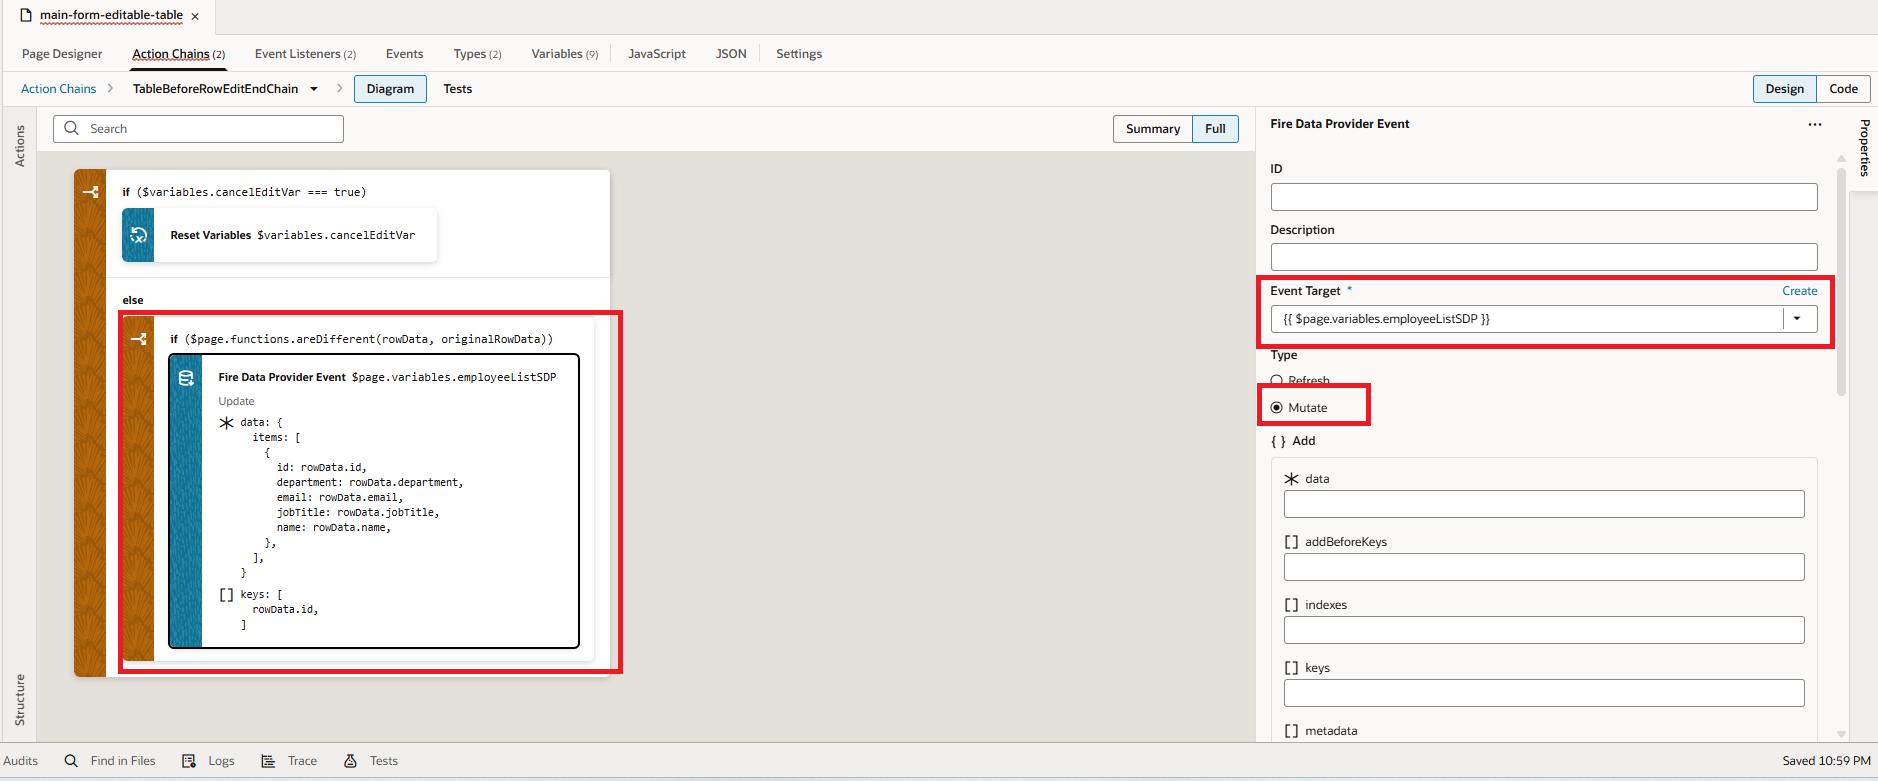
11. After adding the functions to your JavaScript page, return to the action chain and drag an If statement into the else case. Use the areDifferent function in the condition, passing rowData and originalRowData as input parameters.
Since this function returns a boolean, the flow continues only when the result is true (i.e., when changes are detected). In that case, drag and drop a Fire Data Provider Event into the success branch of the If statement. Set the Event Target to EmployeesListSDP and the Type to mutate.
Then complete the configuration by mapping rowData directly to the data field. Finally, map rowData.key to the keys[] array to ensure the correct record is updated, as shown in the screenshot below:
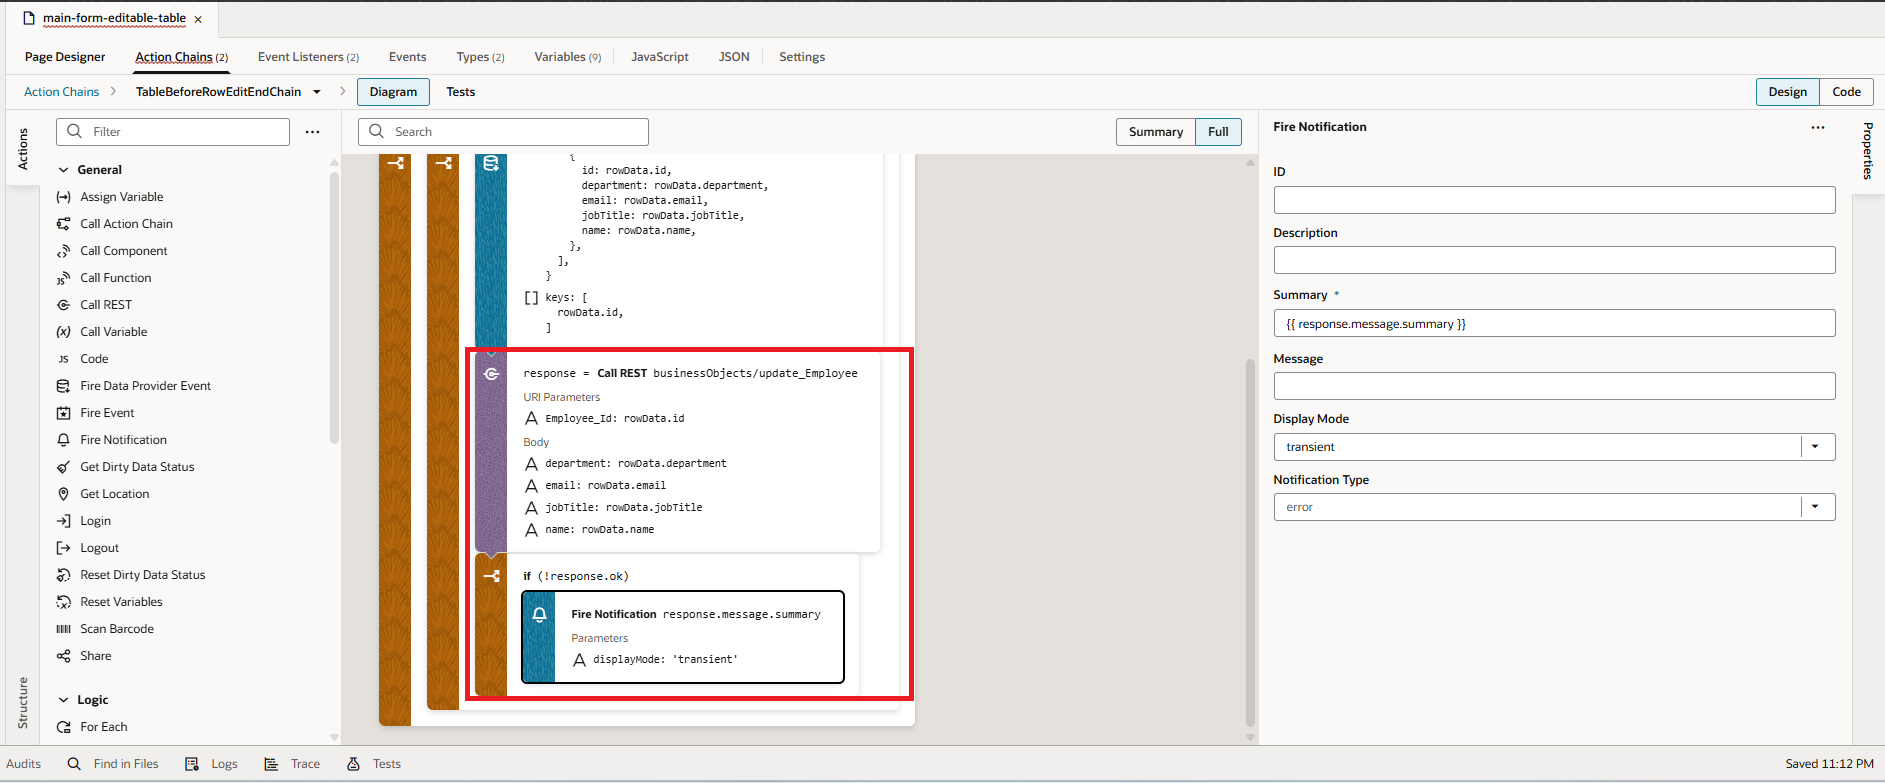
12. Next, drag and drop a Call REST action and select your Employee Update statement from the Business Object endpoint.
Once selected, configure the action by mapping the body and ID fields exactly as shown in the following screenshot:
 13. Since we are building an editable table within an inline Form Layout, you will need to provide an Edit icon, a Cancel button, and a Save button to manage record updates effectively.
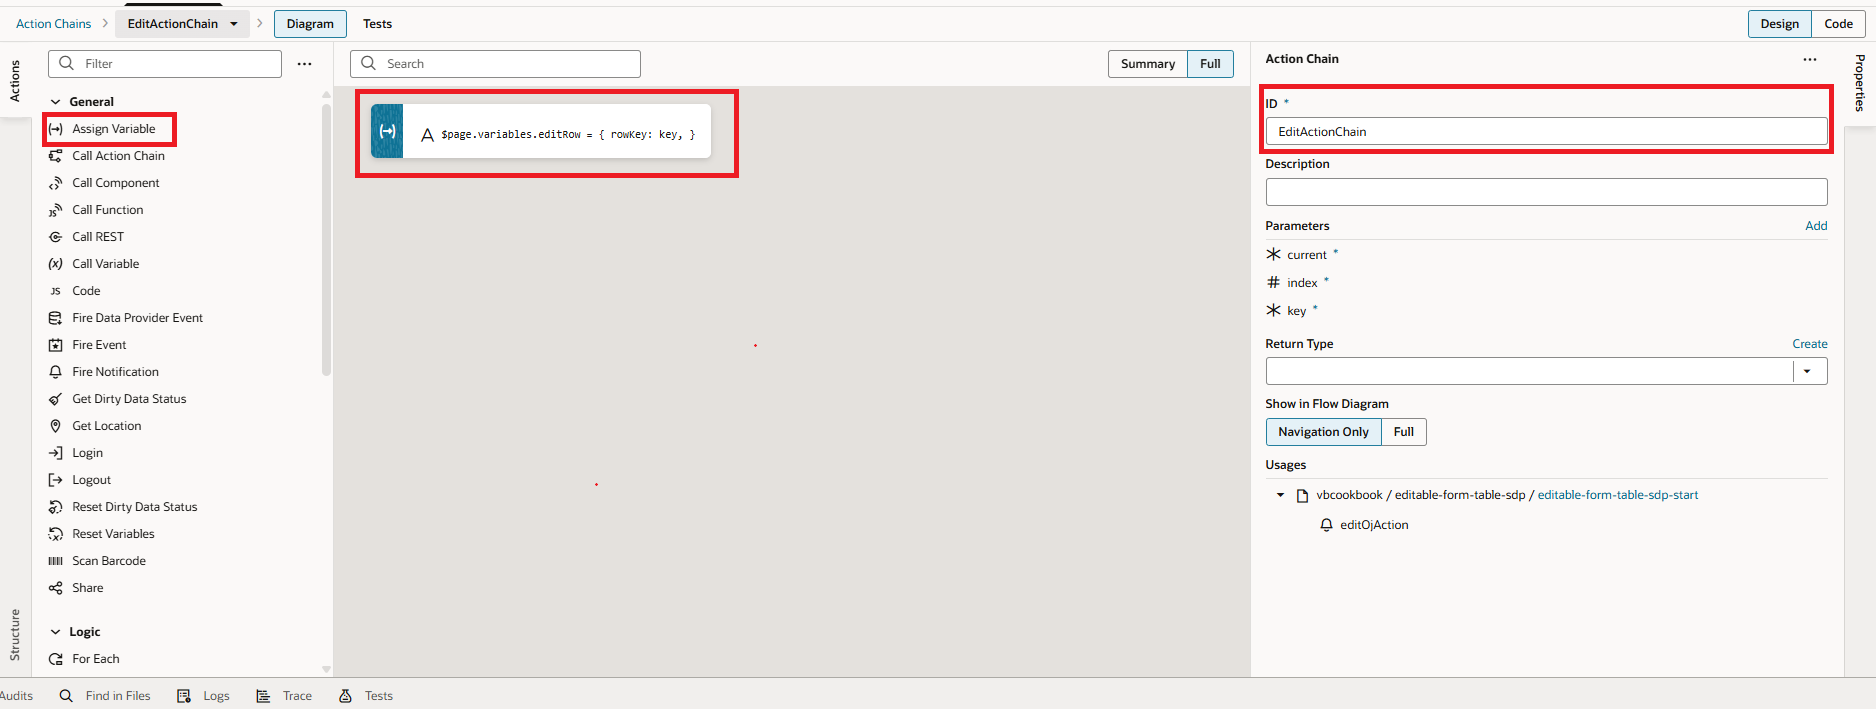
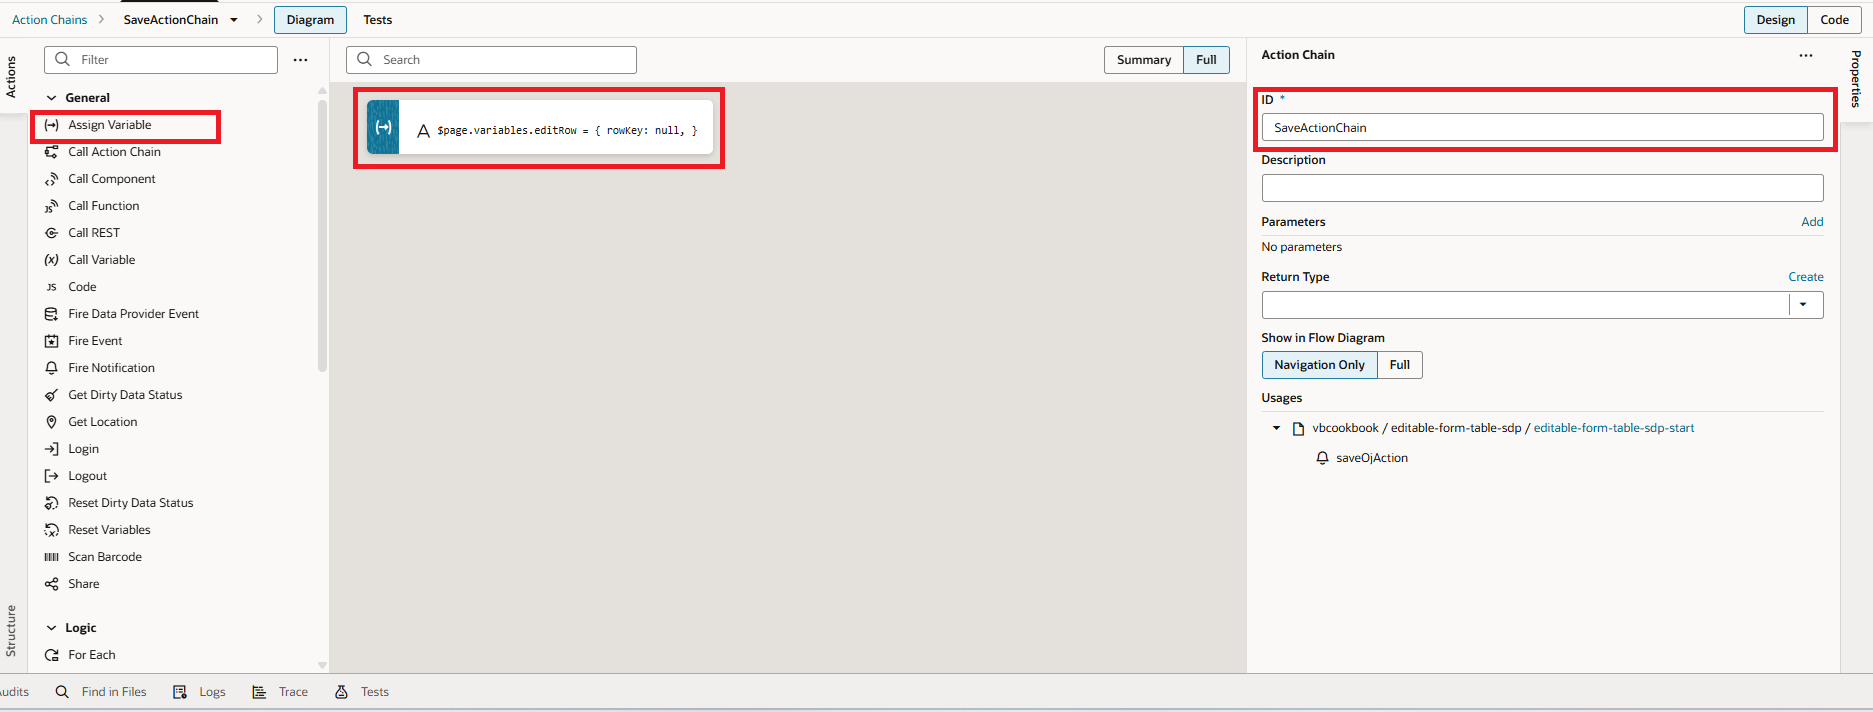
Before designing the UI components, we should first create the corresponding Action Chains. To begin, navigate to the Action Chains tab and click the + Action Chain button.
Enter a name for your new Action Chain, then follow the sequences shown in the screenshots below to configure the correct logic for each action.
Edit:
 Save:
Save:
 Cancel:
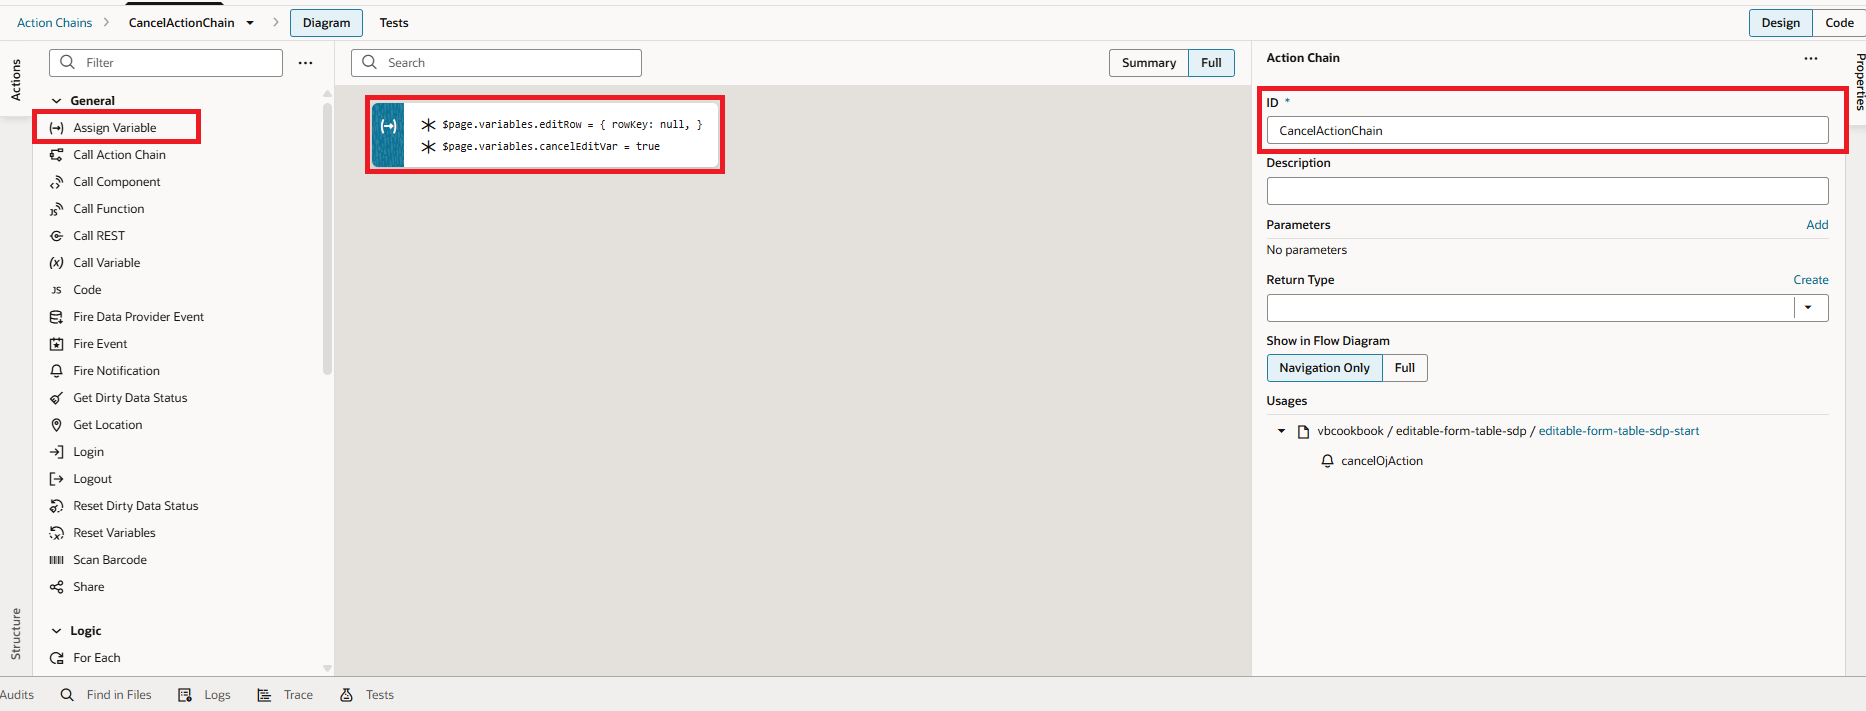
14. Next, switch to the Event Listeners tab. Right-click on any existing Component Event listener and select Go to Code to open the source view as shown in the following screenshot:
15. In the code, create the event listeners for these three new Action Chains. Once they are defined, hook them up appropriately so each UI action triggers its corresponding logic, as shown in the following screenshot:
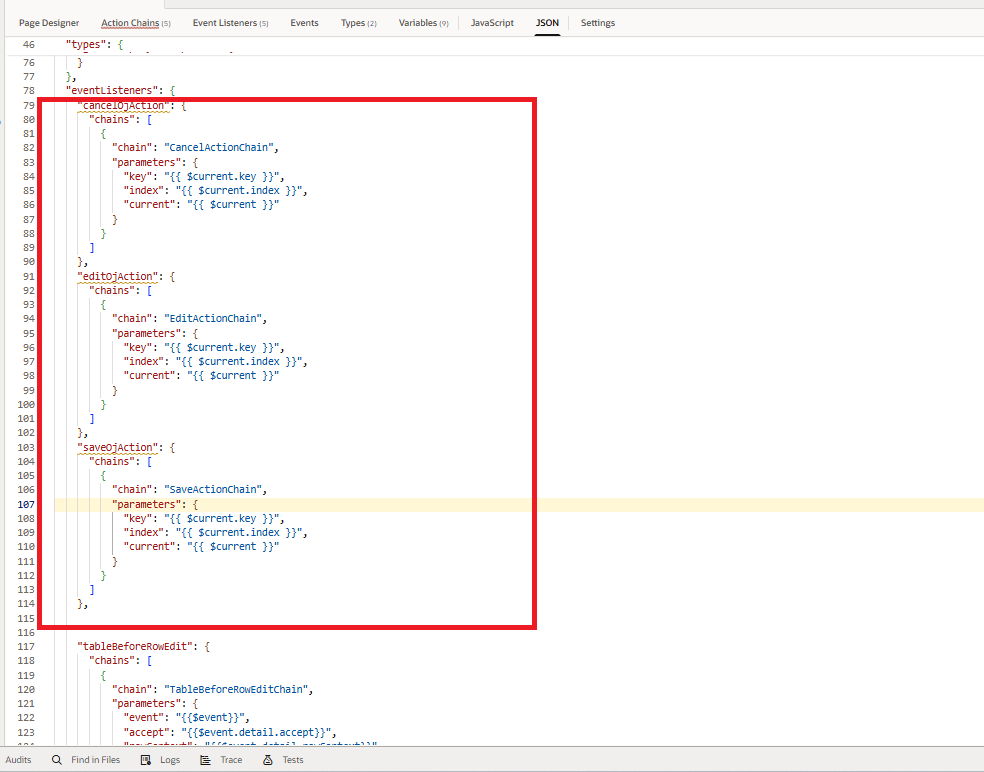
Now we are ready with Events and Action Chains. Let’s move to UI implementation.
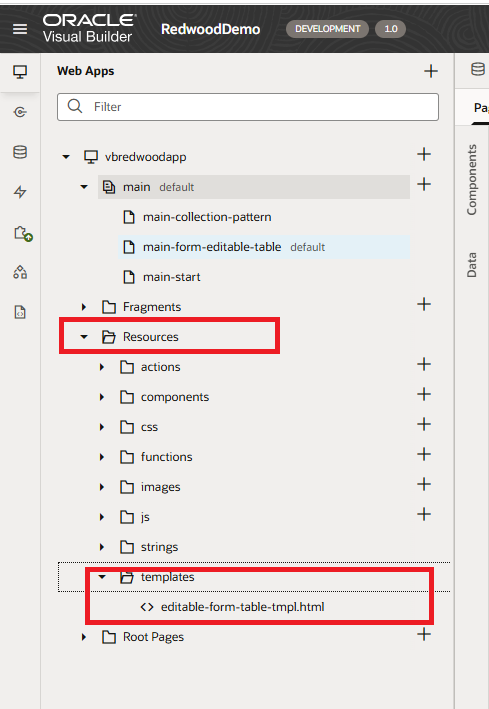
16. Create a folder on desktop, add an empty HTML file, name it editable-form-table-tmpl.html, and zip the folder.
17. Now navigate to the Resources folder, right click on the resources, click on import, and select zip folder that has an HTML file, as shown in the following screenshots:
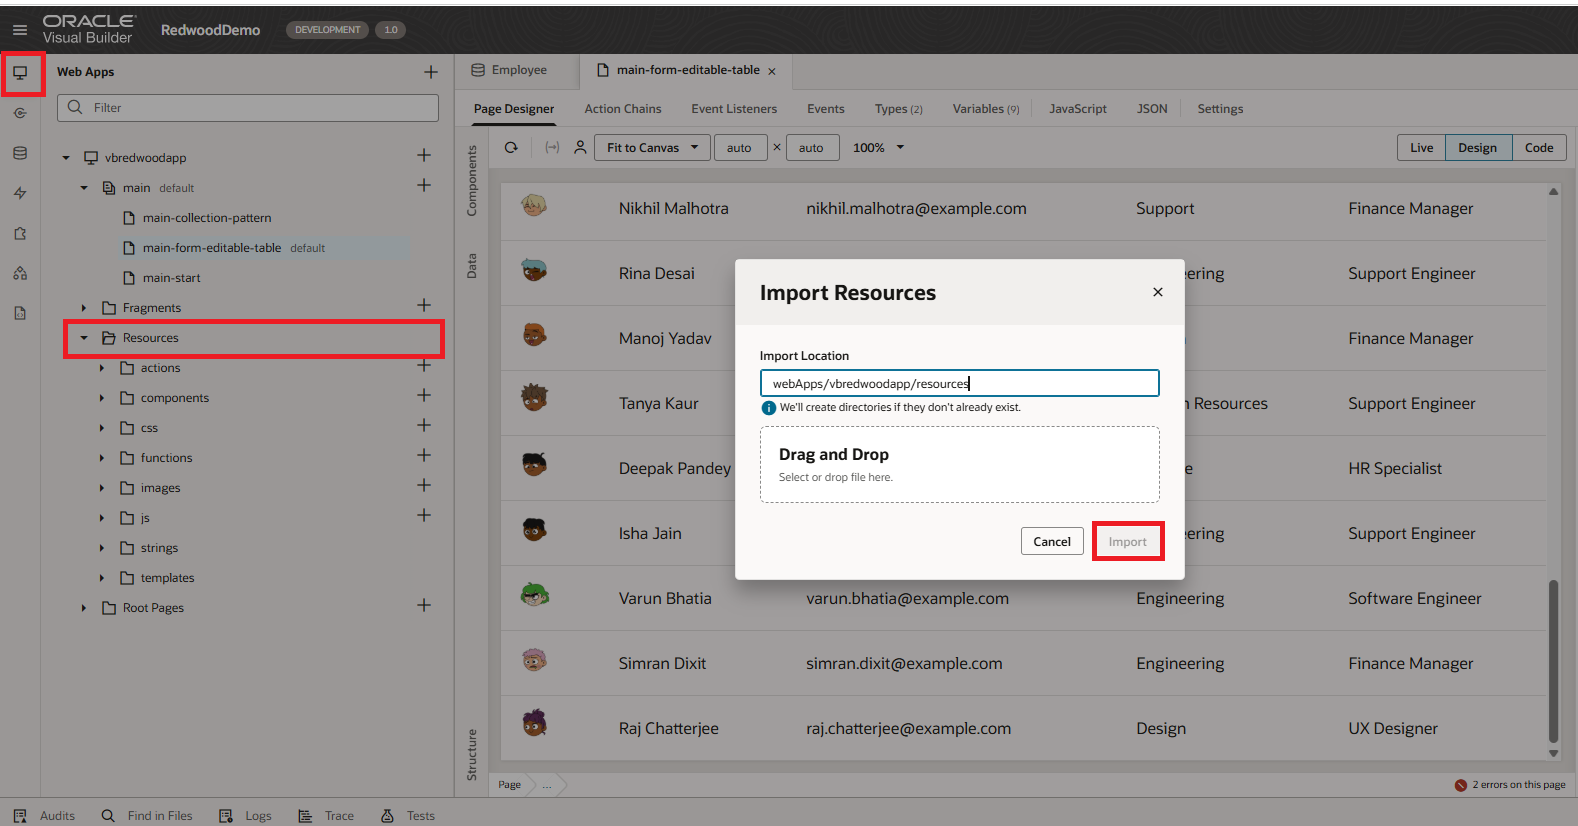
After importing your resource folder should have a templates folder, and if you expand it we should be seeing the HTML file inside it as shown in the following screenshot:
18. Open the file and provide the templates for the columns and form fields. You should structure these within the code exactly as shown in the following example:
<oj-bind-if test="[[row.mode === 'navigation']]">

  <tr>

    <td>

      <img :src="[[row.data.image]]" width="35" height="35">

    </td>

    <td>

      <oj-bind-text value="[[row.data.name]]"></oj-bind-text>

    </td>

    <td>

      <oj-bind-text value="[[row.data.email]]"></oj-bind-text>

    </td>

    <td>

      <oj-bind-text value="[[row.data.department]]"></oj-bind-text>

    </td>

    <td>

      <oj-bind-text value="[[row.data.jobTitle]]"></oj-bind-text>

    </td>

    <td>

      <oj-buttonchroming="borderless"

                 on-oj-action="[[$listeners.editOjAction]]"

                 :id="[['edit-'+$current.key]]">

        <span class="oj-ux-ico-edit" style="font-size:18px;font-weight:600"></span>

      </oj-button>

    </td>

  </tr>

</oj-bind-if>

<oj-bind-if test="[[row.mode === 'edit']]">

  <tr>

    <td colspan="6" class="oj-form-control-default oj-sm-padding-2x">

      <div style="margin:5px;">

        <oj-form-layout :id="[['form-'+$current.key]]" max-columns="2" direction="row">

          <oj-input-text label-hint="Name" value="{{$variables.currentRow.name}}" class="editable">

          </oj-input-text>

          <oj-input-text label-hint="Email" value="{{$variables.currentRow.email}}" class="editable">

          </oj-input-text>

          <oj-input-text label-hint="Department" value="{{$variables.currentRow.department}}" class="editable">

          </oj-input-text>

          <oj-input-text label-hint="Job Title" value="{{$variables.currentRow.jobTitle}}" class="editable">

          </oj-input-text>

        </oj-form-layout>


        <oj-buttonchroming="outlined"

                   on-oj-action="[[$listeners.cancelOjAction]]"

                   :id="[['cancel-'+$current.key]]">

          Cancel

        </oj-button>

        <oj-buttonchroming="solid"

                   on-oj-action="[[$listeners.saveOjAction]]"

                   :id="[['save-'+$current.key]]">

          Save

        </oj-button>

      </div>

    </td>

  </tr>

</oj-bind-if>
In the above code sample, along with columns I have added Edit, Save, Cancel buttons along with the events we created in the earlier step.
With this, the template implementation is complete. However, if you preview the application now, you will only see the standard Service Data Provider (SDP) table without the editable templates, buttons, or form fields.
19. To fix this, you must import the template into your JavaScript. Navigate to your page, switch to the JavaScript tab, and add the path for your template and HtmlUtils within the Define section.
In this example, the code is:
define(["ojs/ojhtmlutils", "text!resources/templates/editable-form-table-tmpl.html"], function (HtmlUtils, template) {
Keep in mind that the specific code will vary depending on your unique file name and the directory path where your template is stored.
20. In our HTML page, add the below template to our oj-table:
<template slot="rowTemplate" data-oj-as="row">
<oj-bind-dom
 config="[[$page.functions.getRowConfig($application, $flow, $page, $current, $listeners, $variables, row)]]">
</oj-bind-dom>
</template>
Basically, adding this to your oj-table lets you swap static rows for dynamic ones. Instead of hardcoding every column, you’re telling the table to let a JavaScript function decide what each row should look like.
This is the “secret sauce” for inline editing. It allows a row to switch instantly from plain text to editable form fields based on whether the user clicked “Edit.”
It also keeps your HTML much cleaner. Rather than cluttering your page with complex “if/else” tags, you handle the logic in JS and inject the correct layout exactly when it’s needed.
With the rowTemplate addition to our oj-table should look something like this:
<oj-table scroll-policy="loadMoreOnScroll" data="[[$variables.employeeListSDP]]"
21. Preview the app and double-click a row or click the Edit icon to display the form fields for editing. Press Enter, Tab, or click Save to commit your changes and hide the form.
Finally, our Page will look something like the following:
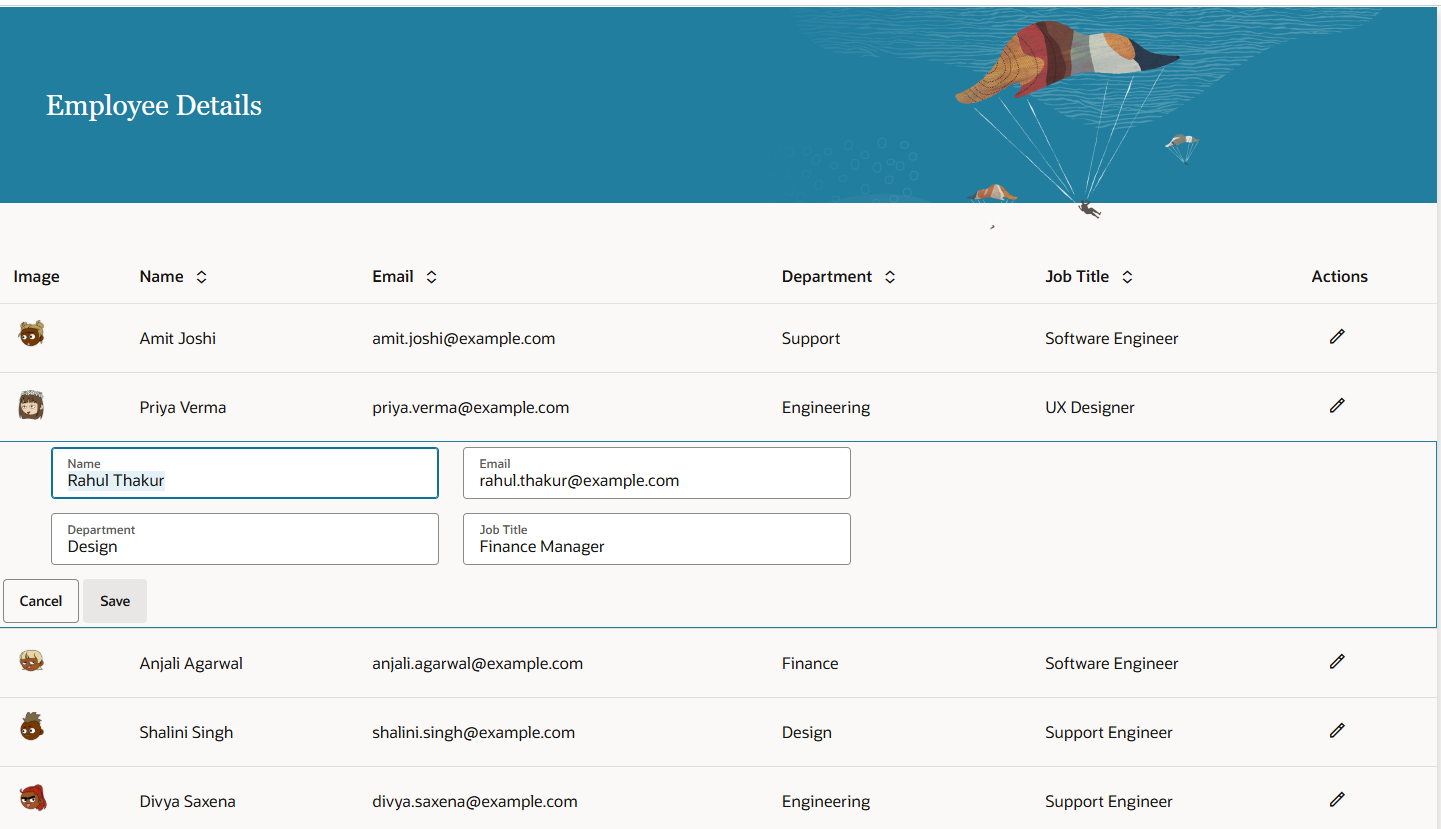
This is how we can work with form layout in an editable table component within Oracle Visual Builder.
Please look at my YouTube channel for Oracle Integration-related videos, and don’t forget to subscribe to our channel to get regular updates.
Further Readings
Creating a search page using Oracle Visual Builder Redwood
Using Redwood General Overview Page Template in Oracle VBCS
Configuring Simple Create and Edit Page Template | Oracle Redwood
Configure General Drawer Template in Oracle Redwood
How to Customize the Lock Screen in Oracle Visual Builder
Merging two CSV files into a single file in Oracle Integration


