OCI API GW & JWT to call OIC with/without Credentials - Part II
To invoke any Integration created in OIC, we need to pass the credentials i.e., Username/Password.
Most of the time these Integrations which we develop are to be triggered by External Applications or Vendors and if we want to not take the risk of either sharing the exact Integration endpoint or OIC Credentials to hit our Integration, we can follow any of the below methods.
In my previous blog, I have discussed Method 1 & Method.
- Method 1 → Invoking Integration where the end user needs to pass OIC Credentials
- Method 2 → Invoking Integration, where no Credentials are passed by the end user
In this blog, we will discuss how to use OCI APIGW with JWT & Functions to call OIC using two other methods as discussed in the following two sections:
Method 3 → Invoking Integration, where the end user needs to pass the Bearer token which can be refreshed.
In this method, we will be sharing ClientID, ClientSecret, AccessTokenURL, and Scope. Using which end user generates a bearer token to invoke our Integration.
Pros → Integration or OIC Instance endpoint is not exposed. Credentials need not be shared with the end user. Only those who have access to ClientID, ClientSecret, AccessTokenURL, Scope & APIGW endpoint for Integration can trigger the Integration.
Cons → The only drawback here is that we configure OIC creds on the APIGW Deployment Route as in Method 2 in the previous blog. But, that shouldn’t be an issue as it will be in Base64 format, and also we will not be providing access to the OCI console to the end users.
To share ClientID, ClientSecret & Scope with the end user, we need to first generate them by creating Auth Resource Server & Client applications in Identity Cloud Service (IDCS).
You can fetch your IDCS console URL from OCI Console (Identity & Security → Federation → Oracle Identity Cloud Service)

Create a Confidential Application here, by clicking on + Add button as shown in the following screenshot:

Give a name to the application and click “Next”

Skip the Client tab by clicking the “Next” button.
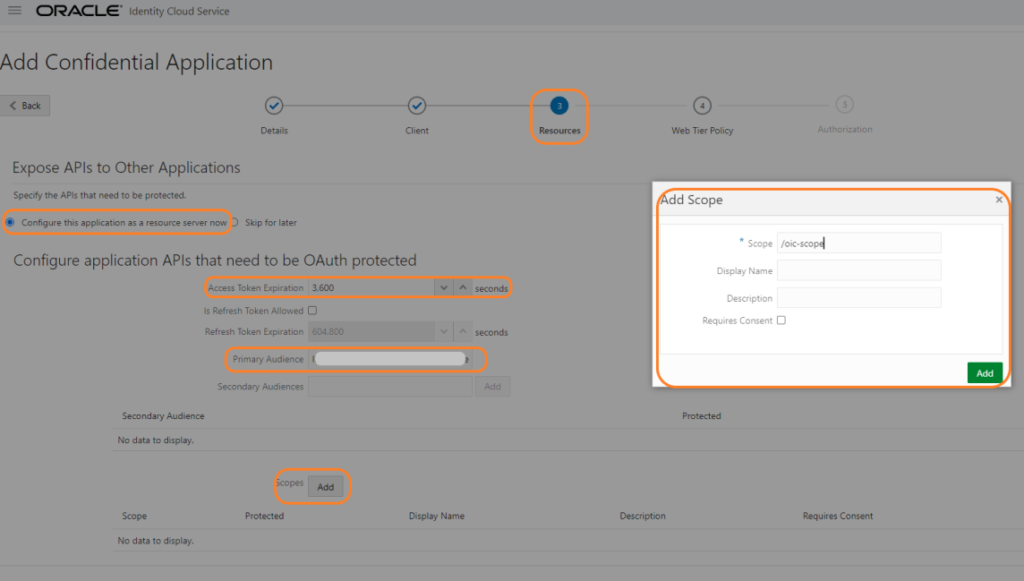
On the Resources tab, choose to Configure this application as a resource server checkbox. Populate Primary Audience with OCI APIGW Host & you need to add a scope by giving some name to it (I gave it as “/oic-scope”). You can also change the default value of the Access Token Expiration as required.
Click “Next”, “Finish” and “Activate” the application.
Now, let us create a client application, where we chose the above-created server application.
Create a Confidential application as above by clicking on Add, and give a name to your application. and click the “Next” button:
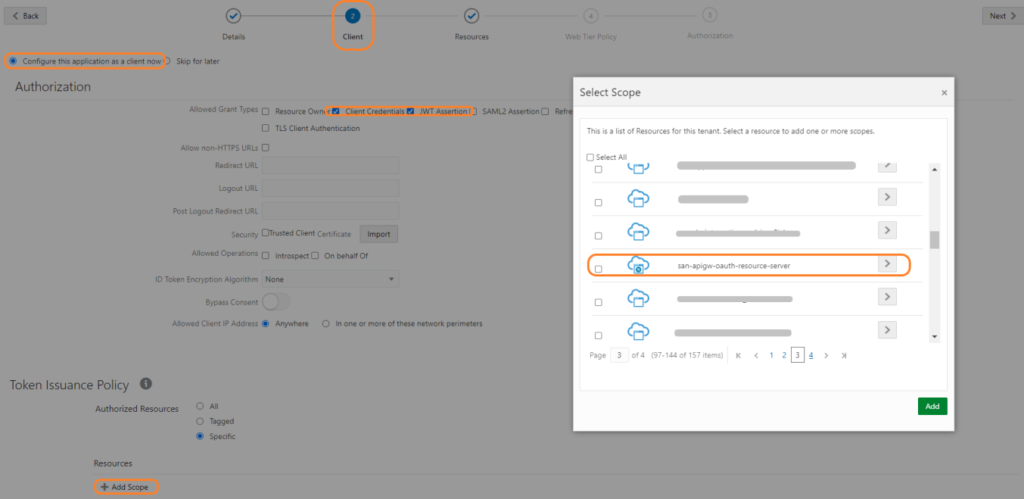
Choose Configure this application as a client now, and choose Allowed Grant Types as “Client Credentials” & “JWT Assertion”. Then click on Add Scope and chose the Auth Resource server created earlier, click on the > to the right of the earlier created application and click on “Add”.
Click “Next”, “Finish” and “Activate” the application.
Open the Client Application, we just created, go to Configuration → General Information, where you will find Client ID & Client Secret.
This completes the creation of Applications in IDCS.
Now, let us create JWT authorization in APIGW deployment.
Go to APIGW, and create a deployment. Configure JWT under Deployment → API Request Policies → Authentication section.
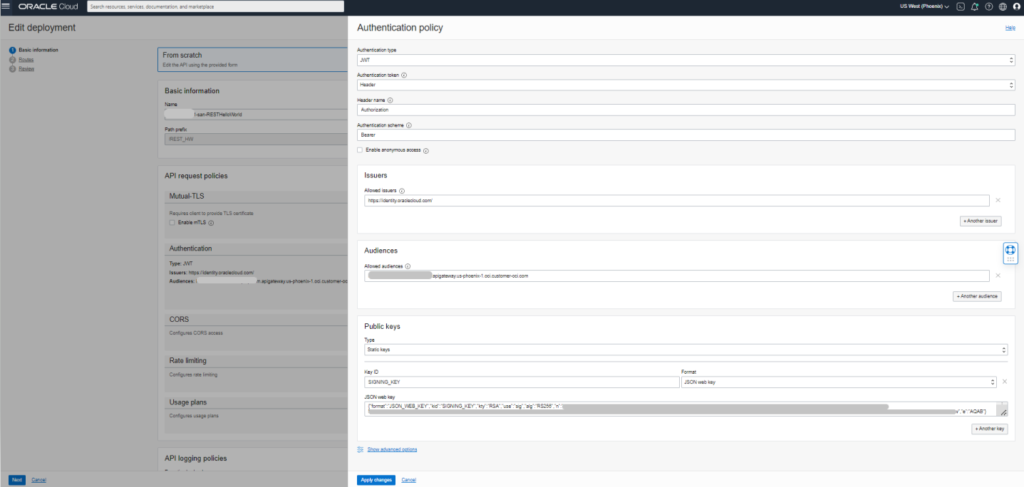
From the Authentication Policy section, choose the data as follows:
- Authentication Type → JWT
- Authentication Token → Header
- Header name → Authorization
- Authentication Scheme → Bearer
- Allowed Issuers → https://identity.oraclecloud.com
- Allowed Audiences → APIGW Host
- Public Key Type → Static Keys
- Key ID → SIGNING_KEY
- Format → JSON Web Key
For populating data in the JSON Web Key section, you need the following JSON:
{"format":"JSON_WEB_KEY","kid":"SIGNING_KEY","kty":"RSA","use":"sig","alg":"RS256","n":"","e":"AQAB"}Values for the above JSON fields, can be fetched as using the following steps:
In IDCS Console, go to Settings → Default Settings. Toggle ON the Access Signing Certificate option and Save it.

Now, download the JWKS file, by running this in your browser https://<YOUR-IDCS-URL>/admin/v1/SigningCert/jwk (replace <> with your IDCS URL value), click enter and save the output. Once you save this data you can revert changes to the Access Signing Certificate.
From this output fetch all the relevant field values to complete creating your JSON_WEB_KEY to be populated in the APIGW Authorization section.
Once done click Apply Changes, add HelloWorld Integration endpoint on the next screen, add OIC credentials under Header Transformation as done in Method 2 and complete the deployment.
Now, to test it from Postman populate details as shown in the following screenshot:
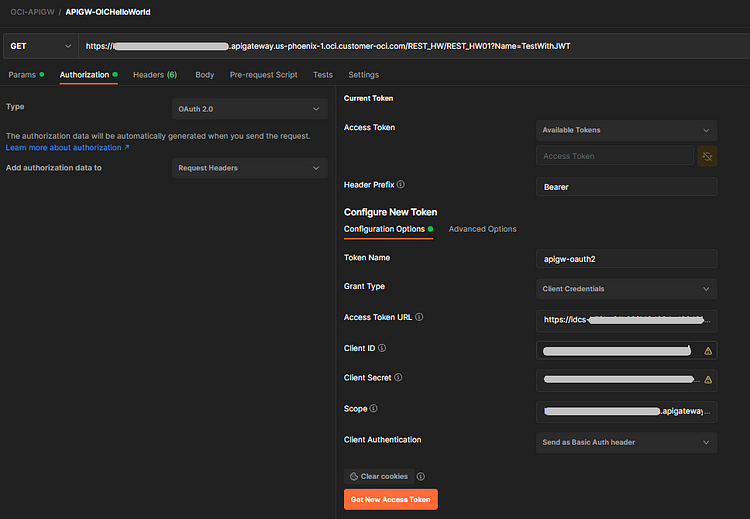
Choose the Authorization Type as “OAuth2.0”. ClientID, ClientSecret & Scope can be fetched from the Client application created in IDCS. Access Token URL → https://<Your-IDCS-URL>/oauth2/v1/token.
Click on Get New Access Token once you are done filling in the above details and click Use Token. This populates token in the Access Token Section of your Authorization section.
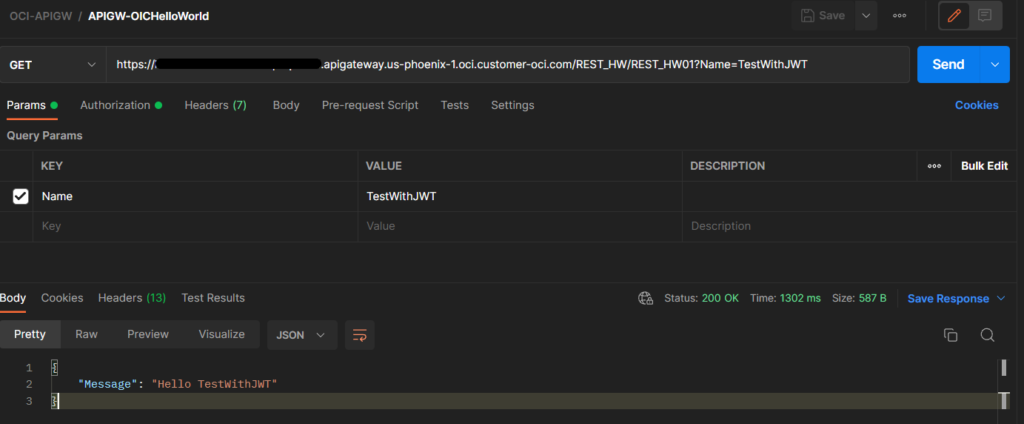
This completes method 3 of calling OIC integration using JWT via API GW.
Method 4 → Invoking Integration, where the end user needs to pass only the Bearer token which can be refreshed and we will not be hardcoding OIC credentials anywhere on APIGW.
In this method, we will be using OAuth authentication made for both APIGW & OIC. For this, we will be creating applications in IDCS for APIGW & OIC. The customer will be making calls to the APIGW deployment endpoint using Bearer Token, which will be validated with IDCS using OCI Function, which generates another Token to call OIC.
The entire process to achieve this is explained in detail in an existing Oracle blog here.
!!!Happy Reading!!!
If you liked the article, please like, comment, and share.
Please look at my YouTube channel for Oracle Integration-related videos and don’t forget to subscribe to our channel to get regular updates.
Further Readings
Scheduled parameters to maintain Last Run Date Time in Oracle Integration
How to Customize the Lock Screen in Oracle Visual Builder
Merging two CSV files into a single file in Oracle Integration
ERP Integration using File Based Data Import: Oracle Integration

